Day 9
Add musicals to your content

Recently I watched my first musical — the stage version of Back to the Future — and I was amazed! It was the most beautiful, entertaining performance that I have ever seen. And just like the rest of my team, I became a fan of musicals!
If you’ve never had the pleasure, a musical is a form of art performance that combines acting, dancing, and music, with storytelling that takes place in the form of songs. Some of the most popular musicals in the world are Hamilton, Wicked, and The Lion King.
I have become such a huge fan that for every project I work on, I want to tie them to musicals! As a result, I created a Contentful app that allows users to add soundtrack album details to their content. Of course, you could also add conventional albums, but my starting inspiration is a fondness for musicals.
In this article, I’ll walk you through the steps of creating the Last.fm app and help you add some music to your content. So Marty McFly, let’s get started!
What is Last.fm?
Last.fm is a popular online service that offers music information. You can get details on the artists, albums, top songs, and more. After you create your user profile, the platform can recommend songs based on your listening habits. For this app, you will use the Album Search API provided by Last.fm.
Prerequisites
To build this app, you will need the following:
- Last.fm API Account: Sign up for a Last.fm API account and create a new app. Follow the instructions mentioned in this documentation to create an app and generate an API Key.
- Contentful space: If you don’t already have an account on Contentful, sign up here and create a space with at least one content type. If you are unsure about how to create content types, follow the instructions mentioned in this documentation.
- Node.js and npm: To develop and run the app locally, you need Node.js. Install Node.js, and it will also install npm for you.
Quick start
If you want to skip the details and get started quickly, you can find the application on GitHub. You can install it on your Contentful space directly, or run it locally on your machine.
To learn to build the app from scratch, then keep on reading.
Bootstrap the app
You can create apps for your Contentful space to customize the editorial experience, integrate external services, and much more.
To create apps for your Contentful space, you will use the App Framework. The App Framework provides all the necessary tools to create apps. It provides packages that allow you to interact with the APIs, interact with various locations, and more.
If you want to learn more about the App Framework, check out the documentation.
You can use the CLI to create an app on your machine by running the following command to bootstrap the app.
npx create-contentful-app
NOTE: By default, the above command will bootstrap the project in TypeScript. If you want to use JavaScript, use the —javascript flag.
Once the repo is ready, you can start the local server by running the following command from the project directory.
npm start
If you navigate to localhost:3000, you will see a warning message that states that you can’t view the app outside Contentful.
In the next section, you will learn to create an app in Contentful and interact with the app inside Contentful.
Creating an app in Contentful
Now that you have the project running locally, the next step is to create the app and configure its app definition in Contentful. The app definition will allow you to select the locations, the host URL, and other parameters for your app.
Login to your Contentful space and select Manage apps from the Apps dropdown list. Next, click on Manage app definitions on the top left, and then click on the Create app button.
Enter a name for your app in the App name field, and click on Create app. This will create a new app and take you to the app’s definition page.
Since you will be running the app locally during development, on the App definition screen, enter http://localhost:3000 in the frontend field.
Next, under Locations, select the App configuration screen. The app configuration location lets you get configuration details from your users, e.g., setting the Last.fm API key.
You also need to select Entry field > JSON object. This is the location that will allow users to interact with the app and store information.
Click on the Save button to save the app definition. Your app definition should be the same as the following image.
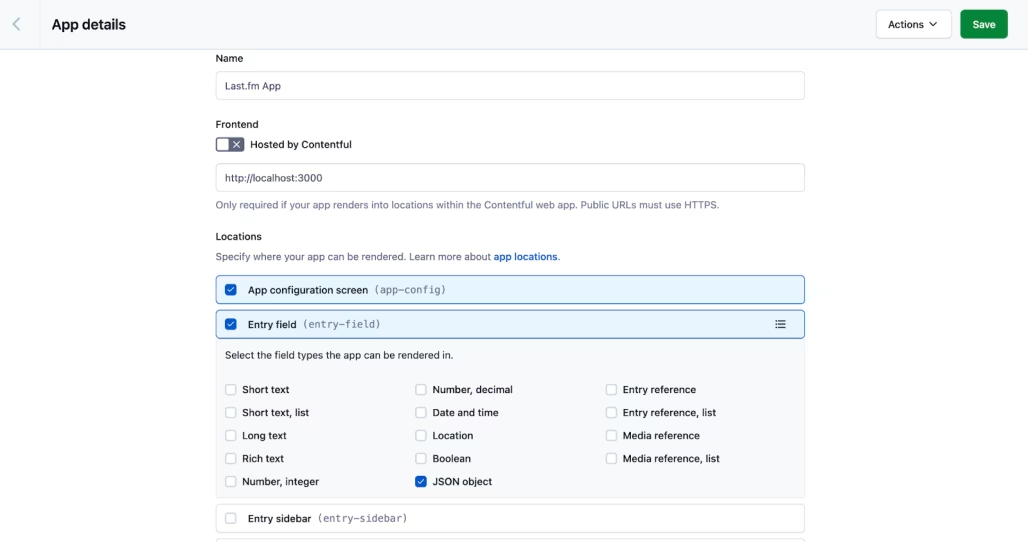
To install the app on your Contentful space, click on Actions and select Install to space.
Select your space from the Select a space dropdown list and the environment from the Select an environment dropdown list. Authorize the app, and you will be greeted with the default App config page.
In the next section, you will learn how to customize the App configuration location.
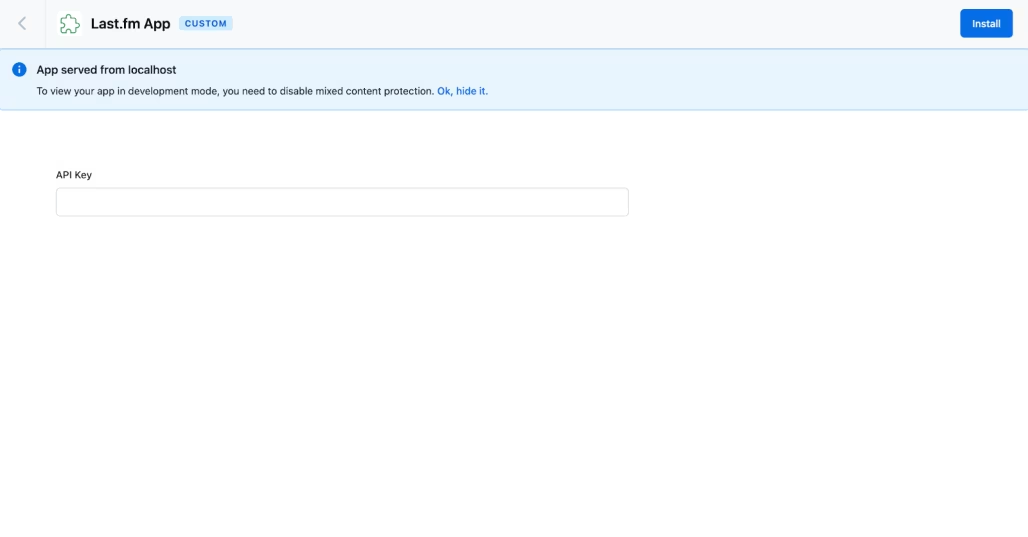
Customize the App configuration location
The App configuration location is the first screen a user will interact with after installing the app if you have configured it in the App definition. This is where the user can provide details like the API Key, properties they want to fetch, etc.
To customize the App configuration location, open the src/locations/ConfigScreen.tsx file. To add a form, replace the code inside return() with the following code.
<Flex
  flexDirection="column"
  className={css({ margin: '80px', maxWidth: '800px' })}
>
  <Form>
    <FormControl>
      <FormControl.Label>API Key</FormControl.Label>

      <TextInput
        value={parameters.apiKey}
        type="text"
        onChange={(e) =>
          setParameters({ ...parameters, apiKey: e.target.value })
        }
      />
    </FormControl>
  </Form>
</Flex>
The above code uses the Flex, Form, FormControl, and TextInput components from Forma 36. Update your imports to use these components.
You can also observe that the TextInput value attribute gets the value from parameters.apiKey.
The parameters is a state of the type AppInstallationParameters that is already defined for you.
To make the most out of TypeScript, update the AppInstallationParameters. Your app AppInstallationParameters should be as follows.
export interface AppInstallationParameters {
  apiKey: string | undefined
}
The final code should look as follows.
import React, { useCallback, useState, useEffect } from 'react'
import { AppExtensionSDK } from '@contentful/app-sdk'
import { Form, FormControl, Flex, TextInput } from '@contentful/f36-components'
import { css } from 'emotion'
import { useSDK } from '@contentful/react-apps-toolkit'

export interface AppInstallationParameters {
  apiKey: string | undefined
}

const ConfigScreen = () => {
  const [parameters, setParameters] = useState<AppInstallationParameters>({
    apiKey: '',
  })

  const sdk = useSDK<AppExtensionSDK>()

  const onConfigure = useCallback(async () => {
    const currentState = await sdk.app.getCurrentState()

    return {
      parameters,

      targetState: currentState,
    }
  }, [parameters, sdk])

  useEffect(() => {
    sdk.app.onConfigure(() => onConfigure())
  }, [sdk, onConfigure])

  useEffect(() => {
    ;(async () => {
      const currentParameters: AppInstallationParameters | null =
        await sdk.app.getParameters()

      if (currentParameters) {
        setParameters(currentParameters)
      }

      sdk.app.setReady()
    })()
  }, [sdk])

  return (
    <Flex
      flexDirection="column"
      className={css({ margin: '80px', maxWidth: '800px' })}
    >
      <Form>
        <FormControl>
          <FormControl.Label>API Key</FormControl.Label>

          <TextInput
            value={parameters.apiKey}
            type="text"
            onChange={(e) =>
              setParameters({ ...parameters, apiKey: e.target.value })
            }
          />
        </FormControl>
      </Form>
    </Flex>
  )
}

export default ConfigScreen
Diving deeper into code is out of the scope of this article. If you’re interested in learning more, you can read the official documentation.
But here’s a quick summary of what the code does: when the app gets installed for the first time, the user views this form. Here the user enters their API key. The API key is stored in the parameters object when the user clicks the Install button. This allows you to reference the value from any other location.
Save the code, and you will now view the form in the App configuration location. Enter your Last.fm API key, and hit Install.
Your app is now installed and ready for use!
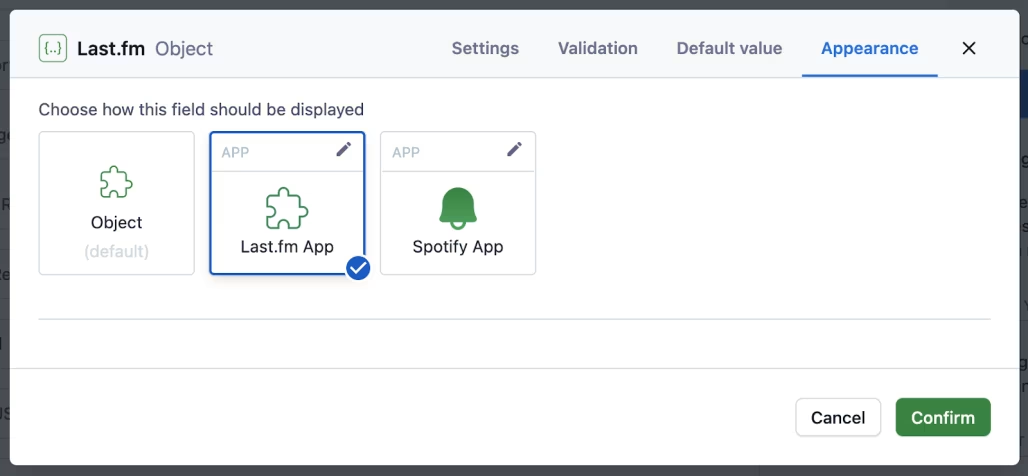
In the content type where you want to add the album data, create a new field of the type JSON object. Make sure you select your app in the Appearance tab.
Create a new entry for that content type, and you should see the default JSON editor. You will learn how to customize this field in the next section.
Customize the Entry Field location
While configuring the App definition, you selected the App configuration as the Entry field location.
In the previous section, you customized the App configuration location. In this section, you will customize the Entry field location to display user input and render data.
For this app, the user will enter the album name they want to add. The app will return all the relevant albums from the API and display them to the user in a dialog component. The user selects the album, and the app saves the album information.
Similar to the App configuration location, you can customize the Entry field location in the src/locations/Field.tsx file. Open the file and replace the return statement with the following code.
return (
  <>
    <Form onSubmit={() => openDialog()}>
      <FormControl>
        <FormControl.Label isRequired>Album name</FormControl.Label>

        <TextInput
          type="text"
          onChange={(e) => setAlbumSearch(e.target.value)}
          isRequired
        />
      </FormControl>

      <FormControl>
        <Button type="submit" variant="primary">
          Search
        </Button>
      </FormControl>
    </Form>
  </>
)
Update your imports to include the Form, FormControl, TextInput, and the Button components.
If you observe the code carefully, there is an albumSearch state and an openDialog function. Initialize the albumSearch state as follows. Make sure to update your imports for the useState hook.
const [albumSearch, setAlbumSearch] = useState<string>('')Next, define the openDialog function as follows.
const openDialog = async () => {
  const album = await sdk.dialogs.openCurrentApp({
    width: 700,
    parameters: {
      albumName: albumSearch,
    },
    title: 'Album Search',
    allowHeightOverflow: true,
    shouldCloseOnEscapePress: true,
    shouldCloseOnOverlayClick: true,
  })
}
The above function will open up a dialog component that returns the result from the Last.fm API. You’re passing the albumName parameter, which gets used within the Dialog component.
Your final code should look as follows.
import React, { useState } from 'react'
import {
Form,
FormControl,
TextInput,
Button,
} from '@contentful/f36-components'
import { FieldExtensionSDK } from '@contentful/app-sdk'
import { useSDK } from '@contentful/react-apps-toolkit'
const Field = () => {
const sdk = useSDK<FieldExtensionSDK>()
const [albumSearch, setAlbumSearch] = useState<string>('')
const openDialog = async () => {
const album = await sdk.dialogs.openCurrentApp({
width: 700,
parameters: {
albumName: albumSearch,
},
title: 'Album Search',
allowHeightOverflow: true,
shouldCloseOnEscapePress: true,
shouldCloseOnOverlayClick: true,
})
}
return (
<>
<Form onSubmit={() => openDialog()}>
<FormControl>
<FormControl.Label isRequired>Album name</FormControl.Label>
<TextInput
type="text"
onChange={(e) => setAlbumSearch(e.target.value)}
isRequired
/>
</FormControl>
<FormControl>
<Button type="submit" variant="primary">
Search
</Button>
</FormControl>
</Form>
</>
)
}
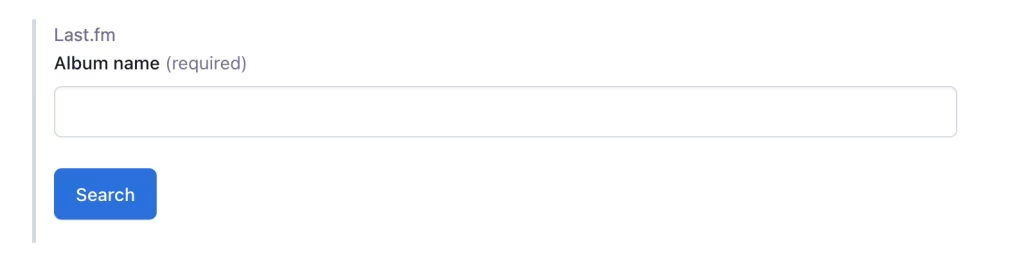
export default FieldSave the code, and the app will hot reload. Your field will now have an input field and a button similar to the image below.
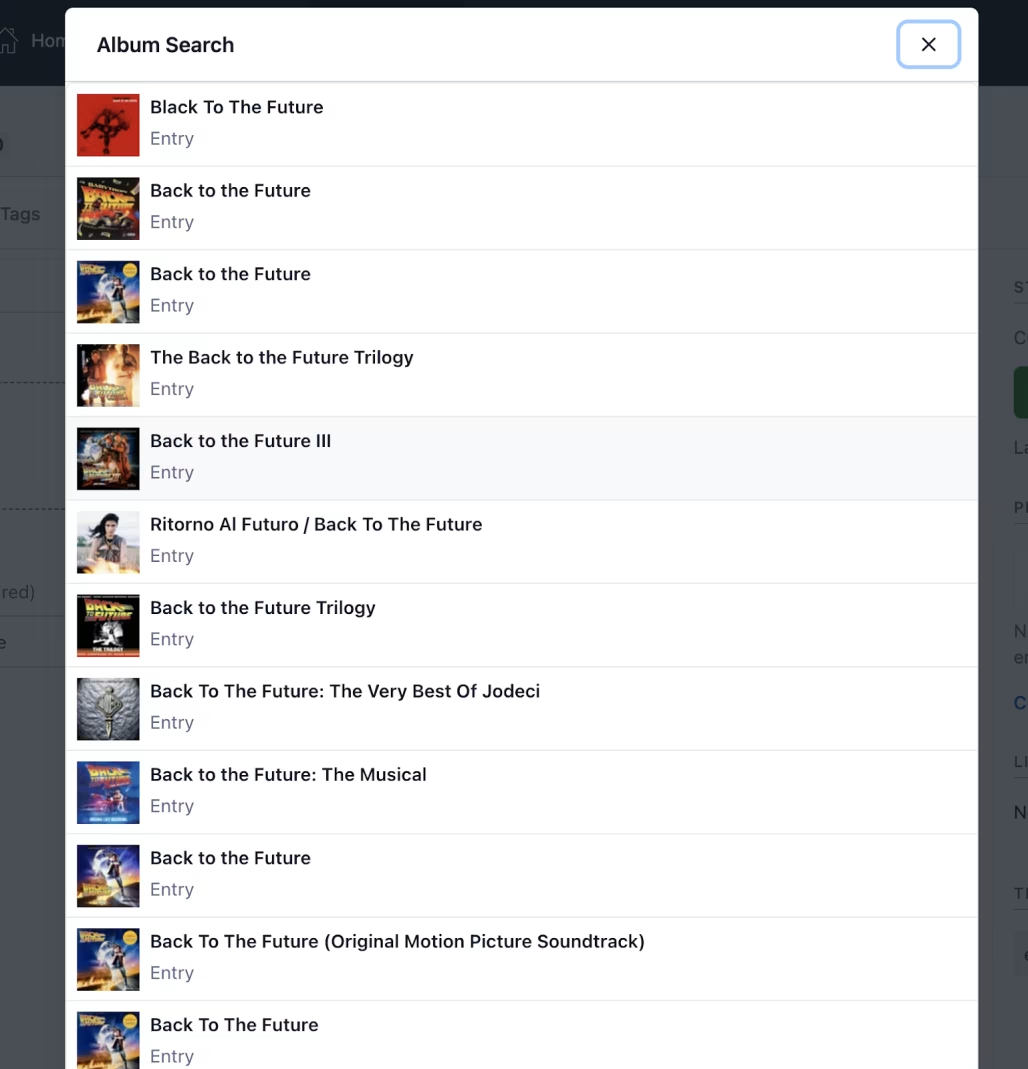
Try submitting the form and the dialog box will render. You know what’s next Marty — customizing the dialog component.
Fetching the data and customizing the dialog component
In this section, you will learn to customize the dialog component. This component will fetch the data from the Last.fm API, and present it to the user.
Open the src/locations/Dialog.tsx file and the following TypeScript interfaces.
export interface Album {
  name: string
  artist: string
  url: string
  image: Image[]
  streamable: string
  mbid: string
}

export interface Image {
  '#text': string
  size: string
}
Next, declare a state album of the type Album. You will store the result of the API call in the album state. You use the API key to fetch data from Last.fm. Since you already set the API key when installing the app, you will use that API key. Destruct the apiKey from sdk.parameters.installation.
const [album, setAlbum] = useState<Album[] | undefined>()

const { apiKey } = sdk.parameters.installation
Now that you have the state and the API key, you will define a function that will fetch the data from the Last.fm API. Copy and paste the following function code.
const fetchData = async (albumName: string) => {
  const response = await fetch(
    `https://ws.audioscrobbler.com/2.0/?method=album.search&album=${albumName}&api_key=${apiKey}&format=json`
  )

  const { results } = await response.json()

  setAlbum(results.albummatches.album)
}
In the above code, you are using the fetch API to fetch the results from the API. In the query parameters, you passed the album name (albumName) and the API key (apiKey).
Once you get a response from the API, you resolve the promise using the json() method and destruct the results array. Lastly, you update the value of the album state with the required result.
The app takes the search query from the input field you created earlier. Once the user submits the form, the dialog gets rendered. The fetchData function should execute as soon as the component gets rendered.
Hence, add a useEffect hook, and call the fetchData function passing the album name from the input field. Below is the code that does just that.
useEffect(() => {
  // @ts-expect-error

  fetchData(sdk.parameters.invocation.albumName)
}, [sdk.parameters.invocation])
Your component will fetch the data every time the user searches for a new album. However, the component still doesn’t render the data. Replace the return with the following code to display the data in the dialog component.
if (!album) {
  return <Spinner size="large" />
}

return (
  <Stack fullWidth>
    <EntityList
      style={{
        width: '100%',
      }}
    >
      {album.map((item, i) => {
        return (
          <EntityList.Item
            key={i}
            title={item.name}
            thumbnailUrl={item.image[1]['#text']}
            onClick={() =>
              sdk.close({
                name: item.name,

                image: item.image[2]['#text'],
              })
            }
          />
        )
      })}
    </EntityList>
  </Stack>
)
Let’s understand what is happening in the above code. Using the IF statement, you first check whether the album contains any value. If the app is fetching the data, the album state is null, and the user will see a spinner. But once the data gets fetched, the result gets rendered.
The onClick attribute of the EntityList.Item component closes the dialog component and sends the name and image information of the selected album back to the field location.
Before moving on to the next section, add the useAutoResizer() hook to your dialog component. This hook handles the resizing of the component. Your dialog component should look as follows.
import React, { useEffect, useState } from 'react'
import { Spinner, Stack, EntityList } from '@contentful/f36-components'
import { DialogExtensionSDK } from '@contentful/app-sdk'
import { useAutoResizer, useSDK } from '@contentful/react-apps-toolkit'

export interface Album {
  name: string
  artist: string
  url: string
  image: Image[]
  streamable: string
  mbid: string
}

export interface Image {
  '#text': string
  size: string
}

const Dialog = () => {
  const sdk = useSDK<DialogExtensionSDK>()

  useAutoResizer()

  const [album, setAlbum] = useState<Album[] | undefined>()

  const { apiKey } = sdk.parameters.installation

  const fetchData = async (albumName: string) => {
    const response = await fetch(
      `https://ws.audioscrobbler.com/2.0/?method=album.search&album=${albumName}&api_key=${apiKey}&format=json`
    )

    const { results } = await response.json()

    setAlbum(results.albummatches.album)
  }

  useEffect(() => {
    // @ts-expect-error

    fetchData(sdk.parameters.invocation.albumName)
  }, [sdk.parameters.invocation])

  if (!album) {
    return <Spinner size="large" />
  }

  return (
    <Stack fullWidth>
      <EntityList
        style={{
          width: '100%',
        }}
      >
        {album.map((item, i) => {
          return (
            <EntityList.Item
              key={i}
              title={item.name}
              thumbnailUrl={item.image[1]['#text']}
              onClick={() =>
                sdk.close({
                  name: item.name,

                  image: item.image[2]['#text'],
                })
              }
            />
          )
        })}
      </EntityList>
    </Stack>
  )
}

export default Dialog
Store album data in Contentful
With your app, a user can search for their favorite album. Once the user selects the album from the search result, the app neither displays it to the user nor stores the data in Contentful. Whoops!
In this section, you will update the Field component to render the selected data and store it in Contentful.
Open the src/locations/Field.tsx file and declare the Album interface.
interface Album {
  name: string
  image: string
}
Next, import the useFieldValue hook from the @contentful/react-apps-toolkit package and declare albumData as follows.
const [albumData, setAlbumData] = useFieldValue<Album | null>()Update the openDialog function, and set the value of albumData to album.
const openDialog = async () => {
  const album = await sdk.dialogs.openCurrentApp({
    width: 700,

    parameters: {
      albumName: albumSearch,
    },
    title: 'Album Search',
    allowHeightOverflow: true,
    shouldCloseOnEscapePress: true,
    shouldCloseOnOverlayClick: true,
  })

  if (album) {
    setAlbumData(album)
  }
}
When the user selects an album from the list, the dialog box closes, returning the album name and the album image. The above code stores this object value in the field. The user might close the dialog without selecting an album. The IF statement takes care of that.
The last step is to update our component to display the selected album. Add the following code at the end of the closing Form tag.
{
  albumData && (
    <AssetCard
      type="image"
      title={albumData.name}
      src={albumData.image}
      actions={[
        <MenuItem key="remove" onClick={() => setAlbumData(null)}>
          Remove
        </MenuItem>,
      ]}
    />
  )
}
Here, you are checking again if albumData contains any data or not. If it contains data returned from the dialog component, you render it using the AssetCard component from Forma 36. You also added an action that allows the user to remove the selected album.
One last thing you should add is the useAutoResizer hook. Your final code for the Field location should be as follows.
import React, { useState } from 'react'
import {
Form,
FormControl,
TextInput,
Button,
AssetCard,
MenuItem,
} from '@contentful/f36-components'
import { FieldExtensionSDK } from '@contentful/app-sdk'
import {
useAutoResizer,
useFieldValue,
useSDK,
} from '@contentful/react-apps-toolkit'
interface Album {
name: string
image: string
}
const Field = () => {
const sdk = useSDK<FieldExtensionSDK>()
useAutoResizer()
const [albumSearch, setAlbumSearch] = useState<string>('')
const [albumData, setAlbumData] = useFieldValue<Album | null>()
const openDialog = async () => {
const album = await sdk.dialogs.openCurrentApp({
width: 700,
parameters: {
albumName: albumSearch,
},
title: 'Album Search',
allowHeightOverflow: true,
shouldCloseOnEscapePress: true,
shouldCloseOnOverlayClick: true,
})
if (album) {
setAlbumData(album)
}
}
return (
<>
<Form onSubmit={() => openDialog()}>
<FormControl>
<FormControl.Label isRequired>Album name</FormControl.Label>
<TextInput
type="text"
onChange={(e) => setAlbumSearch(e.target.value)}
isRequired
/>
</FormControl>
<FormControl>
<Button type="submit" variant="primary">
Search
</Button>
</FormControl>
</Form>
{albumData && (
<AssetCard
type="image"
title={albumData.name}
src={albumData.image}
actions={[
<MenuItem key="remove" onClick={() => setAlbumData(null)}>
Remove
</MenuItem>,
]}
/>
)}
</>
)
}
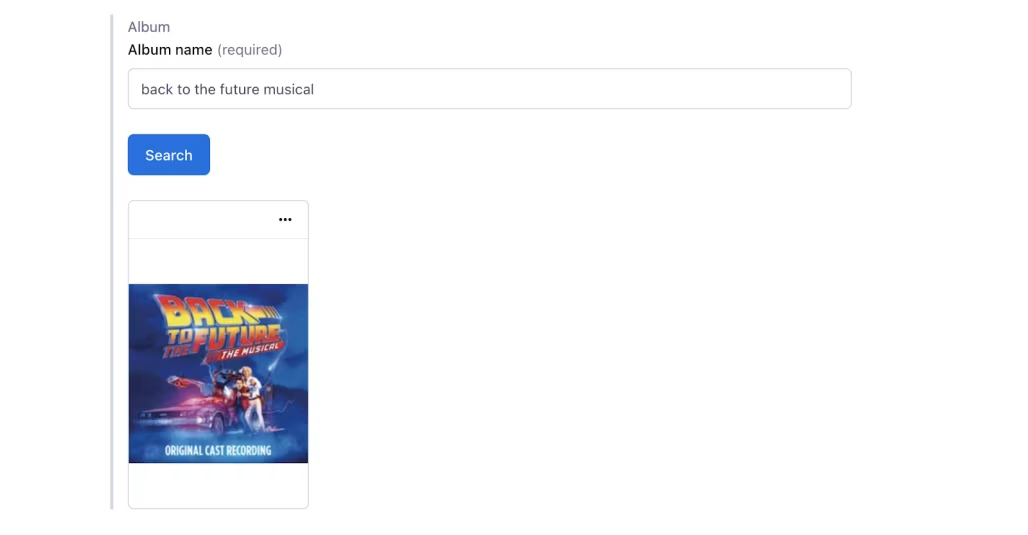
export default FieldTry searching for a different album. Your app will now fetch the data, display the search result, and render the selected album.
What’s next?
In this article, you created a Contentful that integrates with an external API, and allows you to add content.
Now that your app is ready, host it for your team to use. You can host the app on Contentful or on external services like Netlify, Vercel, etc. Follow along with the documentation to learn how to host your app.
There are tons of apps created by the community that you can view on the Developer Showcase. If you create an app that might benefit others, consider making a submission.
And lastly, feel free to hit me up on Twitter to share your favorite musical, talk about Contentful, or ask questions.