

Experience SDK
This Experience SDK is for Contentful Personalization use. If you are looking for the Experiences SDK for studio, see the Studio documentation.
Overview
We provide SDKs and plugins for modern web frameworks to enable you to use Contentful Personalization. Our SDKs include first-class TypeScript support with exported type definitions for a smooth development experience in TypeScript projects.
The SDKs provide abstracted means to communicate with the Experience API and the browser. It shortens integration times into JavaScript codebases.
The SDKs handle:
- Creating
page,track, andidentifyevents and sending them to the Experience API - Providing built-in capabilities to handle errors, retries and queuing.
- Enabling caching of the profile client-side via
localStorage.
Composed JavaScript SDKs
Our SDKs have three levels of abstraction. At the lowest-level, the Shared SDK @ninetailed/experience.js-shared creates an API Client that communicates with the Experience API’s endpoints. The data objects, types, and methods it provides are applicable across all SDKs.
The JavaScript SDK @ninetailed/experience.js is based on the Shared SDK. It creates an instance that stores and updates a profile in response to events.
Front-end SDKs
The Shared and JavaScript SDKs can be used to integrate Contentful Personalization with arbitrary front-ends that run JavaScript. For fast integration with popular front-end frameworks, we provide SDKs for:
Additionally, Contentful Personalization provides a Node.js SDK for interacting with the Experience API in server or edge runtimes.
Server-side SDK
The Node.js SDK (@ninetailed/experience.js-node) is provided for integrating Contentful Personalization in server or edge runtimes.
Choose an SDK
We strongly recommend using the SDK available for your framework, if one is available, for the fastest, most declarative implementation.
For most Contentful Personalization users, it’s enough to install the appropriate React-based SDK, send page, track, and identify events to enhance user profiles, and use the <Experience> component to render personalization and experiment content client-side.
However, you may need to arbitrarily access profile data or exercise more control over how experiences are rendered and tracked.
These needs usually arise when:
- You need more control within a React-based web application, like if you’re edge- or server-side rendering experiences and/or using React Server Components; or
- You’re not implementing Contentful Personalization within a web-based React project (e.g., Vue/Nuxt, Svelte or React Native).
In such scenarios, the API Client created by the Shared SDK serves as the best starting place for upserting profiles in server and edge runtimes, while the JavaScript SDK provides declarative tracking behaviour to use in client-side code.
For any front-end integration that is not based on JavaScript, explore our Experience API for complete freedom on where to integrate.
Install the SDK
Dependency installation
React
Next.js
JavaScript
Create an instance
At its core, the Experience SDK defines a Ninetailed class instance based on your input configuration. That instance then:
- Keeps track of the current profile and provides a hook into profile changes.
- Exposes declarative methods to interact with the Experience API.
- Provides extensibility through plugins.
When working with the React or Next.js SDK, an instance will be created and made available to your application globally through a React context provider.
Your API key is the Client ID field value displayed under the “SDK Keys” section on the Optimization tab.
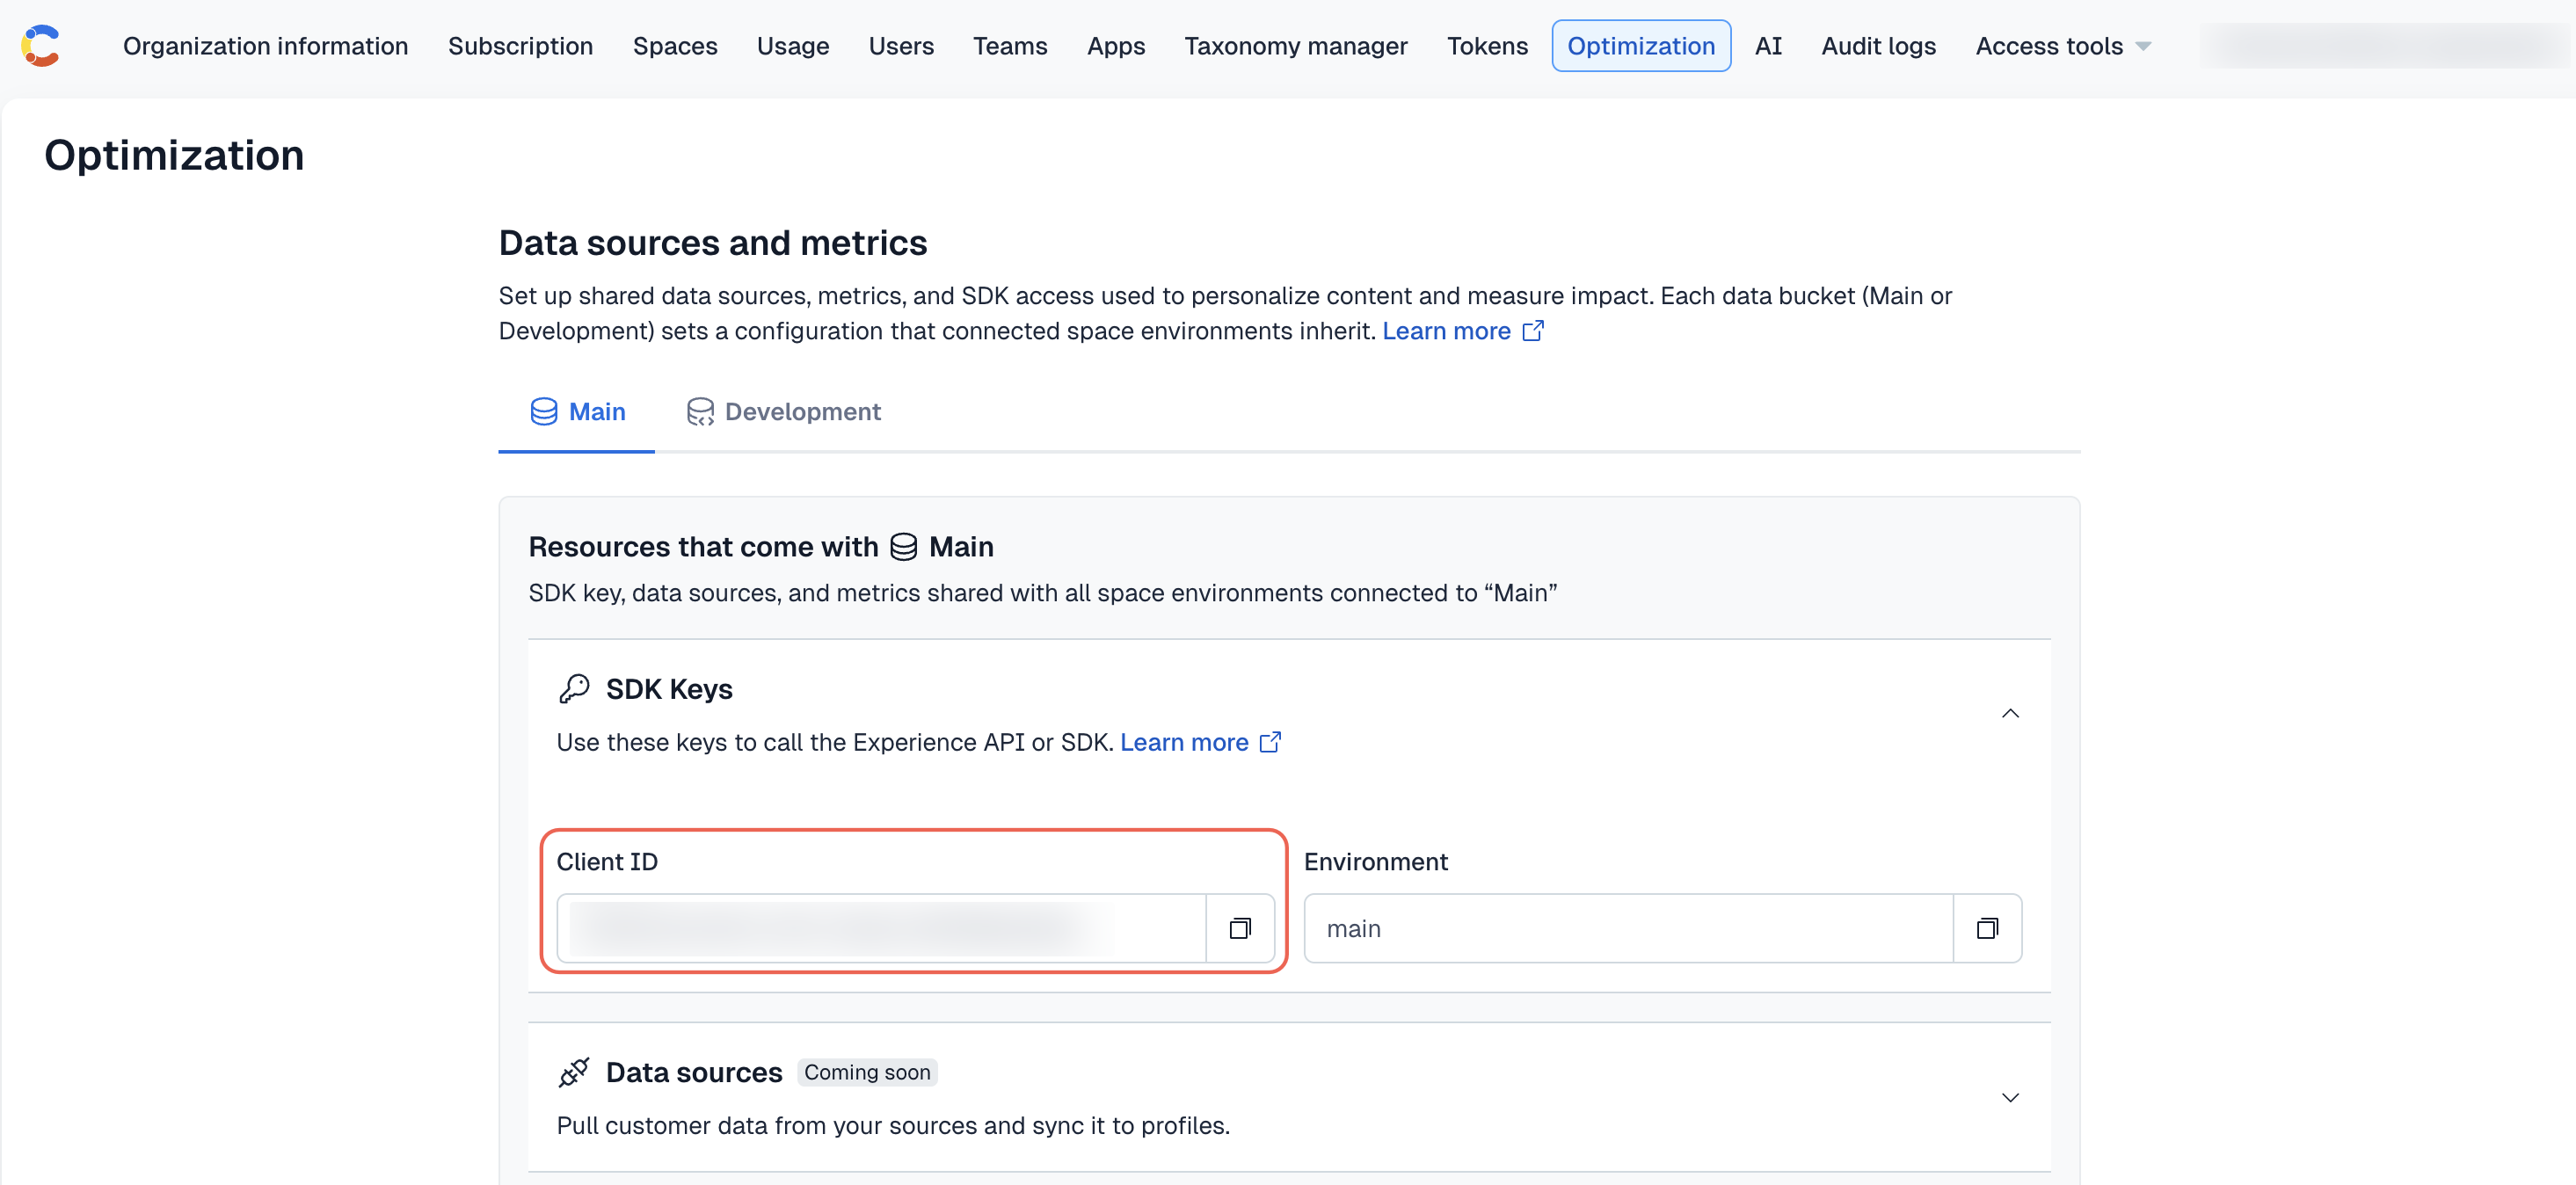
React
Next.js
JavaScript
Add the <NinetailedProvider> component to the top level of the application, so that the profile can be consumed from any child component.
Browser instance access
Installing the Experience SDK exposes several Contentful Personalization properties and methods on a window.ninetailed object to facilitate testing and debugging.
For a full description of instance properties and methods available to your application, consult the JavaScript SDK documentation.
Send events
Contentful Personalization profiles are created and updated by sending events about that profile to the Experience API. Rather than interacting with the Experience API endpoints directly, the principal way to send events is to use the methods made available from the JavaScript SDK.
A class instance created by any of Contentful Personalization’s SDKs composed from the JavaScript SDK provides three methods for sending events: page, track and identify.
You can validate your implementation by observing all incoming events with Live Events in the Optimization tab of the Contentful web app.
page events
A page event indicates a user has viewed the current page. The SDK provides a context object describing the parameters of the page that has been viewed, including the referrer, url, path, user-agent and other properties to be consumed by the API.
While most of the time you will call this page method with no arguments, you may optionally specify any properties you want to send alongside with the page view event. This can be useful when creating Audiences. For example, if the category to which viewed blog posts belong is not contained within the URL of the blog posts but you’d like to create an Audience of visitors who have viewed blog posts of a certain category a certain number of times, you can pass the category along in the argument:
NOTES:
- The Next.js SDK also sends
pageevents automatically on page changes, but only if you’re using Page Router. If you’re using App Router, you have to set up the logic for sending the event. Here is an example where the event is sent in theTrackPagescomponent for App Router. - If your application uses the React, JavaScript or Node SDK, you have to manually implement a
pagecall on every route change.
track events
A track event logs specific user actions, such as signup or registered_for_newsletter.
It can be arbitrarily named and accepts a properties argument that enriches the event with additional information.
For example, you might include the SKU and quantity of items on a track event called "add_to_cart".
In addition to serving as an Audience rule, track events are used to indicate the conversion events you want to measure in Experience Insights.
identify events
Identify events serve two purposes:
First, identify allows you to add custom information, called traits, to a profile. Traits can be any attribute of interest about a customer. Any valid JSON is a valid trait. You can store any information of interest on profiles that you may want to use to segment users. For example, you might store a user’s responses from a sign up form, a list of products they recently visited, or data from an upstream source of your customer data like a CRM or CDP.
Second, identify allows you to name or “alias” a profile such that it can be referenced by that same alias in the future. IDs stored within an analytics system, customer data platform, or e-commerce platform make ideal aliases.
After aliasing a profile, you can reinstate the aliased profile on a different device or browser by calling identify again using the same supplied alias. This merges the latest activity of the current profile with the profile at that alias. For personalizations and experiments served to logged in users, you will likely want to call identify after each successful authentication.
identify is powerful but should be used with caution. In particular, you should consider what privacy legislation your application needs to abide by, and whether that affects what data should not be stored as traits. For example, you probably would not want to store contact information, such as email addresses or phone numbers as traits, or use them as aliases.component events
A component event records every time a user views a Contentful content entry on a website, as well as how long they viewed it for. It includes contextual details such as the entry ID, timestamp, device type and environment. component events are automatically sent by the SDK.
Component events:
- Track the total number of views for each component.
- Track the amount of time that each component was viewed for.
- Attribute conversions to specific components.
- Analyze the impact of content at the component level.
- Support Contentful Personalization by linking views to specific experiences or variants.
component click events
A component_click event records every time a user clicks an interactive element inside of a Contentful content entry on a website. It includes contextual details such as the entry ID, timestamp, device type and environment. component_click events are enabled by adding the trackClicks prop to an <Experience /> component.
Component click events:
- Track the total number of times each component was clicked.
- Analyze the impact of content at the component level.
component hover events
A component_hover event records every time a desktop user hovers an element inside of a Contentful content entry on a website, as well as how long they hovered it for. It includes contextual details such as the entry ID, timestamp, device type and environment. component_hover events are enabled by adding the trackHovers prop to an <Experience /> component.
Component hover events:
- Track the total number of times each component was hovered.
- Analyze the impact of content at the component level.
Access event methods
React, Next.js
Javascript
The useNinetailed hook provides the tracking functions page, track, and identify. These methods will call the Experience API using the configuration parameters supplied to a <NinetailedProvider>.
Render analytics entries
When using one of the React SDKs, Contentful entries must be rendered as children of an <EntryAnalytics /> component, or an <Experience /> component for analytics to work correctly.
The <EntryAnalytics /> component
The React-based SDKs provide an <EntryAnalytics /> component for rendering analytics entries.
7.17.6.The <EntryAnalytics> component functions wraps your existing React component. It automatically detects the properties needed from the wrapped component.
Example use
Custom flag change types
Custom flag change types provide an alternative way to manage changes within a personalization or experiment, using an ID in your code paired with plain text (string) or JSON (structured format) to make the change.
Using the <useFlag()> hook, you can fetch the changes from a profileState. We are accepting the changes that may come with the profile that is returned from the Experience API and handle that in the hook.
Parameters
Returns:
value: The current flag value.status: ‘loading’ | ‘success’ | ‘error’.error: Error object or null.
If you use the same flagKey across multiple Experiences on your website and the end-user visiting your site is a part of more than one Personalization that share the same flagKey, they are exposed to the one with the alphabetically lower entryId value. This means you cannot define an order of priority for your Experiences.
Example
Basic usage
JSON flags
Track views for custom flags
You can track the performance of your custom flag views by passing the shouldAutoTrack option to the useFlag hook, so you can analyze the impact of the dynamic content managed through the variable flags. It accepts a boolean or a function returning a boolean.
shouldAutoTrack option. No tracking is sent for fallback values.Example 1: Always track when resolved
Example 2: Conditionally track based on state
Manual tracking
If your personalization only becomes visible after a user interaction, for example, a modal shown on button click, you likely want to track the “view” of a custom flag at a later, custom point in time. For this purpose, you can use the following option: useFlagWithManualTracking. This ensures tracking is sent only when the user is actually affected by the flag.
Example:
Tracked metadata
When a view is tracked for a Variable, the SDK sends a componentView event with:
Validate values at runtime
When providing JSON values for a custom flag, you must make sure the defined values are valid. For that, we can use runtime validation packages like zod.
Example: Button colors
In this example, we want to test button colors. To do so, we create a new Experiment in Contentful Personalization and use Custom flags with a JSON type. We then define the values as needed:
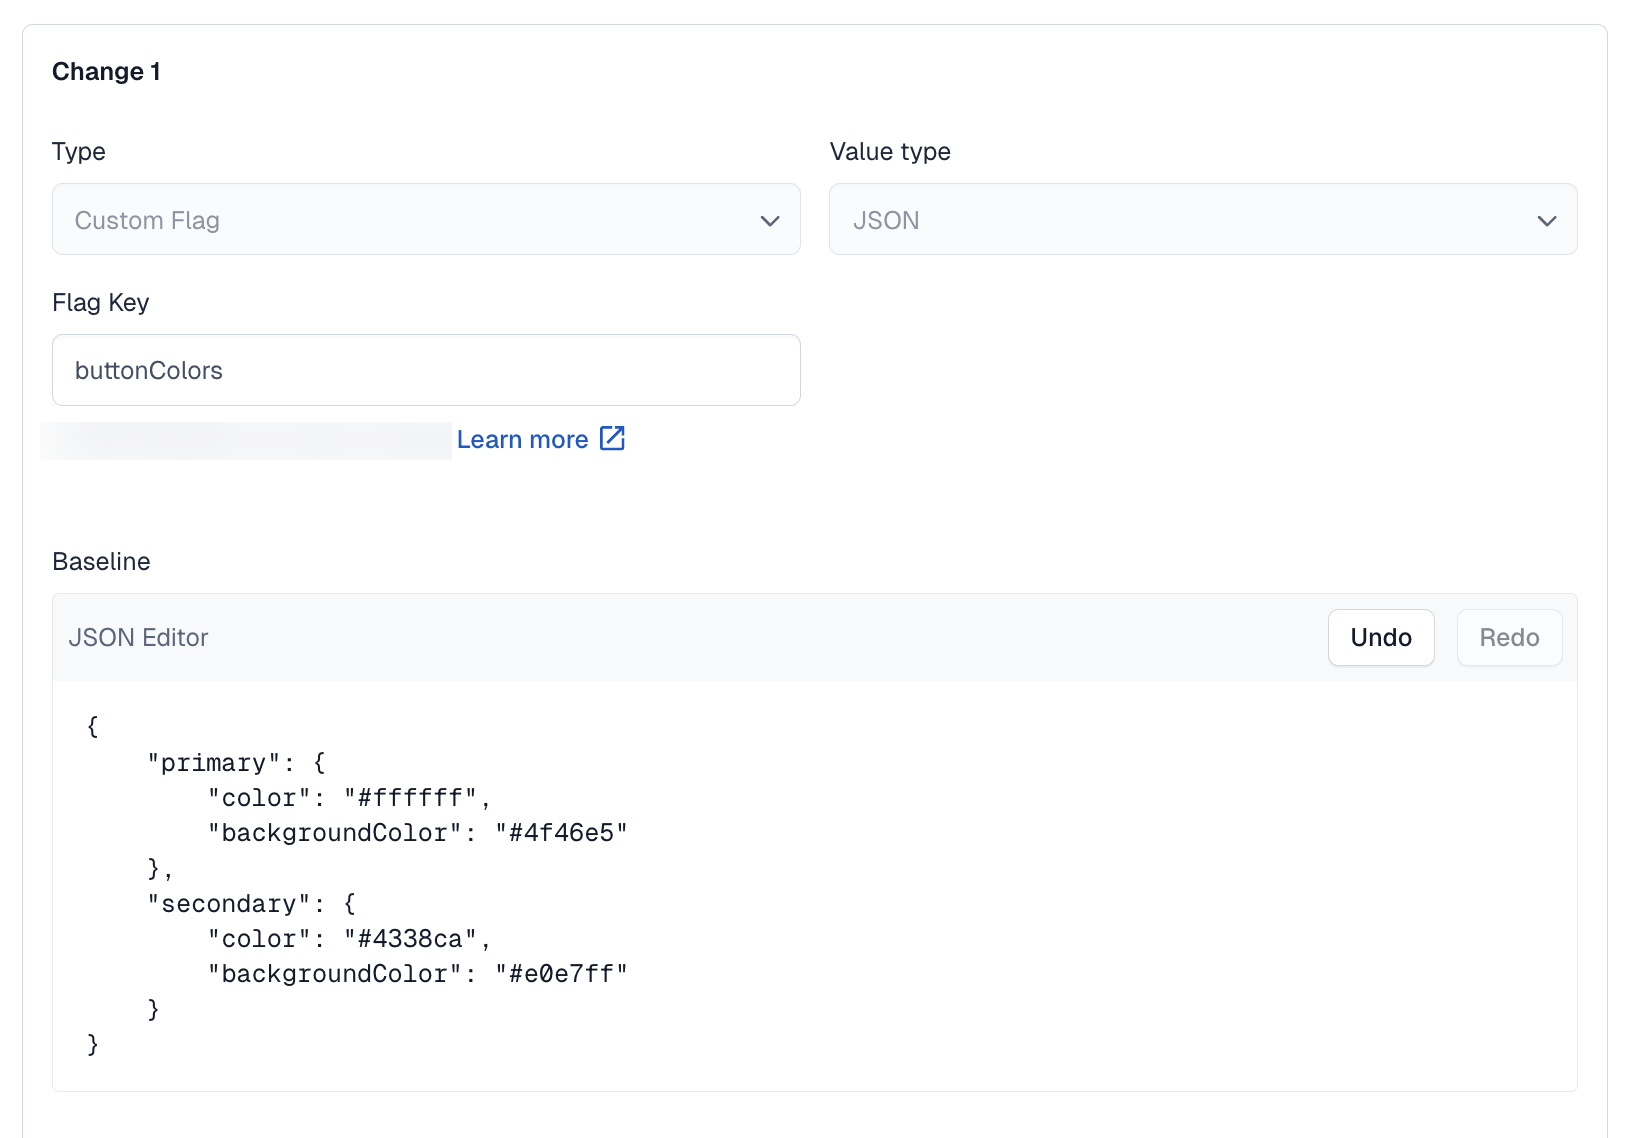
In code, we need to use these values and validate them at runtime to ensure that our visitors don’t encounter any errors in production:
For simplicity reasons, the example above doesn’t include some of the capabilities that you would usually also include, such as:
- Tracking using the
{shouldAutoTrack: true}option or theuseFlagWithManualTrackinghook, to correctly track the performance of an optimization. - Handling loading states with the provided status value.
Utility libraries
Our Experience API utility libraries provide methods to map experience content to the format required by the <Experience> component exported by our React and Next.js SDK.
Use the Contentful Utility SDK if you are retrieving content and experiences using Contentful’s client libraries that interface with the Contentful REST APIs, including:
- the Contentful Content Delivery API
- the Contentful Content Preview API
For all other sources, including the Contentful GraphQL API or your own internal content APIs, middleware, use the JavaScript Utility SDK and map your experiences to the type required by the ExperienceMapper class methods.
JavaScript library usage
You must map your fetched CMS Experience entries to a particular shape prior to transforming them with the ExperienceMapper methods. The following examples show the format required in a .map step prior to calling .filter to remove ill-formatted entries.
Generic
Contentful GraphQL API
Contentful library usage
See also our Contentful + Next.js example project for context.
ExperienceMapper class methods
isExperienceEntry
Determines if a provided entry is of valid type to be consumed by mapExperience. Use with .filter to remove any invalidly typed experiences.
mapExperience
Transform an experience to the type required by the <Experience> component.
isExperimentEntry
Determines if a provided entry is of valid type to be consumed by mapExperiment. Use with .filter to remove any invalidly typed experiments.
mapExperiment
Transform an experiment to the type required by the React and Next.js <NinetailedProvider> experiments prop.
mapCustomExperience
This class method is for the Contentful library only. If you need to modify how the variants referenced by an experience entry retrieved from Contentful are mapped, use this method to pass a custom variant mapping function. Example usage:
mapCustomExperienceAsync
This class method is for the Contentful library only, SDK >= 7.7.x. Similar to mapCustomExperience, but allows asynchronous operations to be executed in the variant mapping step.
mapBaselineWithExperiences
This class method is for the Contentful library only. Supply an object representing a baseline entry and its attached experiences and return an array of filtered and mapped experiences.
Render Experiences
The <Experience> component
The React-based SDKs provide an <Experience> component to wrap your existing React components you use to render your content. This is the most declarative way to render personalization and experiment content, and therefore the methodology that most users should adopt when possible.
If you track your content with the Insights plugin, it is recommended to wrap all of your content entries with the <Experience> component. This allows you to track content on a component level, even if they are not connected to a personalization or experiment.
The <Experience> component automatically detects the properties needed from the wrapped component. The experiences prop accepts Experience content that has been appropriately transformed by the ExperienceMapper available from our Utility libraries.
<Experience> component props
Example use
These examples show working CMS data, our Utility Libraries, and the <Experience> component together in demonstrative examples. Your implementation will vary according to your existing React components and your data source. Consult the Utility libraries documentation to know what data to fetch from your content source and how to transform the returned Experience entries to the format required by the <Experience> component.
These examples show fetching CMS data from within potentially deeply nested React components. In practice, you will likely fetch that data from higher within your rendering tree and pass it to components, especially when statically pre-rendering. However, the mapping exercises and use of the <Experience> component demonstrated remain the same no matter what rendering strategy you adopt.
General JavaScript Utils Library
Contentful Utils Library
Inline Personalization with merge tags
Contentful Personalization allows you to embed content placeholders into Rich Text Fields that can then be rendered client-side using information from the current visitor’s profile. These dynamic placeholder entries are called Merge Tags, which can then be used as inline entries within a rich text field of your CMS entries.
The React-based SDKs provide a corresponding <MergeTag /> component that allow you to declaratively render the inlined Merge Tag entries.
While rendering Merge Tag entries embedded within Rich Text Fields is the most common use for merge tags, you simply pass the property accessor (using dot notation) of any Contentful Personalization profile property as the id of the MergeTag component.
From Contentful Entry
Inline accessor
Tracking impressions of Experiences
The <Experience> component needs to track when the markup it renders is present within the visitor’s viewport. This is the criteria used to fire impression events to any connected Contentful Personalization plugins.
Unless the component prop being passed to <Experience> is defined as a React forwardRef, the <Experience> component will insert an empty non-displaying <div> of class nt-cmp-marker immediately prior to the rendered component. It is this inserted element’s intersection with the viewport that then tracked.
Under the hood, the tracking component uses React’s useRef to store the DOM node to track. See the React forwardRef documentation for more details.
Because of the use of useRef, it is important that the components you pass have some consistent parent element between re-renders. Conditionally rendering top-level elements in a component may cause tracking to become decoupled.