Creating classes from your content model
Published on June 27, 2018


Inspiration for your inbox
Subscribe and stay up-to-date on best practices for delivering modern digital experiences.
In my , I showed how to use the Contentful.CodeFirst package to let your C# classes act as the basis of your content model in Contentful. But what happens if your content model already exists and you want to create corresponding, strongly-typed C# models? That's a lot of boilerplate code to write—today I'm happy to release a new tool that helps you do just that.
With the release of .NET Core 2.1, "global tools" is a new feature that will become generally available. This means that you can run dotnet tool install -g your-tool-id and install any tool directly from NuGet for it to become available to call from your command line.
To install the model creator tool, make sure you have the latest .NET Core SDK version installed and run dotnet tool install -g contentful.modelscreator.cli from your command line.
You should now be able to run contentful.modelscreator.cli --help to list all the available commands. Only the access token and space ID are mandatory, but there are a few other commands that are interesting:
The
--namespaceor-noption allows you to specify the namespace in which the classes should be created.The
--pathor-poption allows you to specify where the classes should be created on your hard drive.
If you test it with credentials from our Example App, you get the following result:

What’s happened is that the classes have been created in my current directory where, for example, the Course class looks like this:
It automatically resolves the field types to the correct type and sets the name of the property to correspond with the id of the field in Contentful. It also tries to resolve reference field to the correct generic type, List<Lesson> and List<Category> for example, by inspecting the content type validations of the field. If there's a single content type validation, the class that content type corresponds to will be used as the generic type of that property.
As seen in the class above, the namespace will be set to "Replace.Me.NameSpace" if it's not provided in the call. This can then be easily searched and replaced.
To set the namespace in the initial call, just alter it like so...
... and the namespace declaration will look like this:
That's the same way you can change the default path, which is the current directory, by using the -p parameter.
As a result, the classes will now be created at c:\temp.
If the path already contains the files, you will be prompted to overwrite (if you've made changes you want reflected in an existing class) or skip (if there are no changes) that file.

If you want to automatically overwrite files in the directory, you can use the --force or -f command and the files will be overwritten without any prompts.
Leaving the command line
Not everyone is crazy about using the command line and would rather have something in the IDE or editor of their choice. The CLI tool above is available as a plugin to both Visual Studio and Visual Studio Code.
To install it in Visual Studio, click Tools --> Extensions --> Updates, search for Contentful and install the Contentful.ModelsCreator plugin.
After successfully installing the plugin, a new number of settings can be found under Tools --> Options.

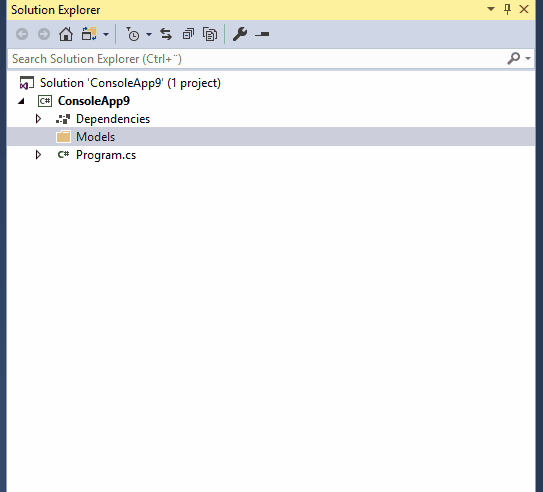
Once the access token and space id have been set, I can now right click any folder in my solution and the models will be created there.
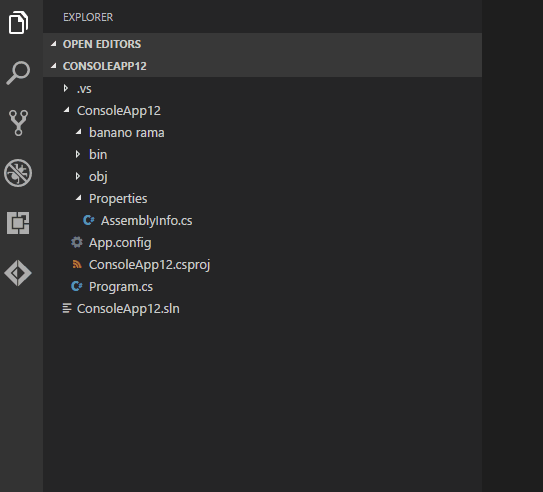
Similarly, you can install the plugin through the Marketplace in Visual Studio Code by clicking the Extensions tab and searching for Contentful. Once the extension is installed, there are a similar number of settings where you can specify the API key, space id and namespace.

After that, right click on any folder in Visual Studio Code and choose the Create Contentful Models option.
Discover more and use Contentful
In this article, we looked at a new CLI tool and plugins available to help you create strongly-typed C# classes directly from your Contentful content model. If you want to learn more, check out the CLI and the Visual Studio Code plugin on our Github repository. You can also read more about .NET Core 2.1
If you're new to Contentful, you can easily create an account for free to try what we've run through in this tutorial. Getting a space for your content to get your static site up and running is a breeze; try it for yourself!
Happy coding!
Inspiration for your inbox
Subscribe and stay up-to-date on best practices for delivering modern digital experiences.
Meet the authors

Robert is a .NET developer in the Ecosystem team at Contentful. He's has been building .NET solutions since the early 2000s, he is a passionate open source advocate and an avid chess fan. You can find him online at [https://robertlinde.se/](https://robertlinde.se/) or on Twitter ([@svalgrodnad](https://twitter.com/svalgrodnad)).
Related articles

React pagination tutorial: 4 ways with full code examples
September 22, 2024

Start a React app with Tailwind CSS in under 5 minutes
October 25, 2024

Model Context Protocol: The new AI connection standard
August 7, 2025
