A loosely-coupled approach to creating MailChimp campaigns with Contentful webhooks
Published on November 30, 2018


Inspiration for your inbox
Subscribe and stay up-to-date on best practices for delivering modern digital experiences.
There’s no point in producing compelling content if no one knows it’s been published. And despite its ancient status, email is still an extremely popular and effective method for publicizing new content.
For years, major mass-email providers, such as MailChimp, have offered RSS campaigns that automatically create and send an email when new posts are detected in the feed.
So, you could simply generate an RSS feed with your website as that is relatively easy to set up — but there are limitations, especially if your email is not simple. Combining multiple data sources (such as adding a promotion) often means multiple RSS feeds. And it’s highly likely that to get the formatting you want you’ll end up including some design in the function that generates the RSS feed.
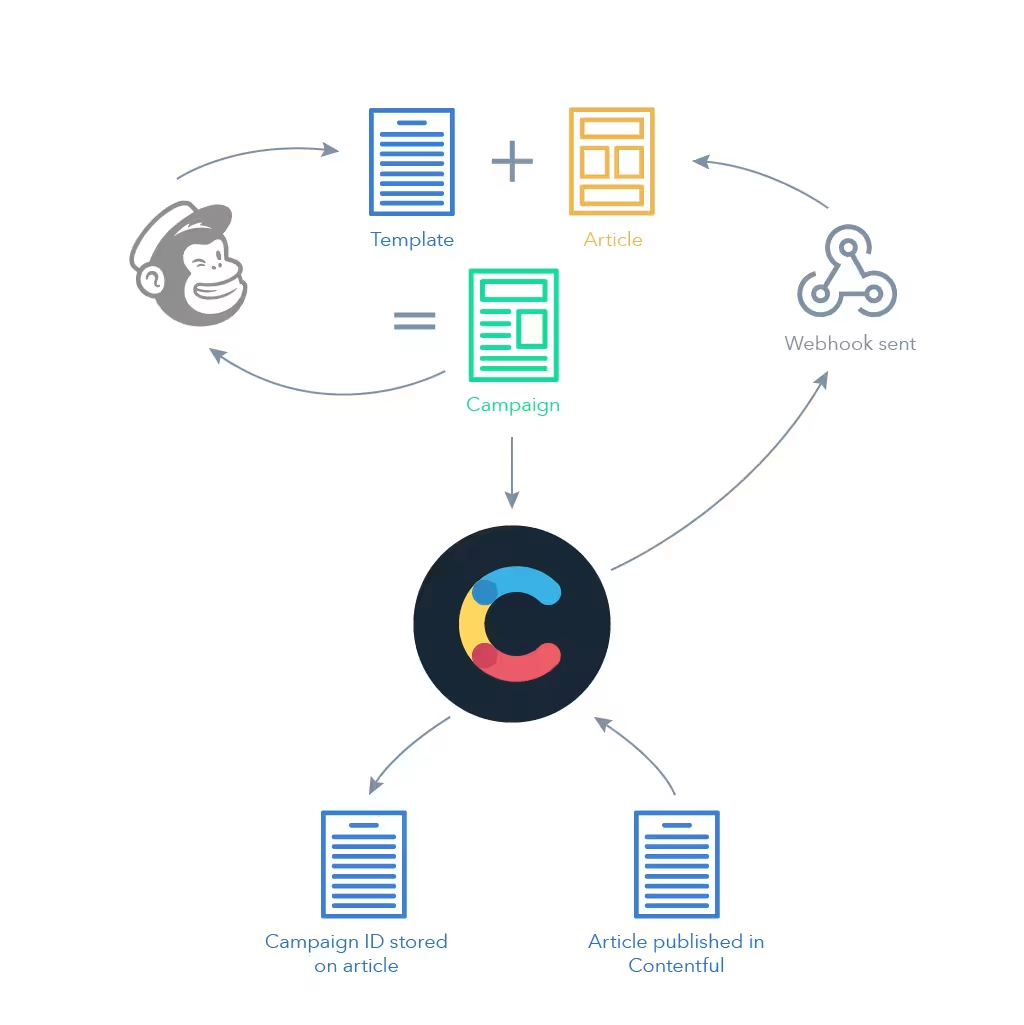
Contentful provides a thoroughly modern, highly flexible approach to generating email notifications that keeps your code and design entirely separate, while cutting out the RSS middleman.
By using Contentful’s webhooks functionality and a cloud function, we can create, schedule, even send campaigns based on the publish event itself — not on a changing RSS feed.
So, let’s delve a little deeper into what’s required to trigger the creation of a campaign in MailChimp.
Creating the MailChimp template
One key aim of our solution is to keep design and code separate. We want to be able to make changes to the template using the MailChimp interface. This is especially pertinent if you are not the person managing the template design.
To achieve that separation we need to create a MailChimp template in a particular way.
A MailChimp editable sections primer
MailChimp’s templates are designed for use with the visual editor. They allow the designer to define editable sections by adding an mc:edit attribute to a HTML tag. This allows non-designers to create campaigns by choosing a template and simply filling in the sections.
The MailChimp API offers access to a template’s editable sections, and can return a list of the editable sections and their default values. You can fill the areas with your own content and use the updated object to update your campaign’s content.
The big advantage of editable sections is that they are mostly immune from MailChimp’s habit of reformatting your HTML. But there also are a number of drawbacks with using editable sections via the API:
You can’t use them to update attributes
You can only use the editable sections to replace the text value (or innerHTML) for an element. You cannot, for example, set the src attribute for an image tag or href for a hyperlink tag.
You can’t give two editable sections the same name
This obviously makes it tricky if you want to use the same value in multiple spots within your template. Remember, templates are really for the visual editor where this is not a problem.
You can’t set the name for repeatable content
If, for example, you’ve got a list of articles, you can use the mc:repeatable attribute to repeat part of the template for each article in the list. This editable section will be labeled as repeat_1, the next set of repeatable content will be labeled repeat_2, and so on.
This is not an insurmountable problem but we want our solution to be loosely coupled and not have to rely on repeatable sections being in a certain order.
So, if we can’t use editable sections exclusively, how do we get our content into our template? The solution is a single editable content area and a JSON-friendly templating language.
MailChimp + Mustache
It turns out that Mustache templates work pretty well in MailChimp, which is good news as Mustache is quick to learn and also has been implemented in a wide range of languages. There are a couple of gotchas, however.
First, you can’t use a Mustache tag as part of a hyperlink, otherwise MailChimp will escape the tag (I did say that editable sections were mostly immune from MailChimp’s tinkering). It must be the whole link. For example, this will work:
<a href="{{link}}”>This will work</a>
But this won’t:
<a href="https://contentful.com/{{slug}}">This won’t work</a>
And second, our Mustache tags need to be contained in an editable section. Otherwise, MailChimp will remove the standalone Mustache looping and conditional tags.
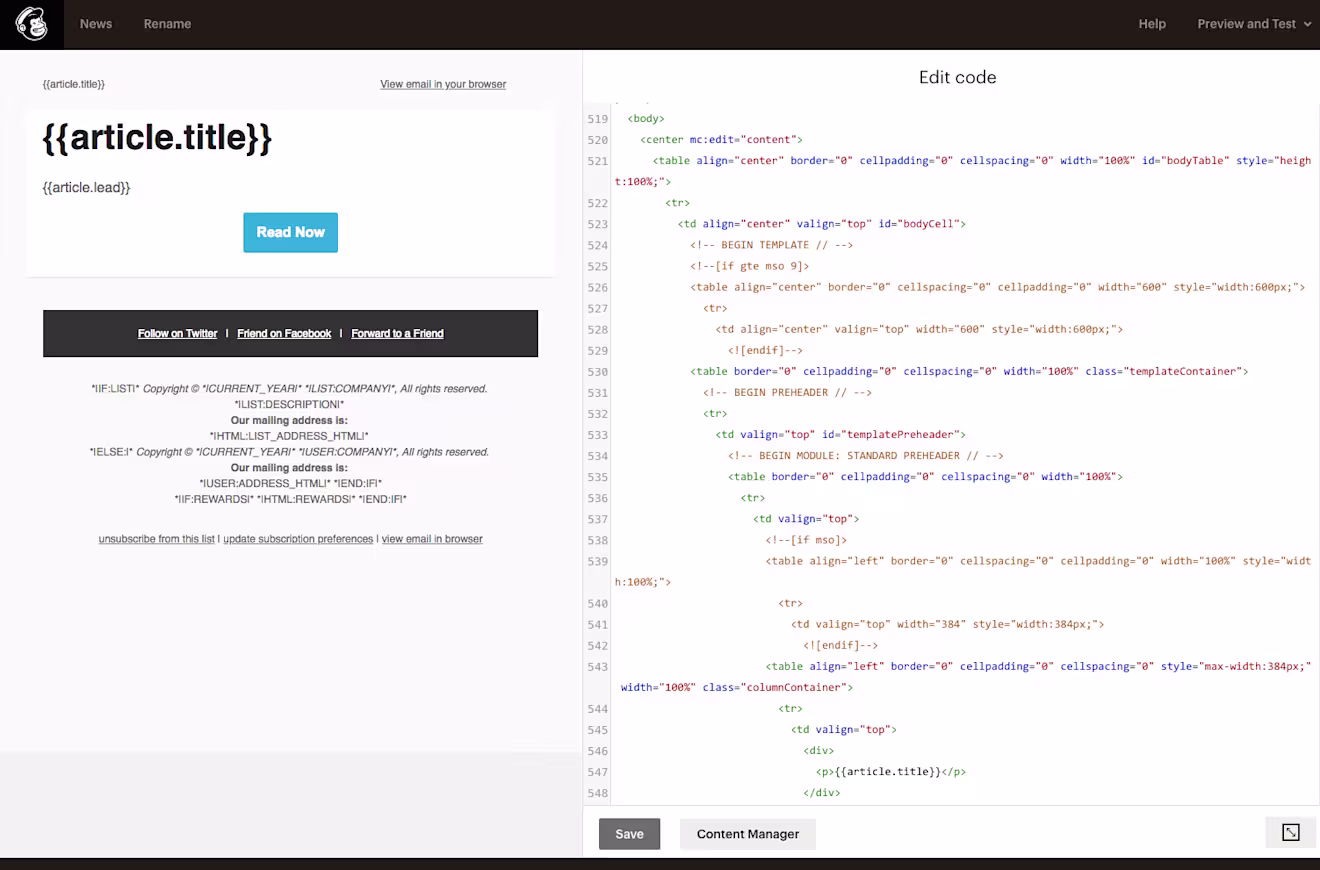
An example MailChimp template
So, let’s look at what a simple template, devoid of any styling and cross-email client formatting, might look like:
Things to note:
You can still use all the MailChimp template tags. I’ve used the
*|mc:subject|*tag to set the title to subject.We use the
mc:editattribute to set a single editable area which contains our template.featuredImageis a linked asset: the content for this won’t be included in our webhook payload so we’ll need to fetch this.When tags are used to set the
hreforsrcattribute, they serve as the entire value
A call to the MailChimp API’s templates/{template_id}/default-content endpoint returns:
We can now access the Mustache template simply by grabbing the value of the mustache property.
Contentful to MailChimp
With this MailChimp template knowledge under our belts, we can now consider the actual process of moving from a publish event in Contentful to sending a campaign in MailChimp. We’re not going to delve too deeply into specifics since you’ll have your own particular choice of language and cloud function provider.
Here’s the example Python code for an IBM Cloud action.
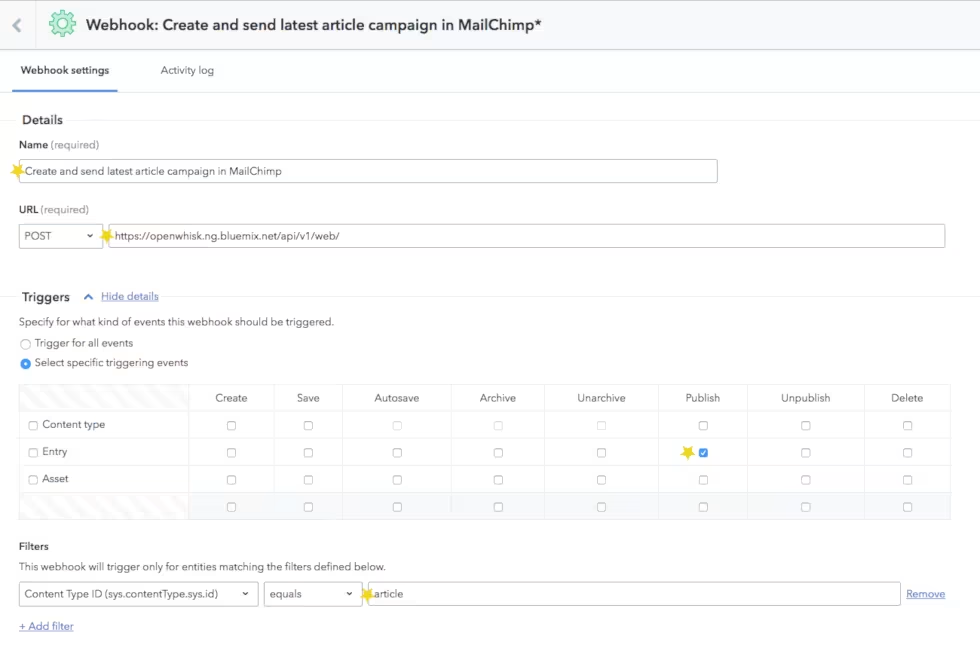
Capturing the MailChimp publish event with a webhook
Everything starts with a Contentful webhook. If you’re new to webhooks, it won’t take long getting up to speed.
To only trigger the webhook on the publishing of a specific content type (e.g., article), we’ll perform these actions:
Choose Select specific triggering events, and check the Publish event on Entry only
Add a filter for Content Type ID and set it to article
Only creating a campaign once
Publishing is not a one-off event in Contentful, but we definitely only want to create a campaign once.
Our cloud function can check that the item’s revision is 1 to ensure that it only creates a campaign on the initial publish. However, the campaign will not reflect any content updates made between the first publish event and the sending of the campaign.
Alternatively, we could keep track of whether we’ve already created a campaign by having our cloud function use Contentful’s Content Management API to add the MailChimp campaign id to the article when it creates the campaign.
If the cloud function finds a campaign id in the payload on any subsequent calls, then instead of creating a new campaign, it can retrieve the existing campaign from MailChimp update its content.
Preparing the content
To render the campaign’s HTML, the cloud function needs to pass both the JSON content and the template to Mustache’s render function. We need to think about how to make it as simple to work with as possible, especially if the template is being designed and managed in MailChimp by someone else.
The default webhook payload is the raw JSON for the published item. It contains at least one translation, so our fields property may look like this:
The template could use references such as {{fields/title/en-US}} but this is cumbersome. It’ll be much easier for our template designer if the JSON looks more like this:
It also means you can use the same template for multiple translations.
How do we simplify the JSON? Our cloud function can flatten the JSON but we’d need to know which translation we wanted to use. Or we could simply customise the payload in the Contentful webhook settings.

Using the latter approach, we can reformat the payload so that our Contentful webhook provides just the data that our cloud function needs, in the format that it needs. This includes creating new structures such as article and new fields, such as link which we’re creating using the slug property.
Now the payload is going to look like this:
Our cloud function still needs to expand linked assets, such as featureImage. This requires retrieving each asset from Contentul and replacing sys with asset’s fields properties:
Becomes:
Depending on your template, you may need to do this recursively to fully expand the content.
This may seem like a lot of overhead. But simplifying your content as much as possible is worth the effort, especially if you are combining multiple data sources. It will make the design process quicker and easier, less frustrating and less prone to errors. Contentful’s recently released webhook templates can help make it easier when you’re doing this.
Rendering the HTML
You’ll recall that the Mustache template is in an editable section called mustache in our MailChimp template.
Our cloud function retrieves the MailChimp template using the MailChimp API’s template/{template_id}/default-content endpoint. The Mustache template is the value of the of the sections > mustache property.
The cloud function generates the HTML by passing the simplified content and the Mustache template to the Mustache engine’s render function.
Now that we have our HTML content, we can create a campaign.
Create the campaign in MailChimp
To create the campaign, our cloud function POSTs to the MailChimp API’s campaign endpoint with the following payload:
Only the type and the recipients > list_id are mandatory when creating a campaign. However, you won’t be able to send the campaign if from_name, reply_to, title, and subject_line are not set.
In our context, template_id is also essential. It allows us to update the campaign content by providing an updated template object.
Using a folder_id is a good way to keep things tidy in MailChimp. Unlike an RSS campaign, we’re creating a campaign for every publish event so creating a specific folder lets us keep them together.
The subject_line and preview_text will almost certainly depend on your content.
If the call is successful, the MailChimp API will return a campaign object.
Setting the campaign content
To update the content, we make a PUT call to the MailChimp API’s campaign/{campaign_id}/content endpoint with the following payload:
HTML is the result of the call to Mustache’s render function.
By using the template option, we are updating just the editable sections. In this example, we only have one section but you can specify multiple sections in your content. This might be useful if you want to include content that you’ve pre-rendered and stored (such as a promotion).
Our campaign content is now complete and campaign is ready to send.
Sending, scheduling and testing
While you can send a campaign immediately using the MailChimp API, scheduling is the more prudent approach.
You don’t want your campaign to hit subscribers’ inboxes before the article has been published. And there’s considerable merit in regular campaigns sticking to a regular schedule.
Alternatively, you may prefer to automatically send a test email as a prompt for someone to review the content before scheduling its delivery.
Wrapping up
We’ve looked a how we can use a publish event in Contentful to automatically create a campaign in MailChimp.
Some MailChimp behaviors and our desire to keep the template design in MailChimp means that we’ve had to be a little creative. That said, being able to use Mustache templating in MailChimp arguably makes the process much easier.
In fact, we’ve looked at a really simple example here. You could achieve the same thing with Zapier. So long as your cloud function can pull in the data, you can get as complicated as you like.
And, once you’ve created that webhook and captured the publishing event in Contentful, you open up a myriad of possibilities — email is just one, and you’ll almost certainly also want to post to your social media channels too.
The ease of integrating Contentful means that we can automate these processes; minimizing the risk of errors and vastly improving ability to scale.
Inspiration for your inbox
Subscribe and stay up-to-date on best practices for delivering modern digital experiences.
Meet the authors

Chris Knowles
Community Contributor
Days spent next to his Grandfather's printing-press sparked Chris's fascination with content production. Now Chris helps organisations leverage modern technologies to create, manage and deliver digital content.
Related articles

Migrating to Contentful from Wordpress is far easier than it may seem
July 10, 2024

MCP vs. RAG: How AI models access and act on external data
December 3, 2025

How to increase conversion rates with A/B testing
March 14, 2025
