Enterprise-grade Contentful app pipelines
Published on August 20, 2020


Inspiration for your inbox
Subscribe and stay up-to-date on best practices for delivering modern digital experiences.
Content management strategy simply can’t be avoided if you work for a large enterprise these days. At Xolv.io, we have amassed a mountain of experience working with content while partnering with some of the largest global brands. Most recently, we ran a proof of concept with a major automotive client to solve the following challenge:
How do we create a content management strategy that scales across distributed development teams without compromising quality and speed?
This article explains how we solved this challenge, at both a holistic design level as well as at the code level—we even share a code repository that demonstrates how it all comes together.
Unpacking the challenge: autonomy, quality, speed
1. Scales across autonomous development teams 🤝
Teams need to have autonomy while working on content that relates to the apps they control. No one team should be slowed down by another, nor should any team have conflicts with another when it comes to creating content.
2. Without compromising quality 💎
Any solution should allow for both exploratory and automated QA to happen. Everything that can be automated should be automated and repeatable. Manual work can be riddled with human error, therefore, the more that can be automated, the less chance of human error, as well as fewer bugs.
3. Without compromising speed 🚀
Team conflicts create a communication overhead and therefore reduce speed. Manual processes also reduce speed since humans are slower than computers. This is especially true for testing where every new feature introduces new code paths that require an increasing number of tests with every release.
Let’s refer to these challenges hereon as autonomy, quality and speed.
Continuous integration and continuous deployment pipeline CI/CD
A modern practice for software development that allows us to begin addressing all the points above is a continuous integration and continuous deployment pipeline — or CI/CD for short.
A CI/CD pipeline is the steel thread upon which we can build automated quality checks and repeatable processes such as deployments. It’s essential to have this working for any modern software project before full-force development starts. This stage is often referred to as “iteration 0” where the initial “hello world” app is built.
For this challenge, we have chosen to create an “iteration 0” that comprises the following parts:
A GitHub Actions based CI/CD pipeline that runs the build, tests and deploys tasks.
A page composed with a set of React components that will be deployed statically behind a CDN.
The React page/components will be hydrated with content from a content platform.
Creating a CI/CD pipeline for apps with a content platform
Ready-to-go options for CI/CD pipelines are available to teams from places like GitLab and GitHub Actions. However, to use a content platform within a pipeline is not as obvious and requires a little thought.
Let’s first understand how a content platform fits into pipelines, and we’ll start with a nice broad simplification and complicate it as we go along.
Content is data. And just like any data for a given app, you need a store to persist that data. A common approach is to have a database per environment such as QA and Prod.
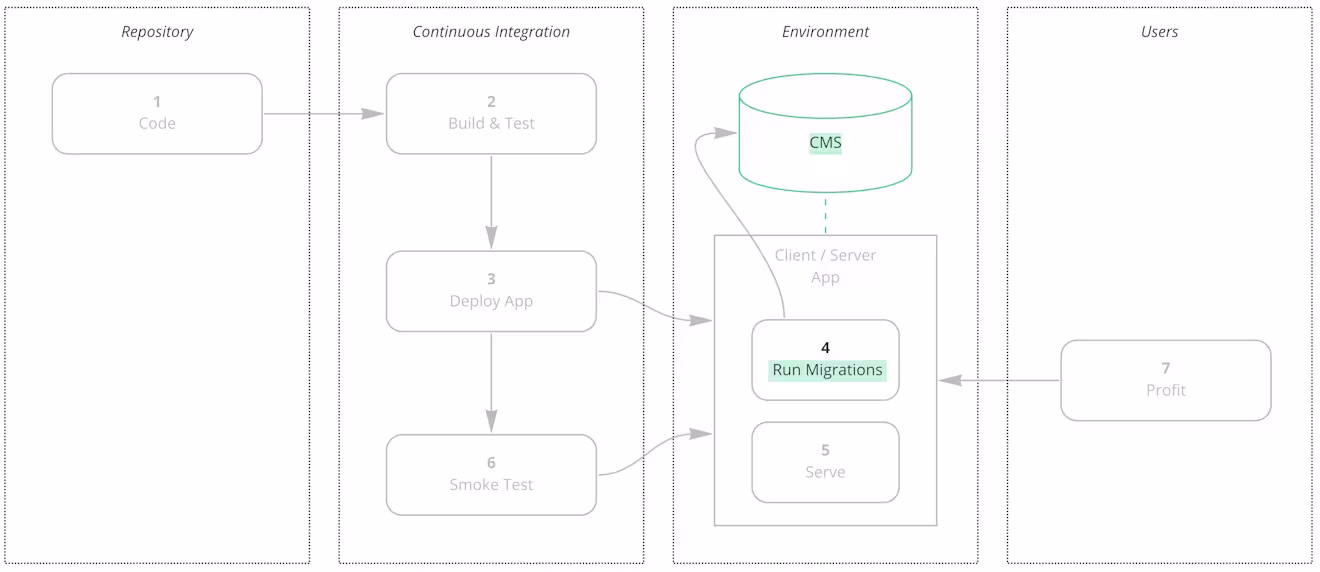
Here is a typical build, test and deploy pipeline that we would employ for an app that has a database:

A developer commits code into a repository which triggers a CI job
The job runs the build & test commands
Deploys the app into a target environment — and here is interesting part —
Runs migrations
The app is then ready to be served from the given environment
Smoke tests are run from CI
Profit!
Depending on your process, you might do further testing and promotion to higher environments or, if you trust your test automation, you can deploy straight to production.
Migrations
The migration step is interesting because it allows you to update the data and schema inside a database programmatically. This is necessary because new code will sometimes require changes to the database to be in place before the app can run.
Migrations manage database change. Let’s look at an example for the uninitiated.
Consider you have a table in the database called Users and in that table you have a name column. This name contains the full name of users like “John Doe.” And let’s say you’ve refactored your app to store the forename and surname fields separately. So you write a migration script that will create the two new columns, and then will go over each row and migrate the names into these new columns. In this example the approach might be as simple as splitting the name at the first space character, so you get “John” and “Doe,” and you set these values in the two new columns. Finally, you delete the name column and you’re done.
So a migration that does the above would look like this:
Also, an app will typically have many migrations over its lifetime which might look something like this:
What you don’t want to do is rerun migrations that have already run for a given environment. For example, if you run split-name-into-forename-and-surname twice, it would fail because on the second run the name column would no longer exist as it got deleted on the first run. So we need to have a way to ensure migrations scripts only ever run once.
This is actually fairly simple to do. Create a sequence numbering system for your migrations and create a change-log table with a mutex where you store the last migration you executed.
The final note to make about migrations is that you typically create up and down migrations in case you need to go back, and you also stage the migrations in order not to have downtime. But that is beyond the scope of this article.
That’s it, that’s migrations in nutshell.
Migrations are change control for your database. There are many tools that can do this for databases. You might want to check out some of these links:
So what does this have to do with a content platform? 🤔
If content is just data, then a content platform is a specialized database. And instead of modeling data with tables and columns, you model data with content types.
Let’s change the picture above to a content platform instead of a database and see what happens.
Nothing! It’s the exact same picture. We just need to treat the content platform as a database if we are going to use it in a CI/CD pipeline. And because software and data requirements inevitably change over time, we need a content platform that allows us to perform automated change control. It must be able to:
Programmatically create and manage content models
Easily perform migrations on those content models
Enter Contentful
Although many content management systems allow you to change content models programmatically, only Contentful offers first-class tools to support migrations.
Before we show you how we actualized the picture above, let’s discuss a couple of questions that came up in our challenge.
If content is just data, can’t I just use a database? 🤔
You sure can. But this means you have to allow content authors the ability to modify that data, which means building the following:
A user interface to allow them to author various content types such as uploading images, writing rich text, picking dates and so on.
You have to add support for different locales if you want to serve different languages.
An access control layer that allows certain authors to create content in some areas but not in others. This is especially applicable if you use third parties to author content.
Ok fine, so I can host my own open-source content management system, right? 🤨
Yes, you absolutely can and might want to do that. As long are you’re comfortable doing the following:
Securing the infrastructure you build and take care of applying 0-day exploit patches
Dealing with any enterprise integrations such as SSO
Developing and testing reliable backup and restore mechanisms
Ensuring a business-critical reliability that is acceptable to your org
So database and open-source hosting are a bad idea. 😐
It’s not so much that they’re a bad idea, it’s about what your goals are as an organization and what you have the tolerance and capacity to do, and where you want to focus your efforts. So for the particular challenge above, we chose a SaaS content management provider that can meet and deal with the tasks of being a content management system and will allow us to focus on the task of making great software and create a scalable content management strategy.
Contentful is the content platform that we chose for this challenge.
Enter GitHub Action
As for choosing a CI/CD provider, to be honest, any of the many choices would work such as Jenkins or Travis. It’s just that some are easier to configure than others, and since we’re using GitHub to showcase this code of this project, it made sense to use the built-in CI/CD capability it has.
We decided to make a small simplification to the approach above in order to focus on the challenge and not deal with incidental complexity. The difference being that we’re creating a client-side-only app and deploying static files only as the “App.”
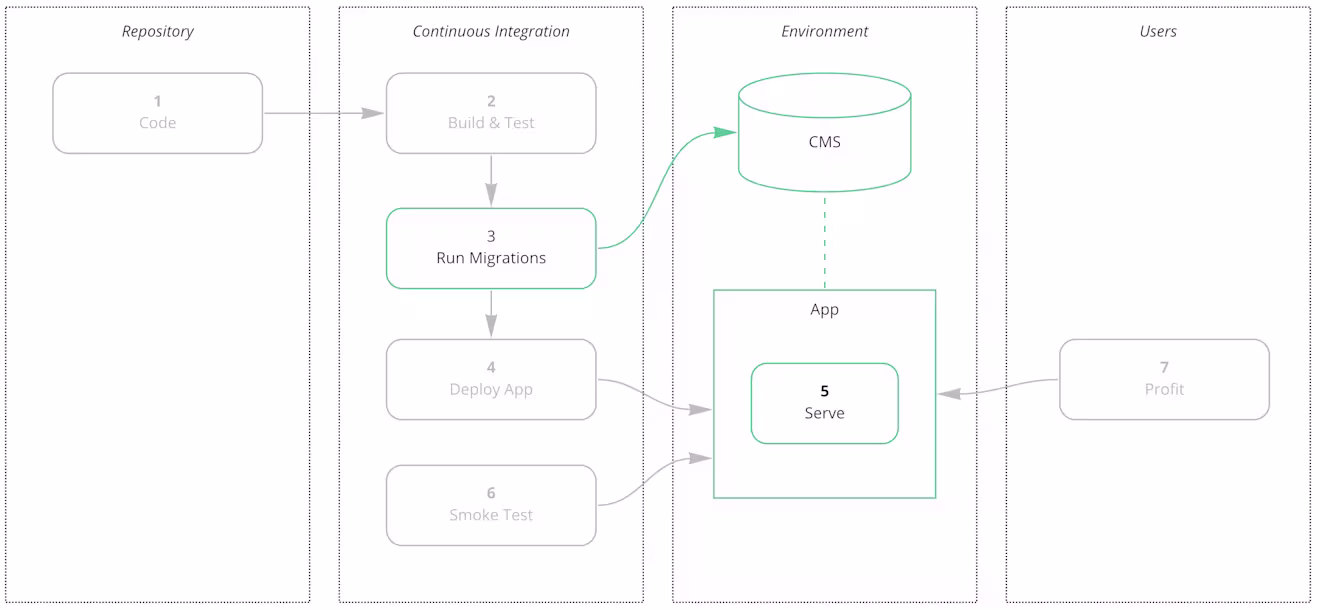
This changes the CI/CD workflow slightly so that instead of running migrations on the startup of the app, we now run migrations as part of the build process as shown in step three above.
GitHub Actions is the CI/CD we chose for this challenge.
OK, let’s build it! 🛠
Hold your horses! It always helps to understand the landscape before climbing the mountain. Maybe there’s an easier way up! 🚠
How does one do Contentful migrations
Let’s start with a quick primer on the Contentful-specific terms that are pertinent to our challenge:
Spaces contain content types, entries, and environments.
Content Types define the fields and structure of the entries.
Entries are the authored content.
Environments are versions of all the things within a space.
In relational database lingo, a space is equivalent to an instance, content types are equivalent to a schema, entries are equivalent to rows, and environments are equivalent to snapshots or copies at a given point in time.
👆More proof that a CMS is just a specialized database!
As for available tooling, we mentioned above that Contentful supported migrations out of the box, but it still took a few attempts before getting the above design to work as intended.
Attempt 1
Our first stop was to look at Contentful’s official mechanism for doing migrations.
✅ It allowed us to programmatically create content types and to migrate entries.
❌ It didn’t solve the problem of running the same migrations again for a given environment.
Attempt 2
After a little searching, we found that someone was thinking along the same lines as we were, and they had created a migrations library appropriately named “contentful-migrate.” The OSS community provided.
✅ This kept track of the last run migration on a per-content-type, per-environment basis. This means if you have a space with two environments and “delta” and a given content type like “profile,” then you can run the migrations on “delta > profile” independently of “alpha > profile.”
❌ It didn’t create a mutex to lock the migration just in case another process tried to run the migration at the same time. For the sake of the PoC this was good enough as we knew we’re only running a single thread from the CI server, however this is essential if you are running migrations on app startup.
Great! Now we know we can migrate things. So let’s create some React components with some matching content types and start to build our snazzy app. ✨
Let’s really build it! 🛠
Note that some details below have been omitted for brevity, so to see the full juicy details, please take a look at the accompanying code repository linked.
Step 1: Build a page with components
Technically you don’t have to start with a page or components, but we’ll build this example top-down to make the example easy to follow.
Here is the page we’ll be building.
This is the services page from the Xolv.io website, and is composed using components from our design system. We have also created a cut-down version of our design system which you can look at.
We have a few React components here. We have the “Services page” component, which contains a “Title” component on the left, and a “Sections” component on the right, which in turn is made up of three “Section” components.
So that’s a total of four components. The “Services page,” “Title,” “Sections” and “Section.”
Step 2: Create a content model
We’ll start by analyzing and dissecting the page above into its constituent parts and use that as the basis to build our content model.
A “Title” has a “Subheading” and a “Heading.”
A “Section” has a “Heading,” a “Description,” and an “Icon.”
The “Sections” component is an array of sections.
The “Services page” contains a “Title” and a “Sections” component.
So we can start to define a “migration 0” for each of the content types above. The reason migration 0 is a special one is because it’s the one that creates your initial schema.
This is what migration 0 looks like for the “Title” content type:
And here’s the “Section”:
Here is the “Sections” migration. Notice the reference to the “Section” content type:
And finally the “Services Page” itself requires a content type. The page is comprised of links to other content types only:
Step 3: Create dummy data
Creating the content types allows authors to create entries within the Contentful UI. But it sure would be nice to create some initial dummy component data to use as an example for content authors and developers to build against without having to go to an authoring UI. This workflow is intended for developers, after all, and we like to automate things, right?
Conveniently, we can use the same migrations mechanism to also create dummy data. So we have a habit of using “migration 1” to do exactly that. Let’s look at an example:
There. Now we have an entry at /entries/titleExample which contains test data for the title component. We do something very similar for all the other components which you can see in the example repository.
Step 4: Project structure
Ok, this is not actually step four and you’d normally do this first, but we had to show you the above for this step to make sense, so bear with us for a hot minute.
We now have the migration scripts to both create the content types as well as some sample data. But where do we put the scripts?
What’s really interesting is the connection between our components from the design system and the content model, don’t you think? 🤔
Content types are intrinsically linked to their interface. In our case, the interface is the UI and therefore, we place the content-type definitions right next to the UI components. This allows us to change the UI components and their content models in tandem and make sure they are always in sync so you don’t have a component’s content schema mismatched with the content model in the CMS. More on this below when we talk about component versioning.
This may not be the case for every business out there and you may have content models that are consumed by a lot of different components, in which case your interface is not a UI but an API, and you might want to create an API layer where you place the migrations. That, however, is a deeper subject for a longer blog post.
The point is that you should keep your content types right next to the interface — in our experience.
So taking this thinking into the challenge, we end up with a directory structure that looks like this:
What you see above is a directory per component, and each directory has the React component along with a migrations directory which contains exactly what it says it should contain.
Note that the timestamp at the start of the name exists to allow the migrations CLI to determine the order in which to run the migrations. This order is obeyed on a per-component basis using some tooling that we build that is discussed below.
Step 5: Run the migrations as part of the pipeline
So we have the React components and we have the content types required by each one, and we also have the initial test data. Let’s run the migration as part of our CI/CD workflow.
Below is the truncated GitHub Actions workflow file (link):
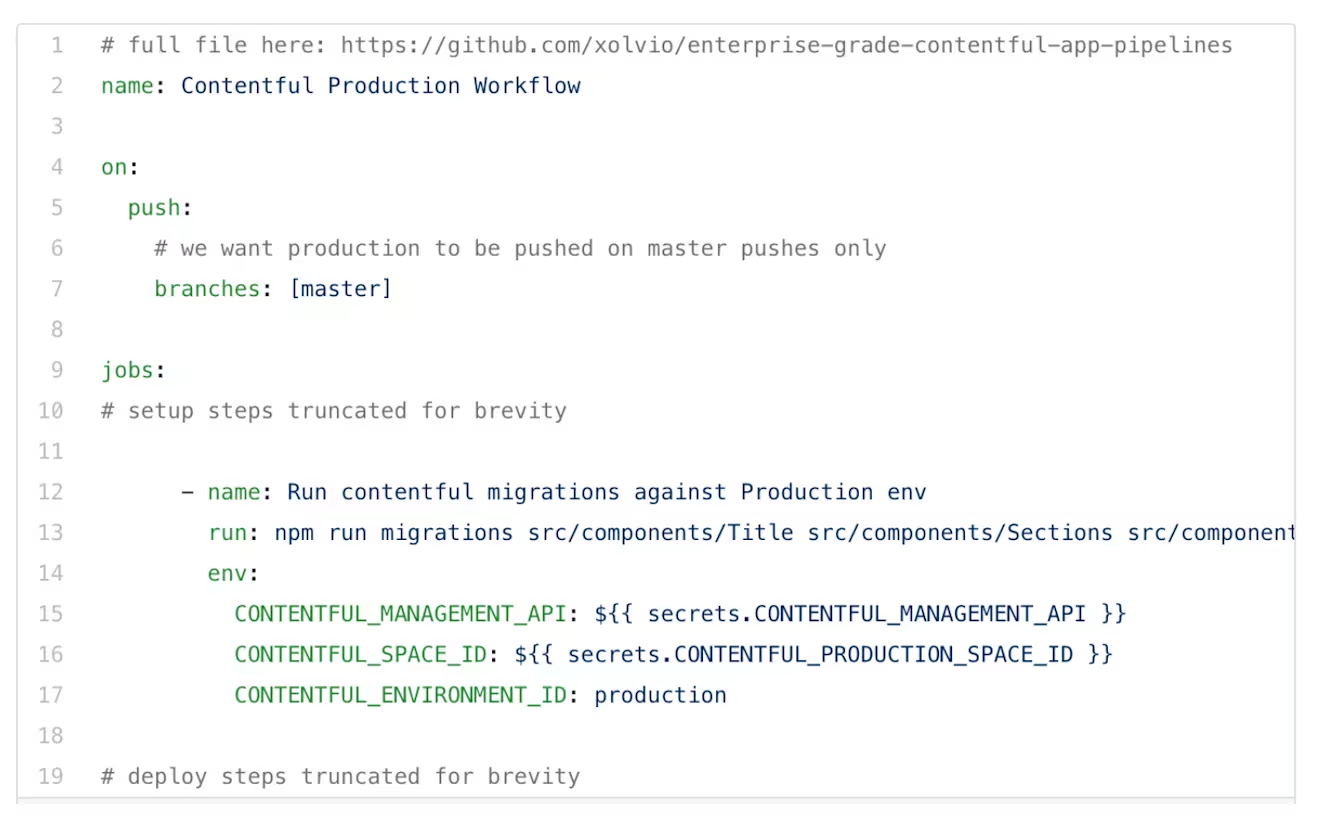
Line 13 is where the magic happens. We run the migrations script and pass it in a list of components.
We actually wrote a custom library called @xolvio/contentful-pipelines that takes in a list of components which have the directory structure shown above, and runs the migrations for each provided directory. This library is published on NPM.
If you go to our lab site, you will see the components pulling in content from Contentful as defined in the content types, and test data entries. With all the things automated! 🙌
Step 6: Author can switch between live and preview content
Authors can now go to Contentful and edit the content for the page above.
Contentful gives you a simple workflow out of the box. You create and edit content which is available immediately at preview.contentful.com, and when you’re ready you push the “publish” button and the changes are instantly live at cdn.contentful.com — provided you pass in the right access token for both endpoints.
But we wanted to see the changes live on the site and not just as data entry forms in the Contentful UI, so we made a widget that allows us to switch the preview/CDN endpoints at runtime. You can see the widget in the image below at the bottom right:
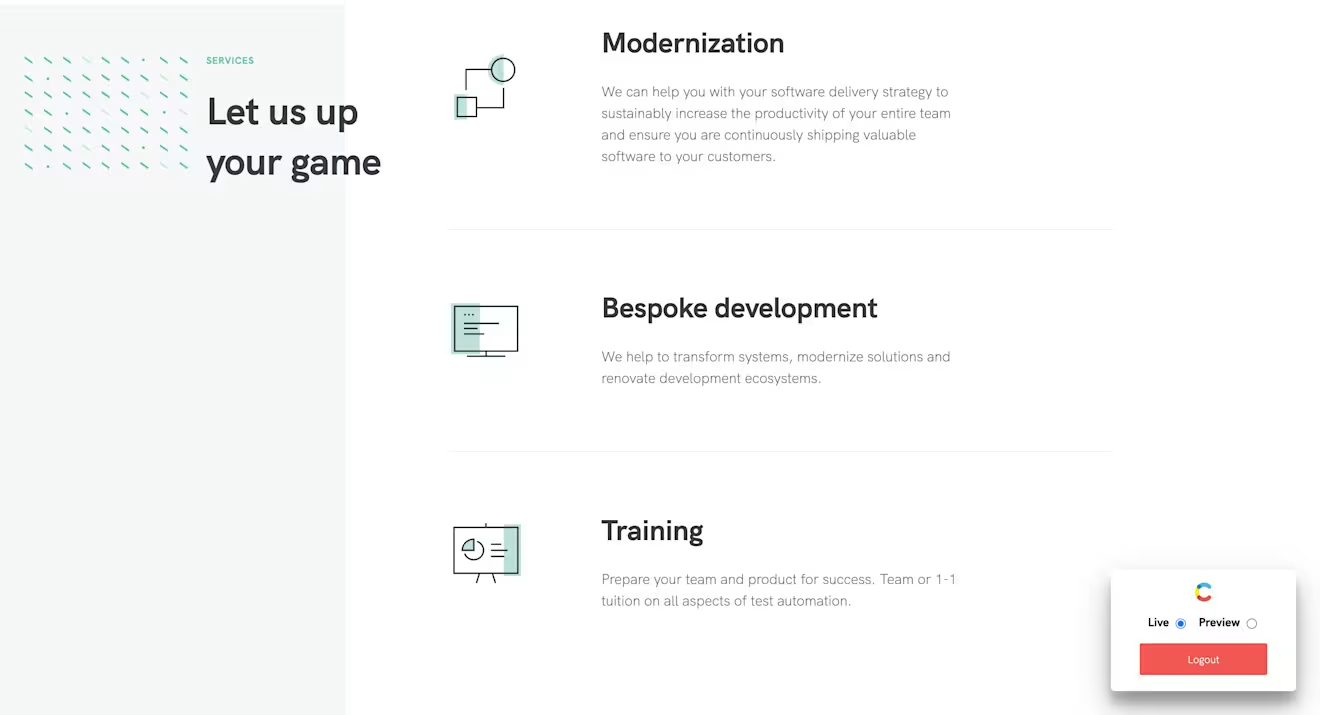
We also made a login page so that the widget only shows up for authorized users which you can see here.— username: xolvio — password: ftw
This widget also allows you to quickly edit the content for the page you’re on by taking you directly to the correct Contentful page to perform the editing.
Note that we made all of this client-only for the demo, but of course in a real-world application you would hook this into some authentication like an IDK or SSO.
There, we solved the challenge.
Wait… this is a simple page, you said “enterprise” 😤
Sure, the example shown above might not look like an enterprise app, but we wanted to show you the required building blocks. So let’s review our challenge and see if these building blocks allow us to do what we need to.
Scales across autonomous development teams
Without compromising quality
Without compromising speed
The fully automated pipelines help solve the speed problem in that a team can now have different developers working on different components and their counterpart content types.
Furthermore, they can write automated tests to ensure that content-type changes work with their components and run these as part of the pipeline, which solves one part of the quality aspect.
The other part of the quality aspect is the QA process, this can be streamlined since it’s easy to switch a site between preview and live content. In addition, the pipeline automation above can easily be expanded to deploy to a QA and/or UAT environments prior to deploying to production. This would allow all sorts of testing to occur depending on your particular setup.
However, all the above happens within a team, but enterprises often consist of multiple teams. So how can we use the above building blocks to have different teams share content types and components but still be autonomous?
Enter component and migration versioning
In order to create, reuse and still maintain autonomy, we employed versioning. This can also be done with the building blocks built above.
Note that there is no one right way to do things, and the solution below was fitting for our challenge. However, I would postulate that you can solve for most use-cases with the building blocks above, or at least with some modifications and/or additions of said building blocks.
Below is a dependency diagram that shows how different component versions can be used by different microsites, and how those components can have their migrations run on different Contentful spaces.

From left to right, the diagram shows the following:
Design System
This contains all the elements that components use. You may or may not have a design system. If you don’t and you have a lot of teams creating components you might want to consider creating one. This allows you to quickly create components (or molecules) from the elemental (or atomic) building blocks.
Component Monorepo
This is a library of all the components that different teams would like to use on their particular sites. We chose to use a monorepo as it provides build, test and deployment standardizations and to create Storybooks which in turn were used for visual regression tests. Your mileage may vary, but the point here is that any change to a component is published as a new version of that component to a shared repository.
NPM Repository
A shared repository and how the components are distributed. This is a standard practice and different teams may use different repositories such as NPM itself, Artifactory or GitHub packages.
µSites (Homepage / Product Page)
This is where the magic happens. Different teams can choose which version of a component they want to use on their particular µSite. This is nothing new on its own, but when combined with migrations and a content store, it’s magic!
Contentful Spaces (Homepage / Product Page)
We created a Contentful space per vertical. This allows for the migrations for a given content type to be at different versions per space. And since each NPM module for a given component will have its migrations included, different verticals can have different versions of components.
Earlier in the article we claimed that “you should keep your content types right next to the interface.” This is the key to autonomy as it allows different consumers of the interfaces to own their migrations.
And now we can say that the challenge has been met. We established the building blocks required to create enterprise-grade Contentful app pipelines.
Limitations ✋
It’s important for us to be open and let you know some of the limitations we encountered with the above.
Contentful is a great platform and has a great experience for both developers and content authors alike. However, there are limits to what you can do and unfortunately these limitations are not technical, but are due to the pricing structure.
The Micro space only has one sandbox environment, the Small space has two, the Medium has three, the Large has five and the Enterprise has 10+.
This is an issue if you want to push the above approach since you can’t have your CI/CD pipeline freely create environments, which means developers can’t easily test their content-type migrations independently. You are basically limited to how many parallel builds you can run by the number of sandbox environments you have.
So if you’re using trunk-based or GitHub flow you’d have to configure your pipeline in such a way that you only run builds against your sandbox environment before merging to master.
There is also a cap on the number of content types you can have per space type. The Micro and Small spaces allow 24 content types, the Medium and the Large allow 48, and the Enterprise has 96+.
So to use this high-speed at-scale approach described above, you will have an imposed limit on the number of interfaces you can have — be those UI or API components.
The Contentful technical limits page shows that the max number of environments per space is 100, and the max number of content types is 500. This should be ample for 99.999% of teams, so it’s sad to see this imposed limitation means high-performing teams that are starting small can’t go as fast as they potentially could.
Additional resources
Thank you very much 🙇♂️
I hope you’ve enjoyed reading this article and that you found it useful. I look forward to helping you deliver higher quality software, faster! Have something else in mind? Get in touch.
Want to try Contentful yourself? Dive in with a free account!

Inspiration for your inbox
Subscribe and stay up-to-date on best practices for delivering modern digital experiences.
Meet the authors

Sam is the founder of [Xolv.io](https://www.xolv.io?utm_source=contentful&utm_medium=blog&utm_campaign=enterprise-grade-contentful-apps/), an agency that specializes in helping clients get more for less. We can help you with [software development](https://www.xolv.io/services/development/?utm_source=contentful&utm_medium=blog&utm_campaign=enterprise-grade-contentful-apps/), [digital modernization coaching](https://www.xolv.io/services/modernization/?utm_source=contentful&utm_medium=blog&utm_campaign=enterprise-grade-contentful-apps/), and [training](https://www.xolv.io/services/training/?utm_source=contentful&utm_medium=blog&utm_campaign=enterprise-grade-contentful-apps/). We can get you to the holy grail of continuous deployment where every commit can go to production — yes, even for large enterprises. You can also check out our [XSpecs](https://www.xspecs.io/?utm_source=contentful&utm_medium=blog&utm_campaign=enterprise-grade-contentful-apps/) and [Quality Faster](https://www.qualityfaster.com/?utm_source=contentful&utm_medium=blog&utm_campaign=enterprise-grade-contentful-apps/) product offerings.
Related articles

Data personalization that customers actually love
September 2, 2025

The power of personalization frameworks
April 14, 2026

Understanding and optimizing for large language models (LLMs)
June 13, 2025
