How to automatically watermark Contentful assets using a serverless function
Published on November 8, 2018


Inspiration for your inbox
Subscribe and stay up-to-date on best practices for delivering modern digital experiences.
We made it friends! We finally reached the point where developers can deploy HTTP endpoints without worrying about infrastructure. You might have guessed it, and you’re right – I’m talking about the serverless buzzword! The big infrastructure players; AWS, Microsoft, IBM, and others all provide functions as a service these days. Serverless functions make it possible for you to write 100 lines of code, test it and ship it – 100% scalable and doesn’t cost you a single dollar whenever the deployed code is not running.
Why is an HTTP endpoint such a big deal?
The industry is shifting towards specialized services to solve specific problems in ways that are better and quicker than I (and probably you) could do it when starting to build solutions today. You sign up to a service of choice and can start using it – saving you weeks, if not months, of developing software that doesn’t belong to your core product. How many times have you built a login mechanism in your software career? For me, it’s been many, many times...
The question arises how you can automate certain things when you are not in control of the source code of all the services that can be in your future technology stack. The answer to this is two core components – APIs and webhooks.
In case you haven’t worked with them previously, webhooks are HTTP requests sent by a service to a defined HTTP endpoint. These requests allow you to connect one service with another, and then combine all the small functionality pieces into something bigger, greater, and more powerful.
However, before you go out and subscribe to a gazillion software-as-a-service (SaaS) products, let me give you a bit of advice. Not every cloud service that provides an API is the same and not every webhook implementation is useful. You should check for two main characteristics:
The provided API has to include read, create and update functionalities
Webhooks have to be secure, filterable and adjustable
In this article, I want to describe how you can implement a webhook flow to improve your productivity when working with images in Contentful. Let’s assume that you’re dealing with photos that should be served to your applications as a watermarked version which includes your company logo. Your content creators could manually add watermarks each time on every image, but you could also automate this task away to save time and effort.
The main flow – webhooks triggering serverless functions
Here’s the plan: whenever someone creates a new asset and uploads an image in Contentful, a webhook is sent. This webhook triggers a serverless function that downloads the uploaded image. The composition of this image with, for instance a company logo, will then be re-uploaded to Contentful as the watermarked version.
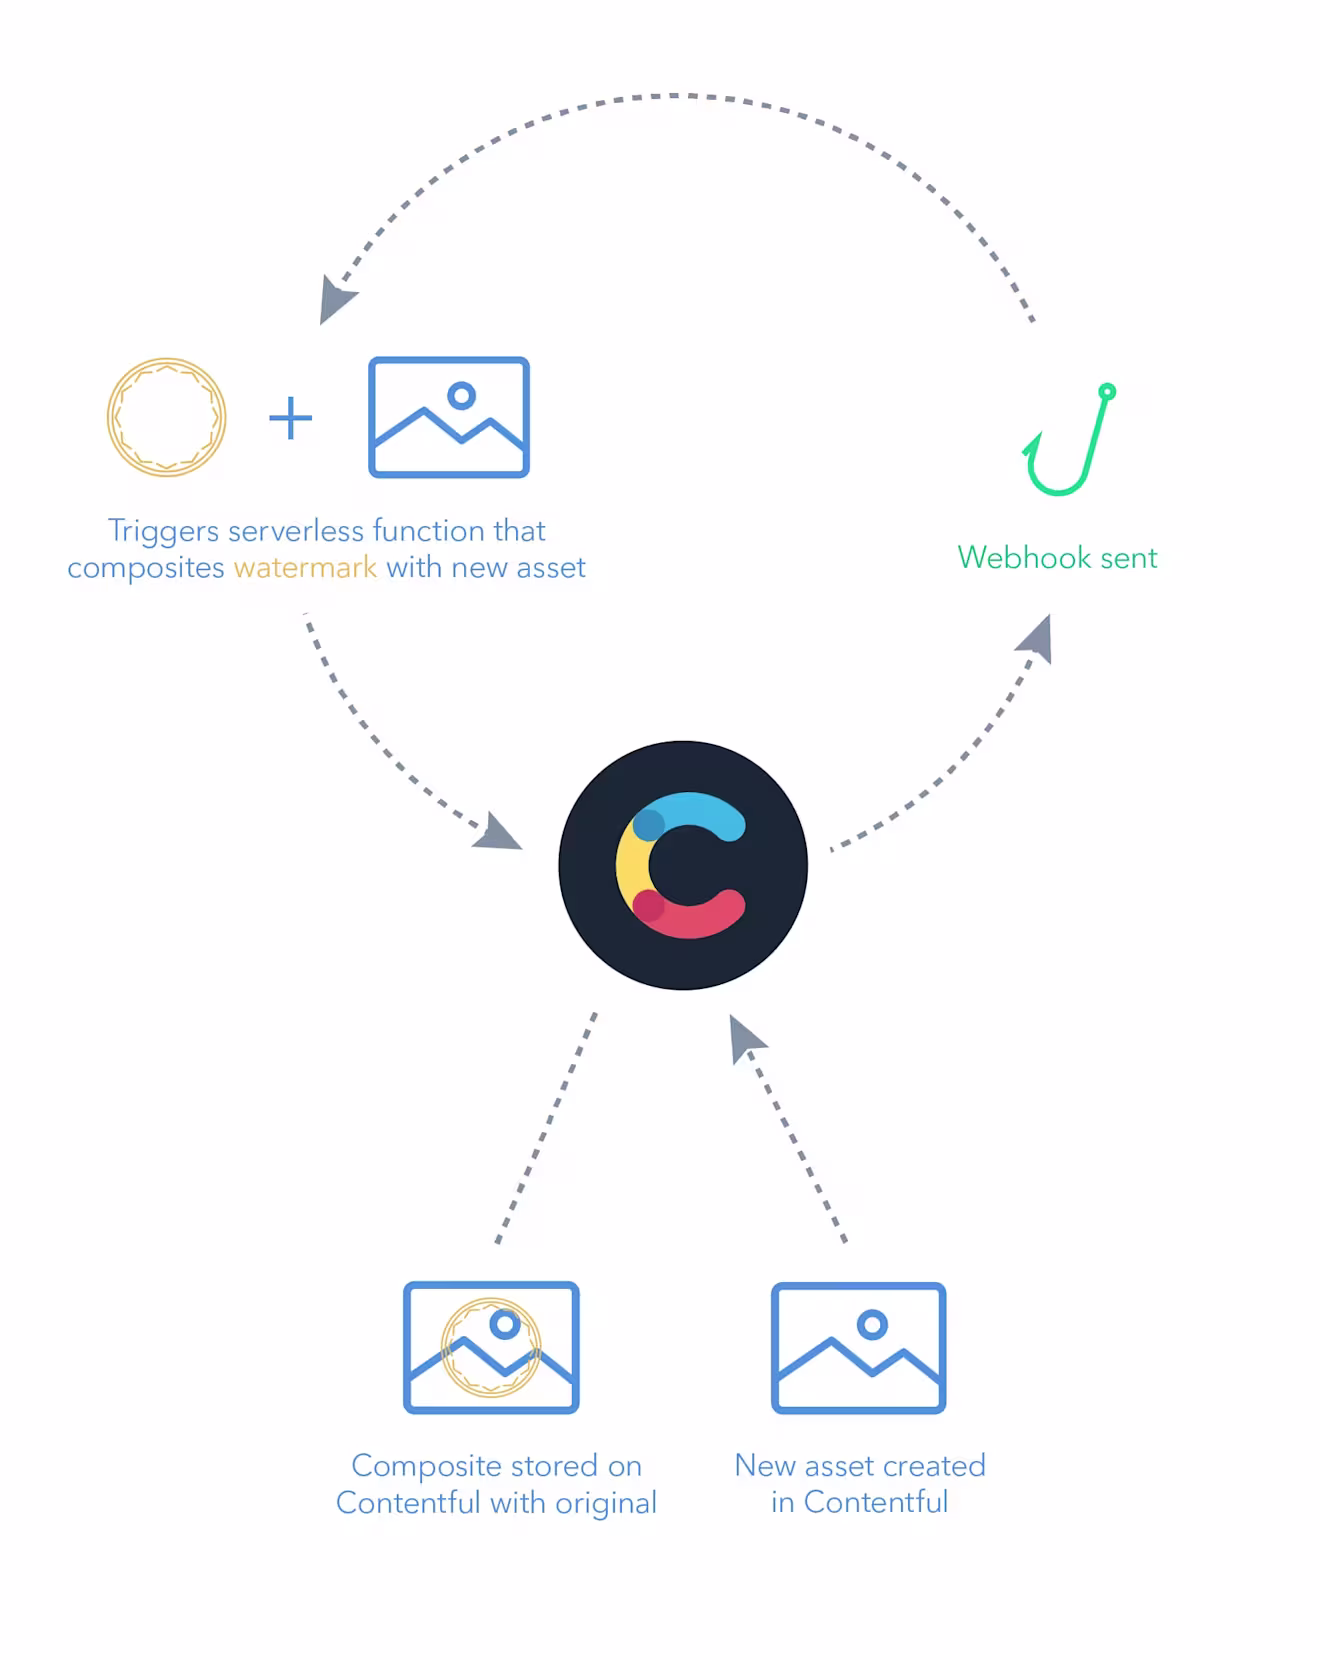
This way you get to both keep the original images and save the work of modifying these yourself. Sounds good? Let’s do it!
Getting started with the serverless framework
To start developing functions that run in the cloud, the serverless framework is always my first choice. It gives you a nice abstraction layer on top of the functionality provided by all the infrastructure providers. You can develop and deploy functions right from your machine, which is way more comfortable than what’s usually provided by online editors.
As a first step, head over to their getting started guide. It explains how you install the serverless executable and what you need to configure. When everything is set it takes you one command to create a project that is ready to deploy to AWS.
This command above creates only two files for you, with serverless.yml being the main configuration file for your serverless projects. Its initial creation includes lots of documentation and comments, but not many configuration parameters and values will be defined in it at this point.
The serverless.yml defines a service name (this is how you’ll identify it in AWS later), you can configure the environment in AWS (Node.js in version 8.10), and it lists the functions that should be available later. Node.js version 8 means that you can use recent additions to the language like async/await which makes source code so much more readable!
The other file handler.js exports a function that is ready to be deployed returning a "hello world" JSON example message.
1. Make the function executable via HTTP
While these two files are enough to deploy your first function to AWS, this function isn’t connected to an HTTP endpoint yet and thus not accessible from the outside. To make that happen, you have to add your first custom configuration to the serverless.yml.
In AWS, API gateway handles the configuration of HTTP endpoints. The cool thing about the serverless framework is that it provides ways to configure endpoints without jumping between all the different pages and settings in the AWS console.
Events triggered by different services of the infrastructure are responsible for function execution in AWS. HTTP, in this case, is only one of them but is the foundation to build serverless function-driven APIs.
By adding the configuration for events to the particular function, the serverless framework configures API gateway for you and make this function available on the internet.
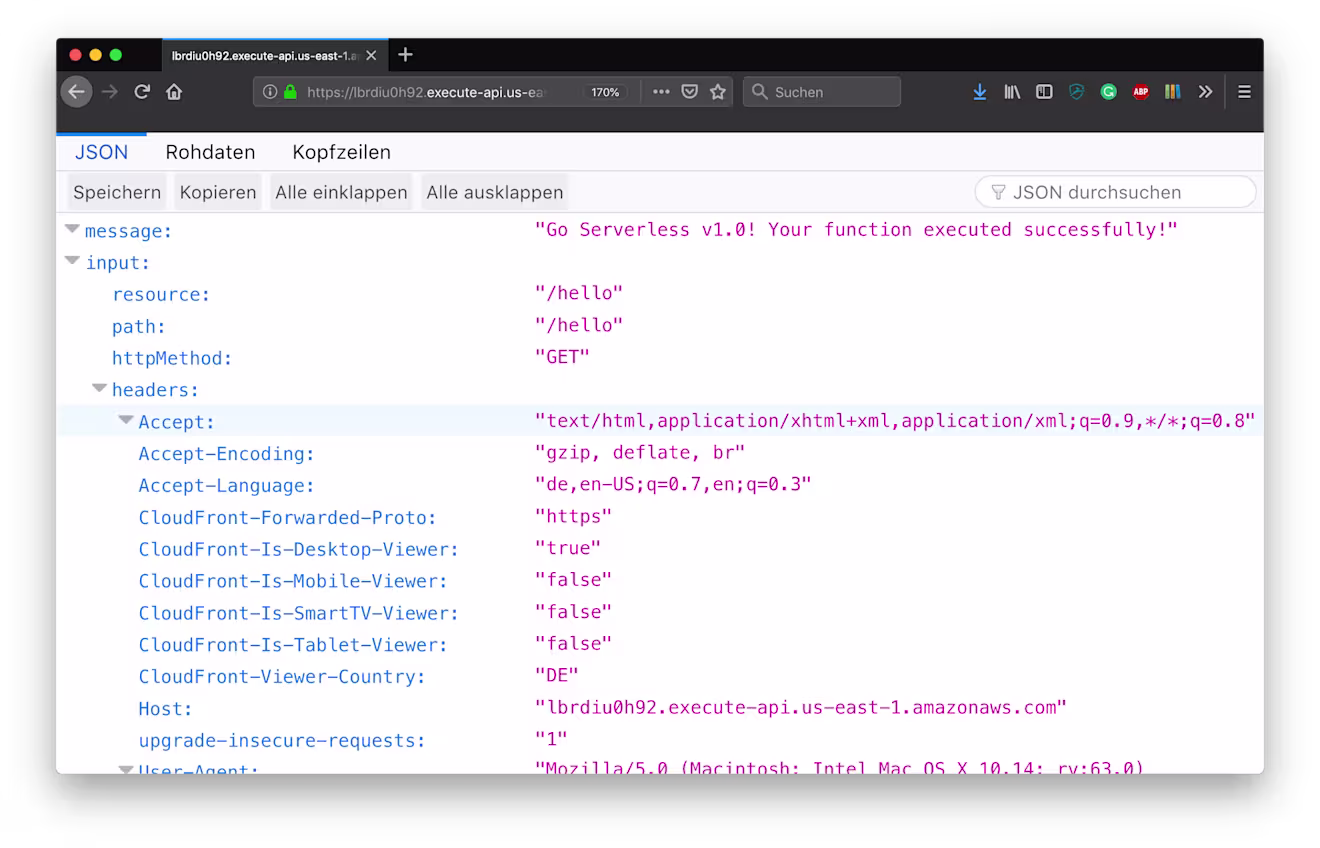
You can now deploy your new function using serverless deploy.
The deployment logs give you information of where the endpoint is deployed so that you can open it in your browser and see the JSON response immediately.
As a last preparation step, let’s change the method name from hello to watermark and also use the HTTP method POST instead of GET.
These two files and a few lines of additional configuration are all it takes to lay the foundation for an endpoint that is capable of handling Contentful webhooks to watermark images and re-upload them.
2. Tailor the webhook to your needs
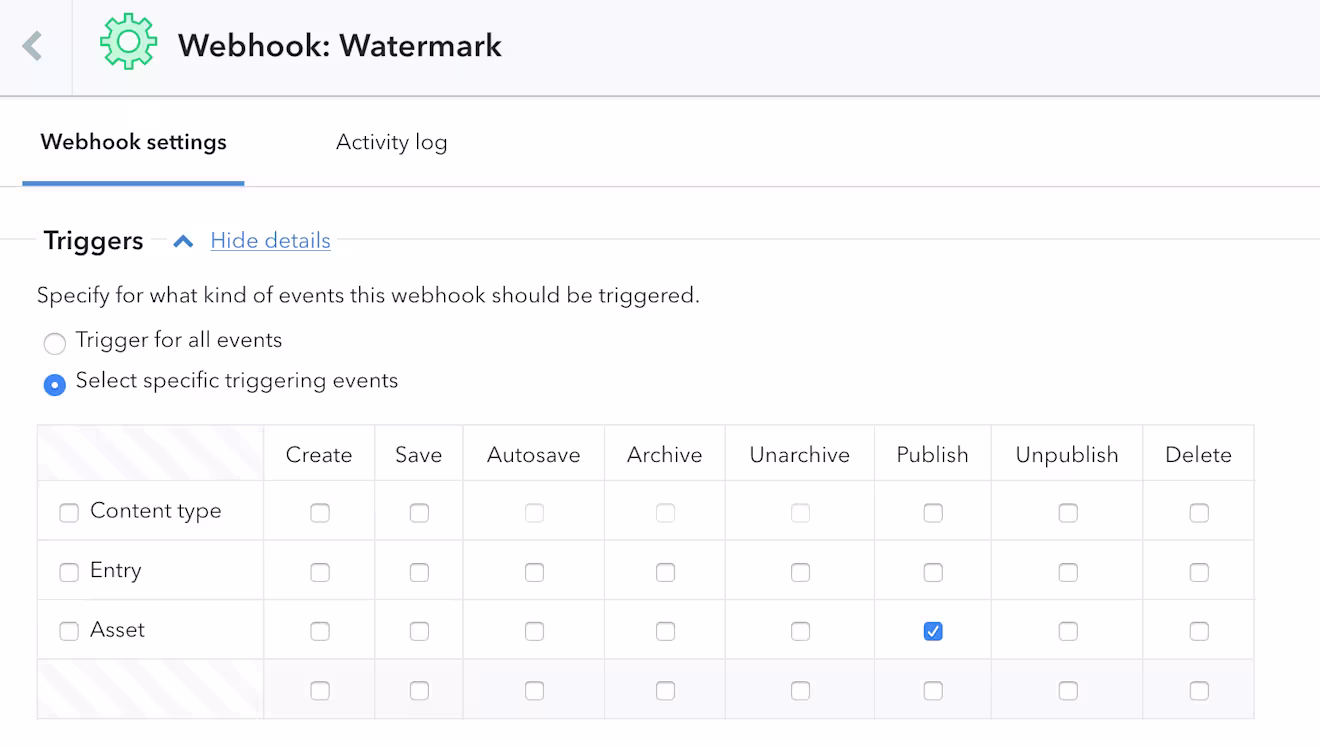
In Contentful you can define a new webhook that will be sent whenever you publish a new asset.
What is cool is that you can define custom payloads in the webhooks configuration. Using JSON pointers, you can slim down the payload and avoid complexity in your functions because it sends only the data you’re interested in.
Adjustable webhooks payloads are also critical when you want to connect two services directly because it might be that a service only accepts requests with particular headers or payloads.
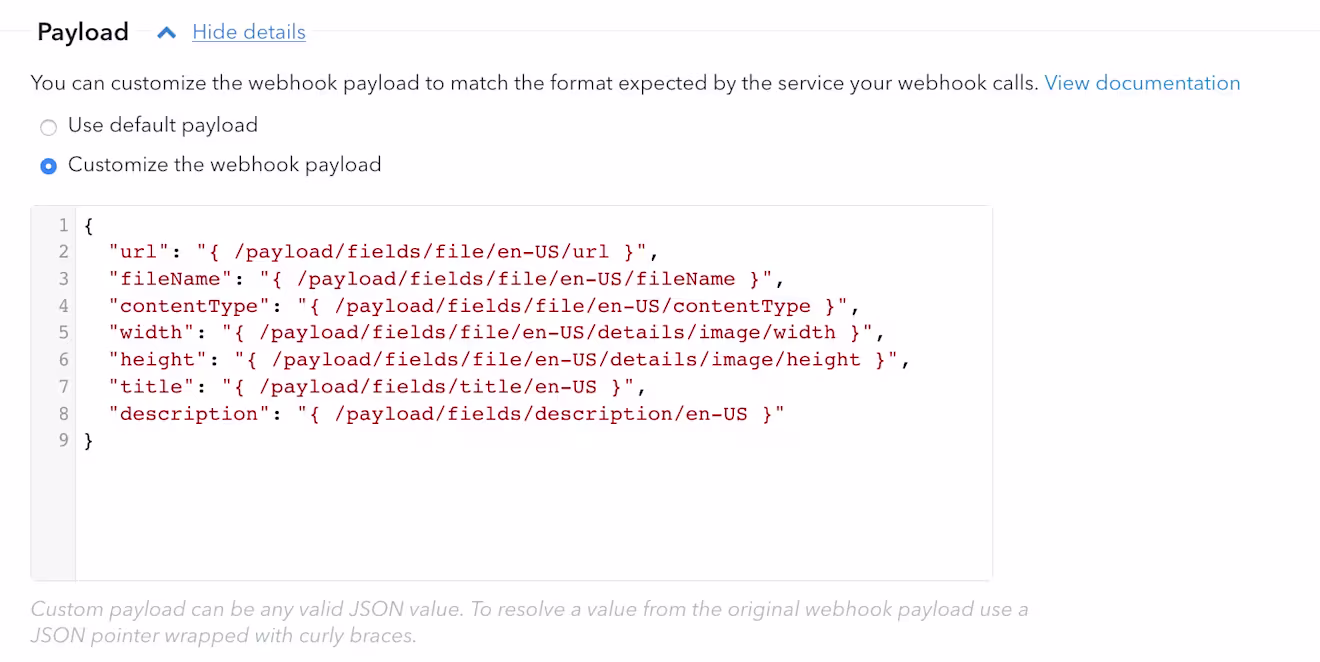
What you see above is the definition of the entire webhook payload sent to the serverless function. The syntax of JSON pointers ({ /payload/… }) makes it possible to access the original payload and restructure everything to your requirements. In this example, you’re going to use the following:
The URL of the uploaded images to download it in the serverless function
The filename of this file, to be used as a base for the filename of the watermarked image
The content type of the uploaded file to only run watermarks for jpegs
The width and height of the image so to not watermark images that are too small
The title and description of the uploaded asset to be reuse in the watermarked asset
Manipulating images in a serverless function using Jimp
Here comes the fun part... image manipulation often requires you to install native dependencies, which can be a little bit tricky when dealing with serverless functions. The Jimp package is handy in this case because it performs image manipulations entirely in JavaScript. The manipulation is probably a little bit slower than a native implementation, but you don’t have to deal with the troubles of installing native dependencies on AWS.
1. Adding npm dependencies to your serverless project
You can add a package.json to the project root with npm init --yes and then install the package as a dependency with npm install --save jimp. When you later deploy the project, the serverless framework scans your project and figures out what dependencies need to be included in the package that goes to AWS. It even excludes development dependencies to keep the package as small as possible. It’s honestly very cool!
You can happily use the Jimp package and manipulate images in your Lambda code.
Your project structure should at this point look as follows:
2. Using Jimp to combine images
The watermark image creation can be divided into four parts:
Read the original image that should be watermarked
Read the image that acts as the watermark
Make the watermark image transparent
Combine both images
Luckily all these steps are reflected in the methods provided by Jimp.
What’s very handy about Jimp.read is that it accepts file paths and URLs which means that you don’t have to deal with file downloads yourself.
3. Read the webhook payload and watermark the uploaded image
Remember the payload we defined in Contentful? This payload is available in the body property of the function argument event inside of the lambda function. You can combine the passed URL with the Jimp functionality and start watermarking images.
The code snippet above also includes validation steps to not always create new watermarked images and to avoid neverending loops. It does not include the download of the watermark logo to avoid complexity, but you can find the full version on GitHub.
4. Uploading the new Jimp watermarked asset to Contentful
To upload the generated image, you can use the Contentful Management SDK which provides you the createAssetsFromFiles function to upload images with the Content Management API.
5. The overall structure
Reading and validating the JSON payload, downloading and processing of the needed images and uploading a new asset to Contentful are the core parts of this function. The overall implementation for the complete functionality is around 200 lines of code and this article only describes some of the details. If you want to learn more or try it out you can go the repository on GitHub.
The flow codewise should be as follows:
Serverless functions combined with webhooks are the SaaS glue of the future
It doesn’t matter if you use serverless functions to enrich the functionality of a single service like in this example the asset creation of Contentful. Functions are a perfect fit to combine different services, too.
Think for example of Algolia (a Search SaaS provider). To use their search, you have to index data. With webhooks, you can either push data directly into Algolia or, for complex cases, you can spin up a serverless function that controls which data should go in. Head over to the docs to learn more.
In my opinion, we’ve entered a very bright future with the ability to deploy these function-based HTTP endpoints, you and I can focus on building great products without reinventing the wheel!
Additional comments and notes
How to develop Lambda functions locally?
To develop serverless functions deployed to AWS locally, there is the excellent serverless-offline package which emulates AWS on your local machine. I highly recommend checking it out.
Environment variables
The described use case of re-uploading assets to Contentful requires you to create a management token which has write access to your Contentful space. Be aware that this token should not make it into your version control and should be handled via environment variables (that’s the solution you’ll find in the provided GitHub repository) or configuration files. Take care!
Limitations of API gateway
In this example, API gateway triggers the function that deals with image processing. API Gateway currently has a maximum timeout of 30 seconds whereas Lambda functions can run for up to 15 minutes. For processing tasks taking longer than 30s, it is recommended to split this single function into two functions to avoid hitting that timeout.

Inspiration for your inbox
Subscribe and stay up-to-date on best practices for delivering modern digital experiences.
Meet the authors

Stefan Judis
Senior Manager, Developer Relations
Stefan was formerly a Senior Manager, Developer Relations at Contentful. He loves web performance, new technologies, and accessibility.
Related articles

What is vibe coding? Moving fast (and not breaking things) with AI assistance
February 3, 2026

Integrate Contentful with Next.js 16 Cache Components
April 28, 2026

NestJS vs Next.js: The differences and when to use each framework
July 1, 2025
