Improve your visitors' perceived loading speed with primitive art
Published on June 21, 2018


Inspiration for your inbox
Subscribe and stay up-to-date on best practices for delivering modern digital experiences.
Increasing numbers of people have access to fast internet connections, high-speed devices and gapless net coverage. This is especially true for developers, but this remains a luxury that's out of reach for many.
This blog post is for all your users who live in remote areas, or simply for those who access the internet in limited connectivity areas like the subway. Loading websites in non-ideal situations can be very painful and lead to a high rate of user loss. I want to introduce a rarely-used technique that has been around for a while, along with an extra-modern goodie which makes the loading process both painless and aesthetically pleasing.
By embedding previews of relevant images, we ensure that the page layout receives a final structure as early as possible for the benefit of the user. Our goal is to avoid losing a user’s attention by optimizing our critical page render path.
0–100 ms — Instant feel, constant flow
100–300 ms —Slight perceptible delay
300–1000 ms — Loss of task focus, perceptible delay
1 s+ — Mental context switch
10s+ — User leaves
You can learn even more about this in Understanding the critical rendering path, rendering pages in 1 second by Luis Vieira.
The following situation is all too familiar. A page loads and proceeds to jump around as images slowly finish loading.

Filmstrip of frames loading with non-optimized images
The final layout is not predictable for the human eye and the readability of the site is poor until all the images are loaded.
The fix: Introducing low-quality image previews (LQIP)


Instead of having blank spaces in place of images, LQIP ensures that low-quality previews of images are embedded in their eventual positions. This way, users can get an idea of the content of the image before it loads.
This was already introduced by Guy Podjarny (Guypo) in 2013 but has had a low adoption rate, likely due to a lack of research data about user loss in relation to slow-loading pages.
The technique is simple:
Create a small thumbnail of an image (in both dimensions and in file size)
Embed these previews as CSS backgrounds of the original images
Leave as HTML+CSS only or enhance using nice fade-ins with the help of JavaScript
Filmstrip of frames loading with LQIP
Facebook went a step further by using the same file header for all images and only sending the actual image data. Their 42 x 42 px previews went all the way down to 200 bytes!
Tools for implementing LQIP in your next project:
[React implementation (requires server-side rendering)
Node implementation (based on the super-fast sharp)
- Gatsby: working with images in Gatsby
- DIY: Use any image resize tool like GraphicsMagick and optimize for size with tools like mozjpeg, jpegmini, or guezli
Using traced SVG previews

Instead of having small and blurry previews, this technique uses Potrace to create a traced SVG version of an image. While the results are very exact and look fantastic, there is a huge downside. Depending on the detail of the source image, the file size per image may get 3 times as big compared to other techniques, even with SVGO optimizations and HTTP compression enabled.

Filmstrip of frames loading with traced SVGs
Tools for implementing traced SVG previews in your next project:
Getting artistic: Using primitive SVG shapes as previews via SQIP

Let’s get fancy. This technique offers a unique, modernist preview style while achieving file size and compression possibilities that are very close to the original LQIP technique.
By combining primitive SVG shapes like triangles, circles, polygons and more, we generate vectorized primitive version of our images. This is achieved by the wonderful SQIP project by Tobias Baldauf, which in turn is based on the Primitive Pictures Go Tool by Michael Fogleman.

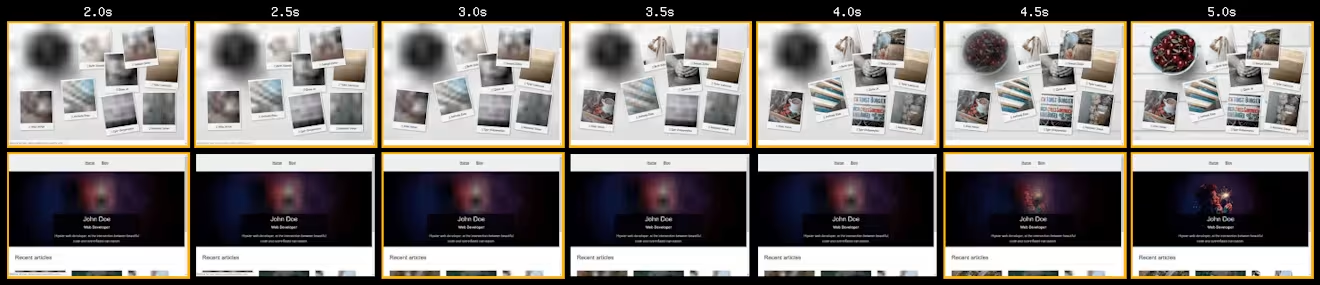
Filmstrip of frames loading with SQIP
I am proud that I could help evolve and implement this technique into the fantastic Gatsby static site generator. Adding it to your website project should take only a few minutes.
The plugin offers a wide variation of configurations like blur factor, number of shapes, type of shapes, and more, leaving a lot of room for artistic freedom. In the future, I plan to contribute faux-loading animations and more via a plugin system for node-sqip.
Tools for implementing SQIP into your next project:
Technique comparison
Configuration: HTML & preview file size recommendations
The maximum size of your previews really depends on your current HTML payload size and personal limits. Generally, I’d say you should go as small as possible, though the 200 byte limit Facebook has given themselves is slightly too ambitious.
General suggestions
Small and frequent previews should range between 500-1000 bytes
A single header image or a full-sized hero might take 1-10 kb
Optimize your LQIP previews with JPEG compressors
Optimize your SVG based previews with SVGO (with a precision of 0 or 1) and embed them without base64 and use mini-svg-data-uri to achieve the best possible compression ratio
SQIP-specific
For frequent previews, like article teasers or image gallery thumbnails, I’d recommend 15-25 shapes or header images. You may go up to 50-200 shapes and, depending on your available file size, you may fill up to the point of reaching the next TCP window. There is more on this in the next section.
I did extended research on how much shape count, shape type and other factors impact your HTML payload size. SQIP is very performance hungry: make sure to cache your generated SQIPs for subsequent builds.
More details about networking performance
Your HTML payload size is the total size of your initial HTTP HTML request. It is the one that happens right after the user opens your website. This data should be as small as possible. Luckily gzip & brotli compression help us a lot over here, so make sure it is enabled on your web server.
>A TCP round trip will normally have 14 kb available. With a reasonable amount of header data, you can assume that you have 10 kb for your HTML response and your previews.
This assumes a initial congestion window of 10 packets of 1,500 bytes each, plus around 100 bytes of IP & TCP headers.
The congestion window grows after the first round trip, which means you can fit a lot more content into two round trips. The growth varies by TCP implementation and operating system, but you can assume that it's around double the previous number - so 28kB. This totals to 42kB for two round trips.
So the rough HTML response size milestones, excluding headers, are: 10 kb, 38 kb, 94 kb, 206 kb, and so on.
This means everytime you exceed one of these size milestones, your page takes at least one more TCP round trip longer to load (actual download time + user ping).
So, keep your HTML as small as possible and use webpagetest.org][33] to measure the impact of your optimizations. Your goal is to achieve a faster time to first paint, not a slowdown of the entire loading process.
For an even more in-depth look at this topic, check out Simon Hearne’s work or do some exploratory googling.
Further reading on network and rendering performance:
Get involved
Do you like what you just learned and want to help to improve the tooling? Do you have an awesome art idea about SVGs which would fit here? Don’t hesitate to reach out and contribute on the following projects:
Support me in rewriting node-sqip to be a plugin based system with an async API
Gatsby’s SQIP plugin still has some issues
Implement SQIP and the other techniques in your favorite framework
Write a tool for Node, Webpack or Gatsby which checks your payload size and tells you how many TCP round trips your site needs to load.
Looking to learn more about Contentful? Try the community edition for free!
For more on images and SEO refer to our Contentful Image SEO guide.
Inspiration for your inbox
Subscribe and stay up-to-date on best practices for delivering modern digital experiences.
Meet the authors

Benedikt Rötsch
JavaScript Ecosystem Developer
JavaScript Ecosystem Developer. You can follow him on [GitHub](https://github.com/axe312ger/) and on [Twitter](https://twitter.com/axe312ger).
Related articles

How personalization engines power smarter, tailored experiences
June 9, 2026

Speak the same language as your customers: AI translation made easy
June 27, 2025

Choosing the right Contentful training: Verified skills and certifications
April 17, 2025
