Retrieval augmented generation tutorial: How to build a RAG pipeline
Published on July 29, 2026


Inspiration for your inbox
Subscribe and stay up-to-date on best practices for delivering modern digital experiences.
This post walks you through a fully runnable retrieval augmented generation tutorial. You'll learn to build a working RAG pipeline from scratch without using any LLM framework, which makes every step of the pipeline visible and understandable.
To complete this tutorial, you'll need:
An OpenAI API key, which you'll use to gain access to two things: an embedding model which is used to convert your queries and documents into a RAG-friendly format, and an LLM.
A ChromaDB vector database, which is where your documents will be stored so they can be searched by your RAG. This is very simple to get started with — it runs in memory on your local machine, so you can just start using it in your code with no extra account or API keys required.
This RAG pipeline example comes with sample data for a company that sells PC components, from a variety of sources, including FAQs and full-length blog posts. By the end, you'll be able to ask questions of your RAG about any of these topics, as well as understand how to evaluate whether your RAG is working correctly.
A recap on key RAG concepts
RAG is an AI technique that fetches relevant information from a knowledge base and injects it into an LLM's prompt to give it domain-specific knowledge that can help improve its response. This is useful when you want an LLM to reason over a large number of documents it hasn't been trained on. For example, an LLM would not have been trained on a private knowledge base of internal company documents, and there are usually too many of them to practically upload them to the LLM's context window.
The knowledge base is stored in a vector database, which stores text data as vector embeddings. A vector embedding is a list of numbers that represents the meaning of the original text, and an embedding model is used to convert the text into vector embeddings.
When a user asks a question, that text is also converted into a vector embedding, and a similarity search algorithm is used to find the most similar vector embeddings from the database. The top results get injected into the LLM’s context so that the LLM can reason across them.
In practice, a system prompt for the LLM is essential here. You can use it to tell the LLM what to do with the RAG data, for example, "answer the question using only information in the context provided" or "tell the user that you don't know if the answer is not in the context."
The RAG pipeline we're building
You'll be using example data that was generated for a fictional company called PC Emporium. This company sells PC parts like GPUs, motherboards, RAM, and SSDs, and its knowledge base will contain three different types of data:
Product FAQs, stored in a structured JSON file.
Company policies, about things like returns or warranties. Each policy is stored in an individual Markdown file.
Blog posts, which are longer-form content on topics like which components to choose or how to build your own PC. These are also stored as individual Markdown files.
The RAG pipeline will first have to split the data into chunks. Without chunking, the LLM might retrieve entire 2,000-word blog posts. Imagine one blog post is about GPUs, and the user asks, "What PSU do I need for the RTX 5080?" But now the LLM has retrieved the entire article, most of which is irrelevant to the specific question. This creates noise that can make it more likely for the LLM to get the answer wrong.
After this, you'll use an embedding model (in this case, OpenAI's text-embedding-3-small) to convert each chunk into a vector embedding. Then the embedding, the original text, and some metadata will be stored in a vector database. This example uses ChromaDB, a free open-source vector database that runs on your local machine.
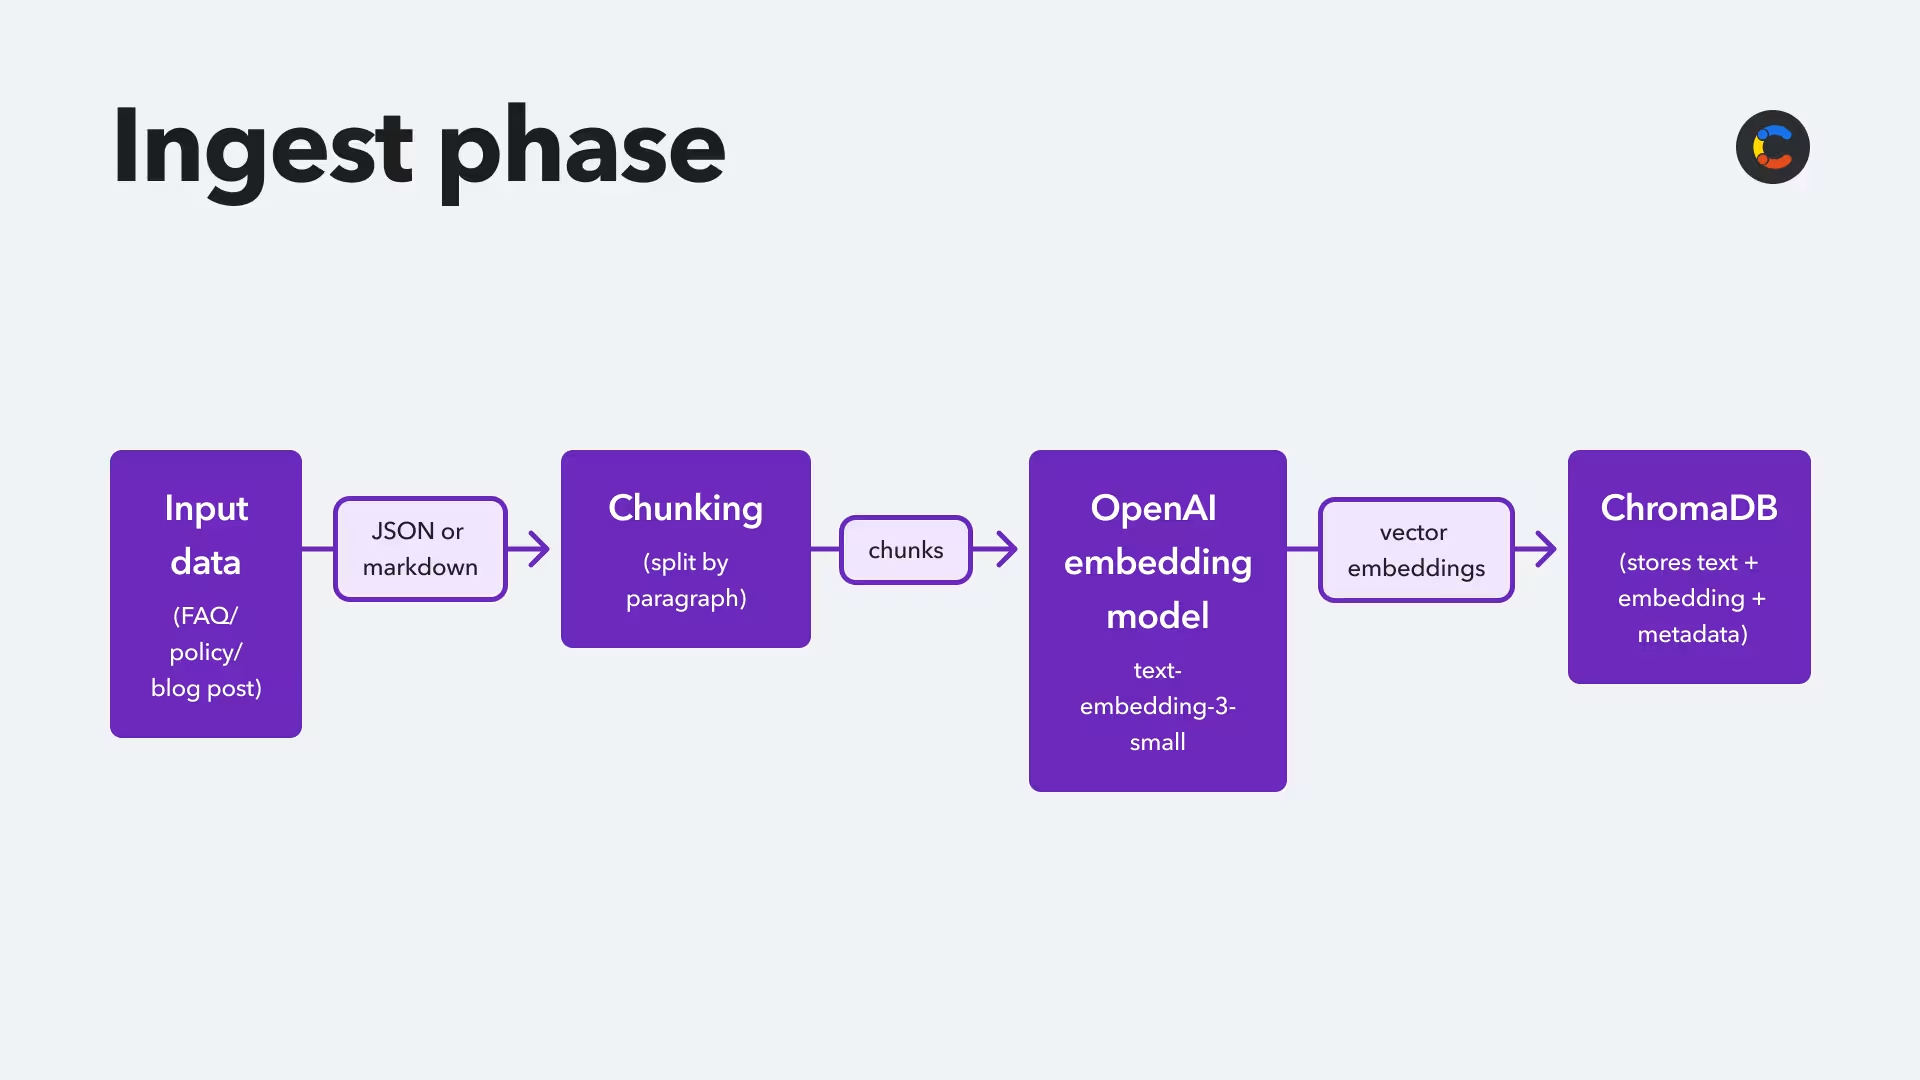
The RAG ingestion pipeline we're building.
A user can then query the RAG system. Within this, the same embedding model converts their question into a vector embedding, and ChromaDB is queried to find chunks of text with similar vector embeddings.
The RAG system uses an OpenAI LLM (gpt-4o-mini) for reasoning. The most relevant chunks from the ChromaDB query will be injected into the LLM prompt as context. The LLM will also have a system prompt that tells it what to do with the user question and how it should respond if there is no relevant info in the knowledge base.
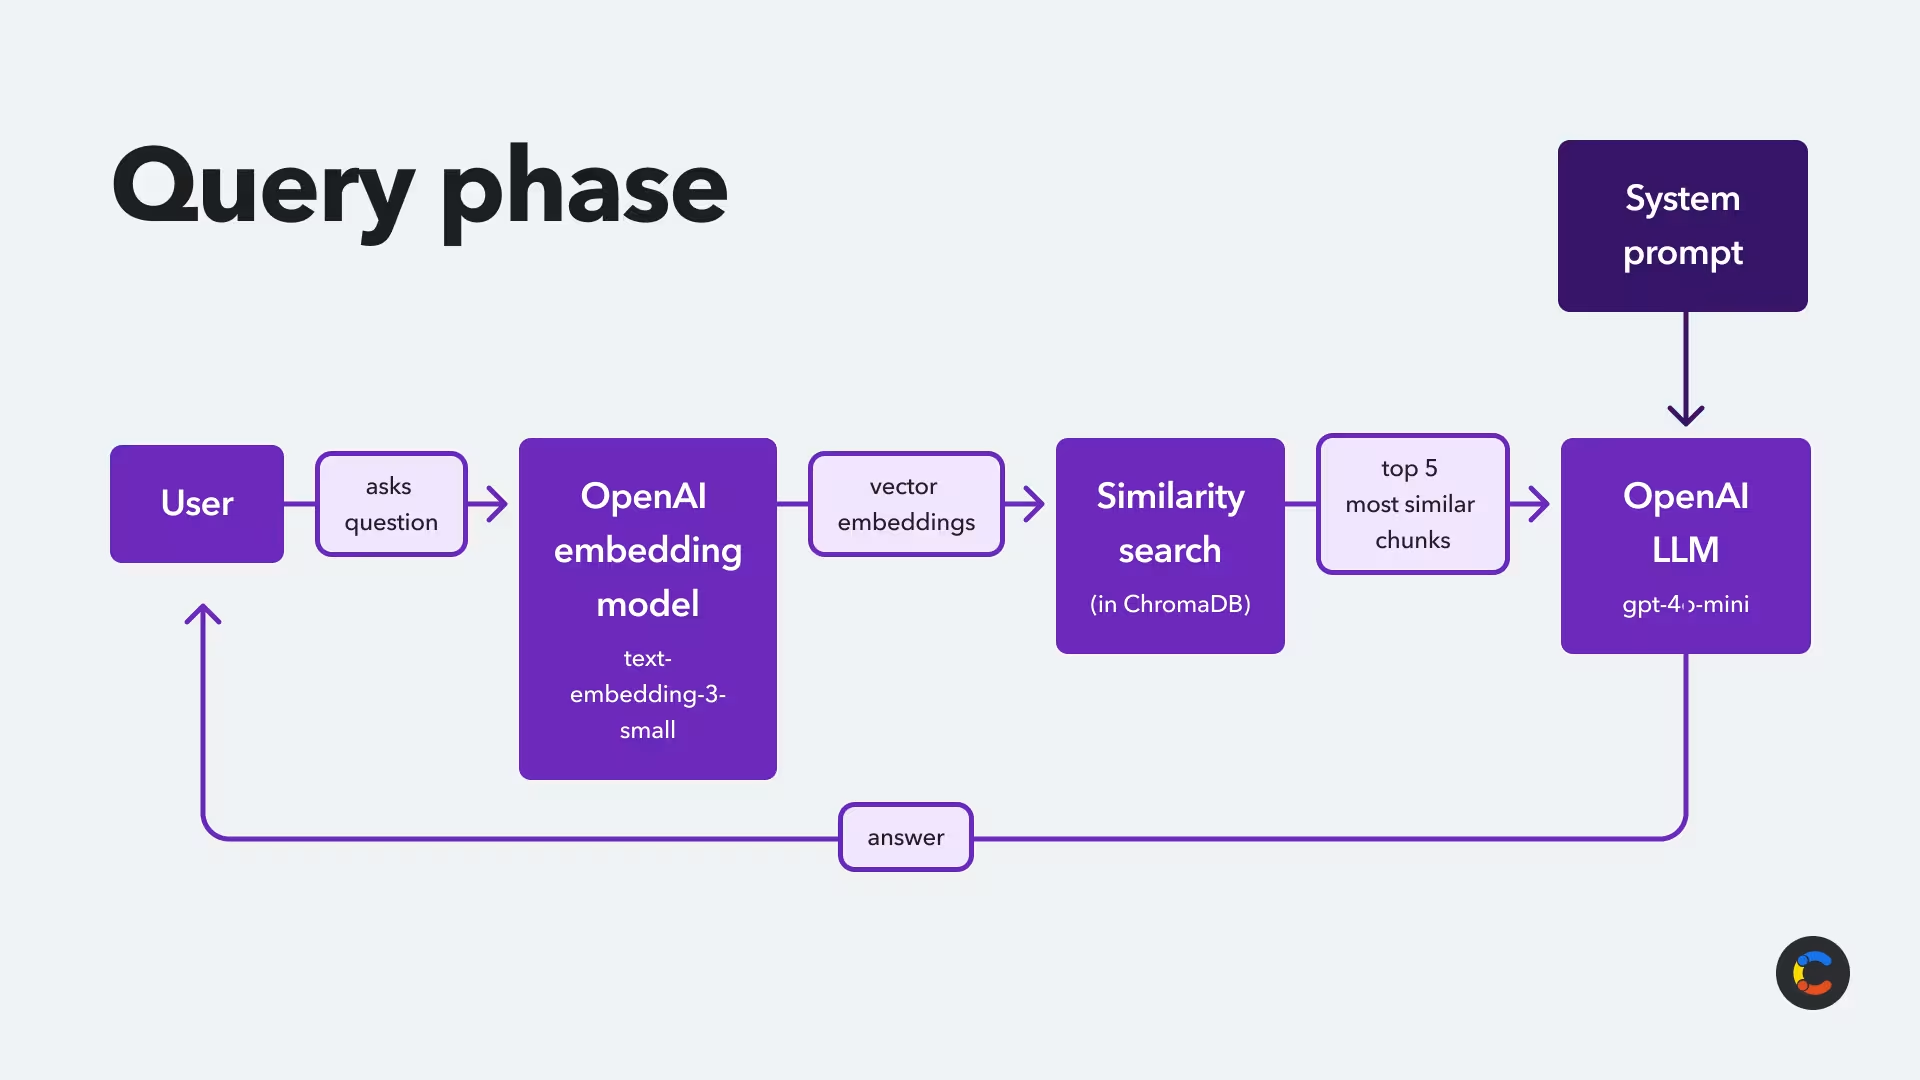
The RAG query pipeline.
The RAG tutorial
Start by forking our RAG tutorial repo, which contains the sample data for PC Emporium in the data directory. It also includes a requirements.txt and a .env.example to help you get started. This tutorial will be in Python, with an optional FastAPI front end.
If at any point you want to compare your code with a working repo, the full code solution for this exists on the ```completed branch of this repo.
There are a couple of setup steps before we dive in:
Create a
.envfile from.env.exampleand add your OpenAI API key.Create and activate a virtual environment with:
Install any needed dependencies (like
openaiandchromadb) withpip install -r requirements.txt.
Phase 1: Ingesting the data into the vector database
In the root of your repo, create ingest.py, where you will build up the logic needed to ingest all the sample data into your ChromaDB vector database. Let's start by testing out the OpenAI embedding model text-embedding-3-small so that you can see how it works. Copy the code below into ingest.py:
This code makes a call to the model and sends it a question, and the text is converted into an embedding. Then, the first five values of the embedding are printed to your terminal.
To test this, run python ingest.py, and you should see output similar to the following:
Next, add a helper function for chunking text, as the data must be chunked before it's ingested into the vector database. Add this function below get_embedding():
Then delete the if __name__ == "__main__" block and replace it with the following:
This will print out the number of chunks (three) and what each chunk is. The chunk_text function is using a simple paragraph-based chunking strategy. Paragraph-based chunking works well enough for the structured sample data here, and for the goal of this article, which is getting a RAG pipeline working end to end. Chunking is a big topic, though. It could easily fill an article on its own, and once you move toward production it tends to need more attention than a single simple strategy.
A note about chunking
Here's what you'll need to understand when you're ready to go further:
Poor chunking sets a limit on RAG quality that nothing downstream can improve. Retrieval can only return the chunks you created, and the model only ever sees what retrieval returns. If an answer gets split across two chunks, buried inside an oversized blob of unrelated text, or dropped by a length filter, then no better embedding model and no reranker can recover it.
When you do invest in chunking, a few decisions carry most of the weight. Getting the size of your chunks right matters most, and it's better measured in tokens than in paragraphs, since one paragraph might be two sentences and another might be fifteen — producing chunks of completely different sizes. Chunks that run too large produce muddy embeddings that match everything weakly, while chunks that are too small lack the context to be retrievable at all. A good rule of thumb is to aim for a few hundred tokens with a hard ceiling.
Another strategy that helps is overlapping your chunks. Carry a little text from the end of one chunk into the start of the next, so answers that span a boundary don't fall into the gap.
It can also be useful to split your chunks in a way that respects structure — breaking on headers first, then paragraphs, then sentences, and going finer only when a chunk runs past your size budget.
Finally, it also helps to prepend the document title and section heading to each chunk, so the retrieval system knows where it came from. This is easy to do and makes a real difference.
For messier data like meeting transcripts with inconsistent breaks, or dense legal documents, structural splitting isn't enough. That's where you'd reach for semantic chunking, which splits on meaning rather than structure — grouping sentences that belong together conceptually, regardless of where paragraph breaks happen to fall.
With that in mind, let's get back to building the pipeline.
Ingesting the data
Now it's time to ingest your data. To do this, create an instance of ChromaDB and create an area in it for the PC Emporium data. You can add this below the line where you set up your OpenAI client.
Next, add ingest_policies() below chunk_text(). The ingest_policies()function chunks the data, generates an embedding, then saves both in the ChromaDB, along with an ID and some metadata.
Finally, update the if __name__ == "__main__" function to test that it's working.
Now, run python ingest.py again. This should produce the following terminal output, which lists all the different policies as they're ingested and how much chunks each policy is:
Once the ingestion is complete, you should see that a chromadb/ directory has appeared in the root of your repo. At this point, it's worth mentioning that if you make a mistake during this tutorial and want to start with the fresh vector database, you can just delete this directory, and it will be recreated fresh when you next run python ingest.py.
The ingest_faqs() and ingest_blog_posts() functions work very similarly to ingest_policies(). The FAQs don't need chunking, as they're already quite short, so each FAQ is treated as one chunk. Add both these functions below ingest_policies():
Note: You need to import json for ingest_faqs() to work.
Now, update the ```__name__ == "__main__" function:
Before re-running ingest.py, delete the chromadb/ directory so that you don't end up with duplicate policies in there. Once you've run this, all the sample data will be in ChromaDB. This time, the terminal output should say that there are 162 chunks stored in ChromaDB.
If you're new to vector databases, you may want to sanity check that you can actually call the data inside ChromaDB. To do this, create a file called check_vectordb.py in the root of your project and add the following code:
Now run ```python check_vectordb.py. This runs a query on one particular chunk and prints out the first 300 characters of the chunk and the first 10 values of its vector embedding.
Phase 2: Querying (retrieval and generation)
Now that your data has been ingested into the vector database, it's time to focus on the parts that happen when a user queries the RAG: retrieval and generation.
Start by writing the retrieval mechanism. This consists of a retrieve() function, which takes a question, generates an embedding for that question, and then queries ChromaDB to find the five top most similar results. This uses a similarity search algorithm under the hood. The top five results are returned with the full document text, the metadata, and a score of how similar the text is to the user's question. To make this work, create a file in the root of your project called query.py and add this code:
Now run python query.py to test the query mechanism. The terminal output should show some information about the top five most relevant results for the question, which in this case was "What is the returns policy?"
Now that you've retrieved the top five results, they're ready to be added to your OpenAI LLM's context so that it can reason across it.
Add these constants just below N_RESULTS = 5, which define the model you'll be using and the specific system prompt that helps it handle the RAG data.
Next, replace the __name__ == "__main__" function with a new version, plus two new functions:
This takes a user's input on the command line and passes their question to the ask() function. This then calls retrieve() to get the top five results, and then generate(). The generate() function adds the chunks to a context string and passes this to your OpenAI LLM, along with the SYSTEM_PROMPT that tells it what to do with the data. The LLM then generates a response which is output to the command line.
You can now test the full RAG code by running python query.py in your terminal. When prompted for a question, you can ask something specific like "Is the Ryzen 9 9950X CPU compatible with DDR4 RAM?" You'll then be able to see the five most relevant results it has found, followed by an actual answer to your question:
You’ll soon have the opportunity to evaluate this RAG and ask more questions of it. But first, there’s an option to add a basic, pre-built FastAPI web front end to your RAG.
Phase 3: (Optional) Add a web front end
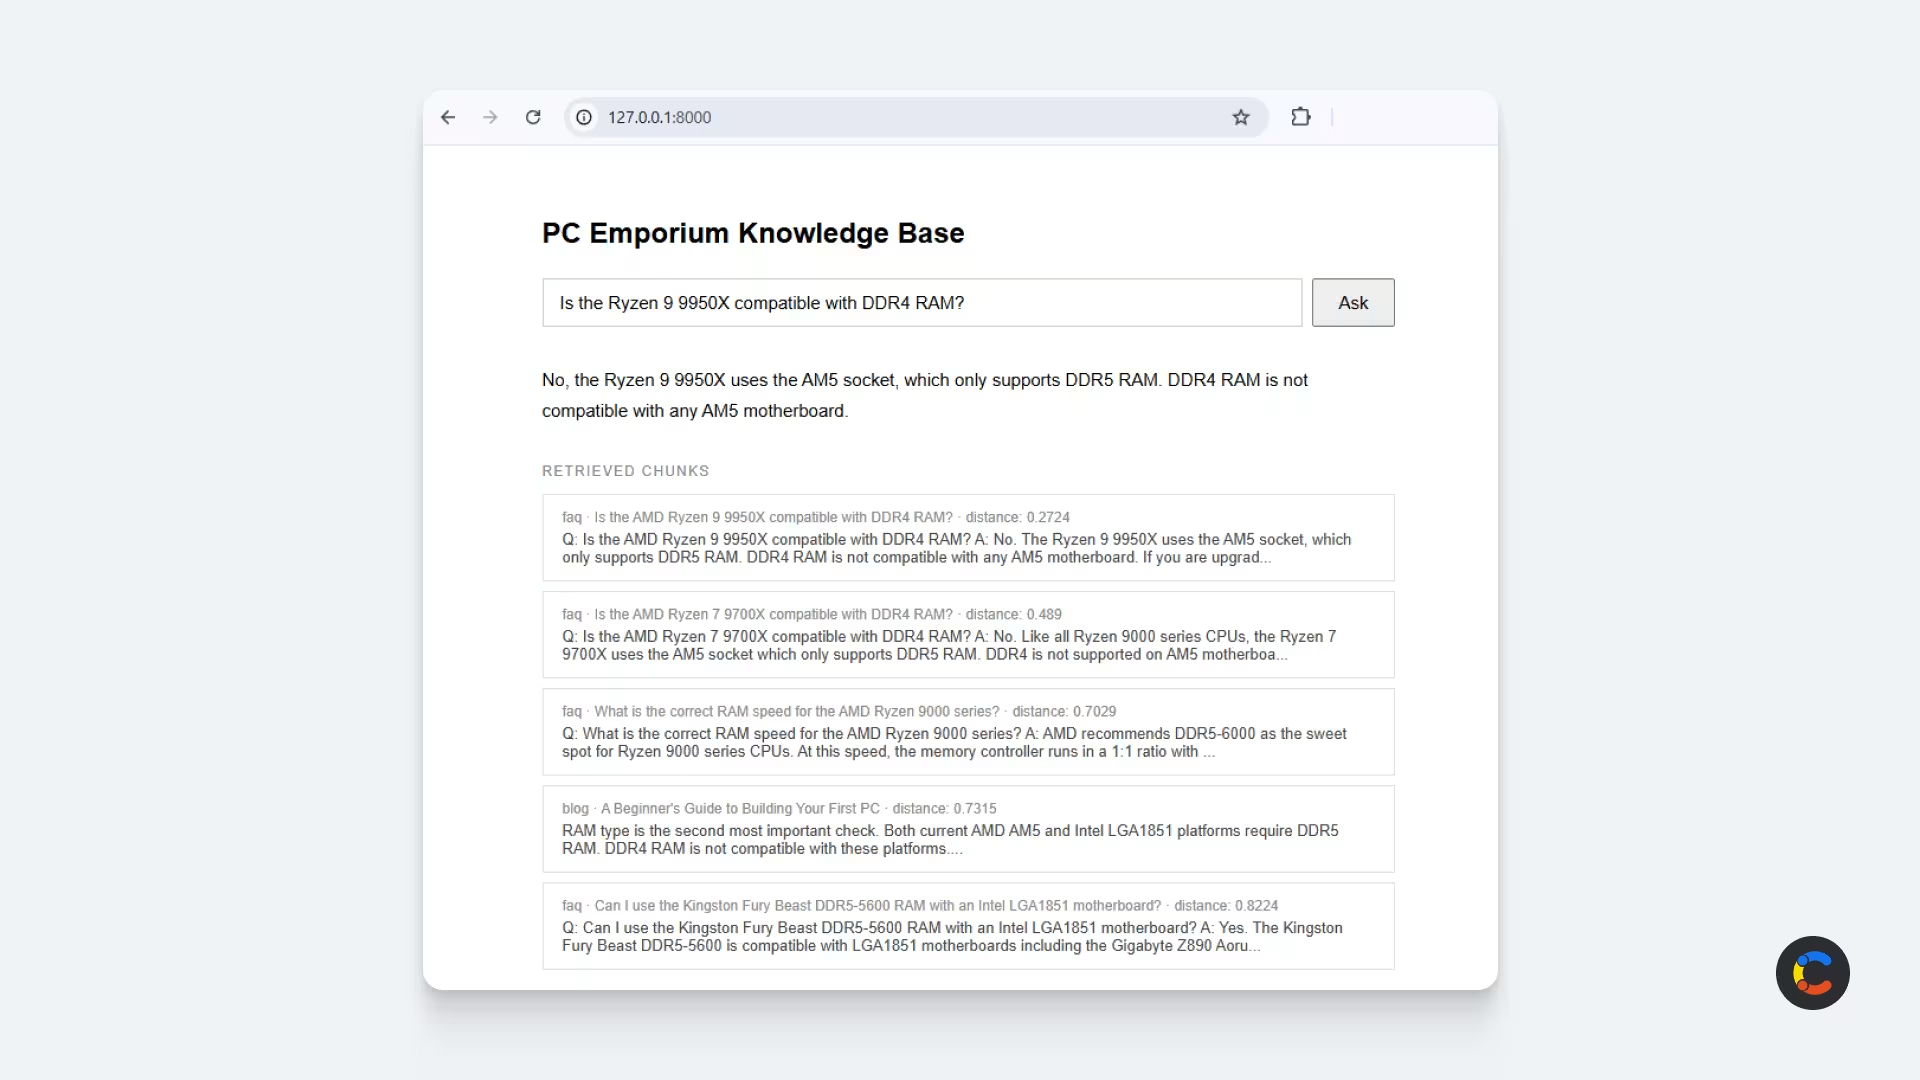
You now have a fully working RAG pipeline that runs from the command line. If you'd like to see this in use on a webpage, you can copy our sample app.py and index.html files to the root of your project, then run uvicorn app:app --reload and open http://127.0.0.1:8000 in your browser. This gives you a minimal FastAPI server to serve the same RAG pipeline on a web page.
Evaluating the success of your RAG
The RAG returns pretty good results for a lot of questions that it has data on, despite the fairly simplistic chunking strategy we used. For example, questions like these should all return accurate results:
"Is the Ryzen 9 9950X compatible with DDR4 RAM?"
"Which GPU is best for machine learning?"
“What is the warranty on a GPU?”
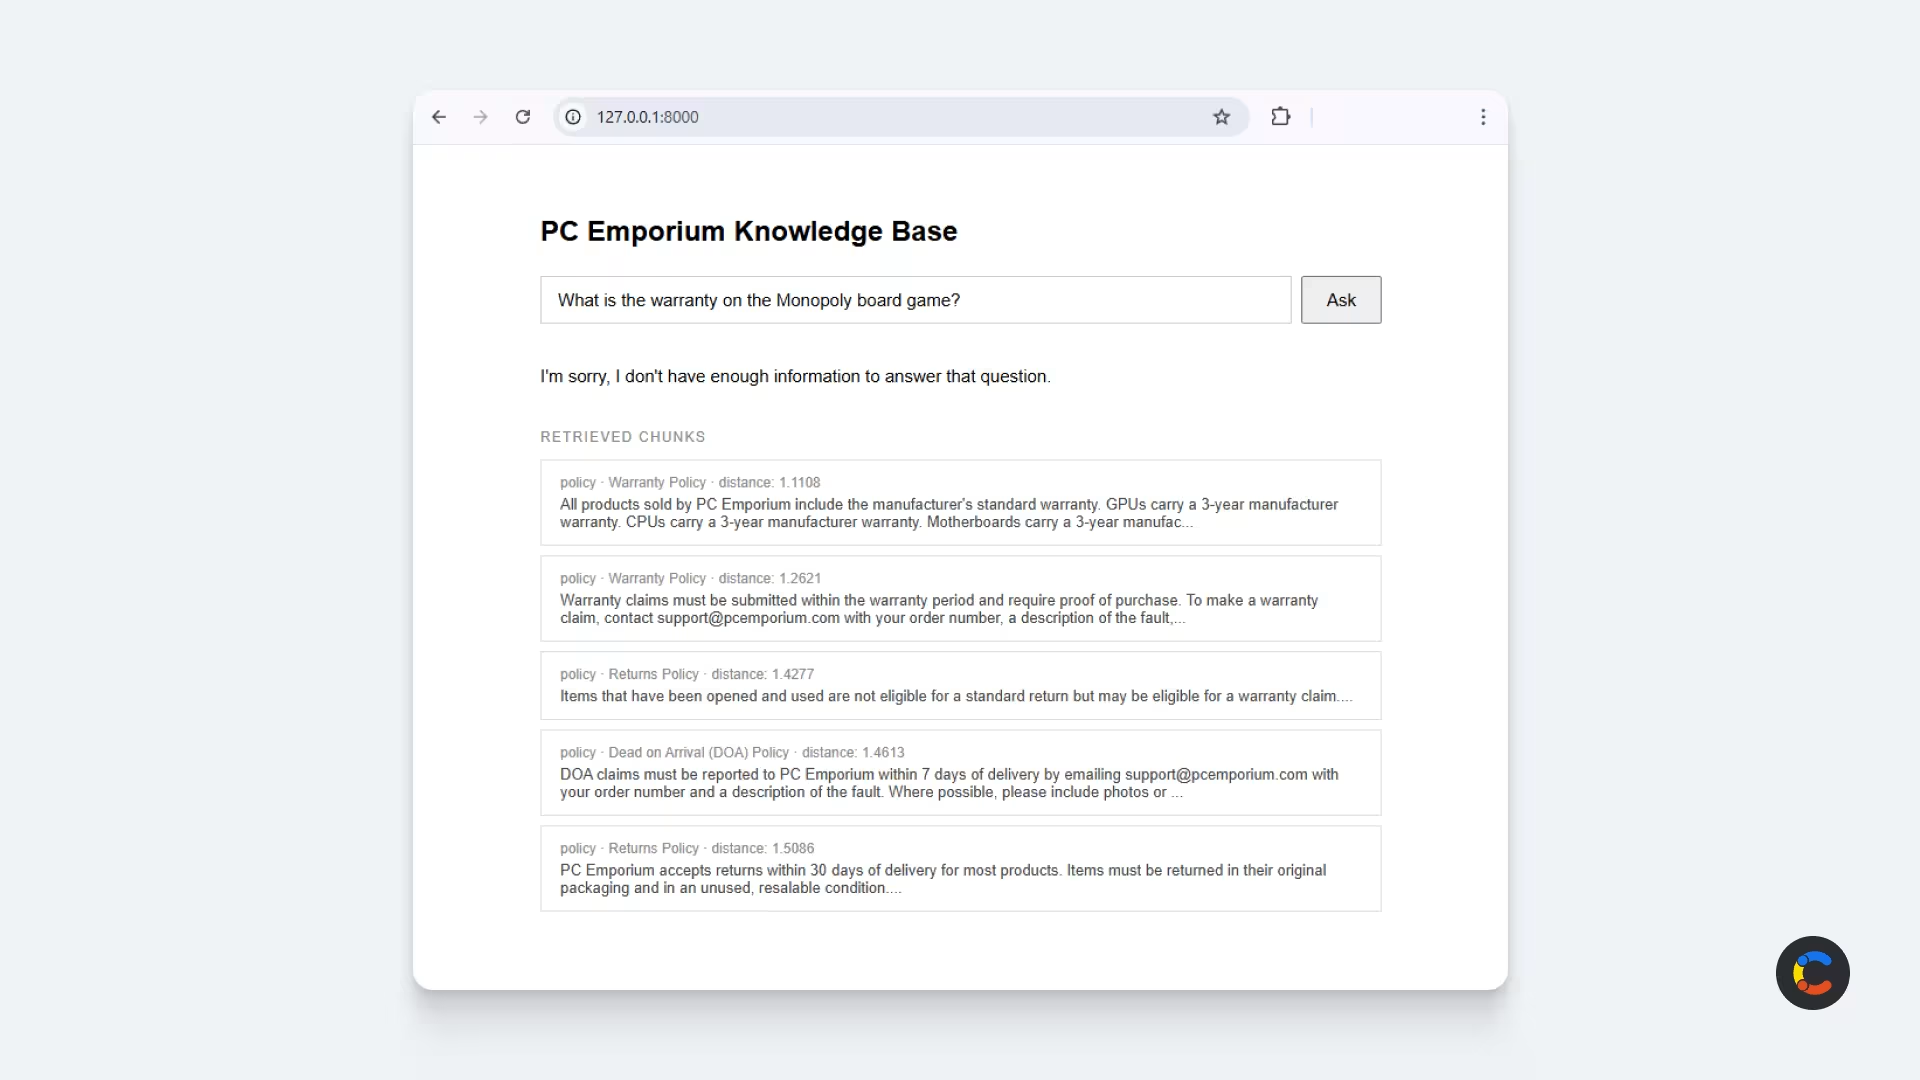
It also correctly answers that it doesn't know the answer if its knowledge base doesn't contain relevant information. For example, during our testing, the question "What is the warranty on the Monopoly board game?" returned "I'm sorry, I don't have enough information to answer that question.".
However, there are occasions where the RAG returns the wrong answer, and there are specific reasons for this. For example, it responds to the question "What is the returns policy?" with "PC Emporium accepts returns within 60 days of delivery for all orders placed between March 2021 and further notice…" This information is incorrect.
This happens because there are two different policy files: returns-policy-2021.md and returns-policy-2026.md. The 2021 policy was written during the COVID pandemic when it was harder for users to return items promptly, so the window was extended from 30 to 60 days. After lockdown, the standard 30-day window was reinstated.
Your RAG doesn't know which policy is the current one, so they're both treated as equally valid, with chunks from both existing in the top five results. In this case, one of the 2021 policy chunks scored slightly higher in the similarity search, so the LLM answer was based on this outdated version. This is a type of RAG hallucination.
The fix for this is to add a metadata field called status with active or deprecated options. This is just one example of how a RAG can return a wrong answer, and many of these cases can be solved by adding structure to your data.
How a headless CMS makes your RAG more reliable
Most documents ingested by RAGs, such as PDFs, text files, or scraped web pages, are completely unstructured. This means important metadata is often missed, causing RAGs to produce bad answers.
Storing your RAG data in a headless CMS like Contentful means you're starting from a better place. This could be because you're fully structuring your content as you add it to Contentful. But even if you're just uploading an unstructured PDF, you can still add some minimal structure to it by adding fields like status around it. Then you can update your RAG to pull in these extra fields into your RAG's metadata.
If your data was already intended to be content for your website, you get the added bonus with Contentful that your website content can now be updated by non-technical staff, freeing up engineers' time to work on more enjoyable tasks.
Next steps with your RAG
Now that you have a working RAG pipeline, here are some things you might want to look at next.
Use a framework: This tutorial avoided frameworks to help make the fundamental steps clear. But now that you understand this, you may want to use a framework like Langchain or LlamaIndex to abstract away some of the embedding and retrieval work. Frameworks also provide built-in evaluation and observability tools.
Switch to a production database: ChromaDB works great for local development, but it doesn't scale well. You may want to consider a hosted version that scales well such as Pinecone or Weaviate.
Incremental ingestion: You need to keep your knowledge base source data in sync with your vector database, whether you're storing your data in a structured CMS like Contentful or somewhere more basic like a shared drive. Right now, if a new blog post is added or a policy document is updated, you need to re-run ```python ingest.py. Once you're working in production, you'll want this to happen automatically. You can do this either in real time, by triggering ingestion with a webhook, or on a schedule.
Use a reranker: The vector database's similarity search sometimes fails to return the most relevant results. A strategy to deal with this is to fetch more results than you need (for example, 20 if you only need the top five), then use a more accurate relevance model to re-score them according to relevance and then pass the new top five to the LLM.
Use your RAG in an agentic architecture: This is where multiple AI agents work together to reach a complex goal, and a RAG can be part of this.

Inspiration for your inbox
Subscribe and stay up-to-date on best practices for delivering modern digital experiences.
Meet the authors

Casey is a Senior Solutions Engineer at Contentful, where he spends his days helping customers rethink what’s possible with composable architecture and AI. He believes the best way to learn something is to build it, which explains the ever-growing list of side projects, prototypes, and 100 browser tabs.
Related articles
Start a React app with Tailwind CSS in under 5 minutes
October 25, 2024
Headless CMS migration: A how-to guide
October 13, 2026
How to generate types with cf-content-types-generator
March 25, 2026

Ready to start building?
Put everything you learned into action. Create and publish your content with Contentful — no credit card required.