Quick start guide
This quick start guide walks you through setting up and integrating Contentful Personalization. The exact setup procedure for each step varies based on your front-end framework, and the mechanism by which you retrieve content, so each step will reference further documentation.
Introduction
Installing Contentful Personalization into an application requires a few essential steps. These steps require modifying both your content model and application. We strongly recommend you create a development instance of both and perform these steps there.
- Create a Contentful account.
- Install and configure Contentful Personalization.
- Extend your application with Contentful Personalization SDKs.
- Configure Insights and/or other Analytics.
- Publish an Audience and Experience.
Step 1: Create a Contentful account
To create a Contentful account:
- Open the sign-up form.
- Enter the required details to set up your account.
- Select the CAPTCHA check box.
- Click Sign up. Your account is created.
Step 2: Install and configure Contentful Personalization.
To install and configure Contentful Personalization:
- Log in to the Contentful web app.
- Click Apps, and select Marketplace.
- Search for Contentful Personalization, and click on its name. The “App details” page is displayed.
- Click Install. The “Manage app access” modal is displayed.
- Select the environment in which you want to install the app.
- Click Authorize access. The Contentful Personalization configuration page is displayed with an overview of the upcoming steps required to correctly configure the app.
- Click Install. The app is successfully installed and the configuration page is displayed.
- Select the data bucket you want to connect to: Main or Development. For more information about data buckets, see the Data buckets page in the Help Center.
- On the "Personalizable content types" tab, select the content types you want to extend with Contentful Personalization. Each content type you select will include an additional field for personalization.
- Click Save.
Step 3: Extend your application with Contentful Personalization SDKs
Contentful Personalization integrates in your application using our SDKs. Contentful Personalization SDKs are responsible for storing a profile that represents the state of a user and communicating with the Experience API using events to update it. The SDKs also provide methods and components so you can declaratively render the correct experience content according to the current profile.
This installation process can be broken down into several steps, as follows:
a. Install packages
You have to install at least two dependencies in your project:
- An SDK for your library or framework.
- A utils package responsible for mapping content source data to a format consumable by SDK components.
For more information of what dependencies to install, see the Installation and Utility Libraries docs.
b. Create a Contentful Personalization instance
A Contentful Personalization instance holds the profile, provides callable events, updates the profile in response to called events, and provided several configuration options. You'll need to instantiate one using the API key assigned to you on account creation and the Contentful Personalization environment in which your content source was created.
The API key is the Client ID field value displayed under the "SDK Keys" section, on the Optimization tab.
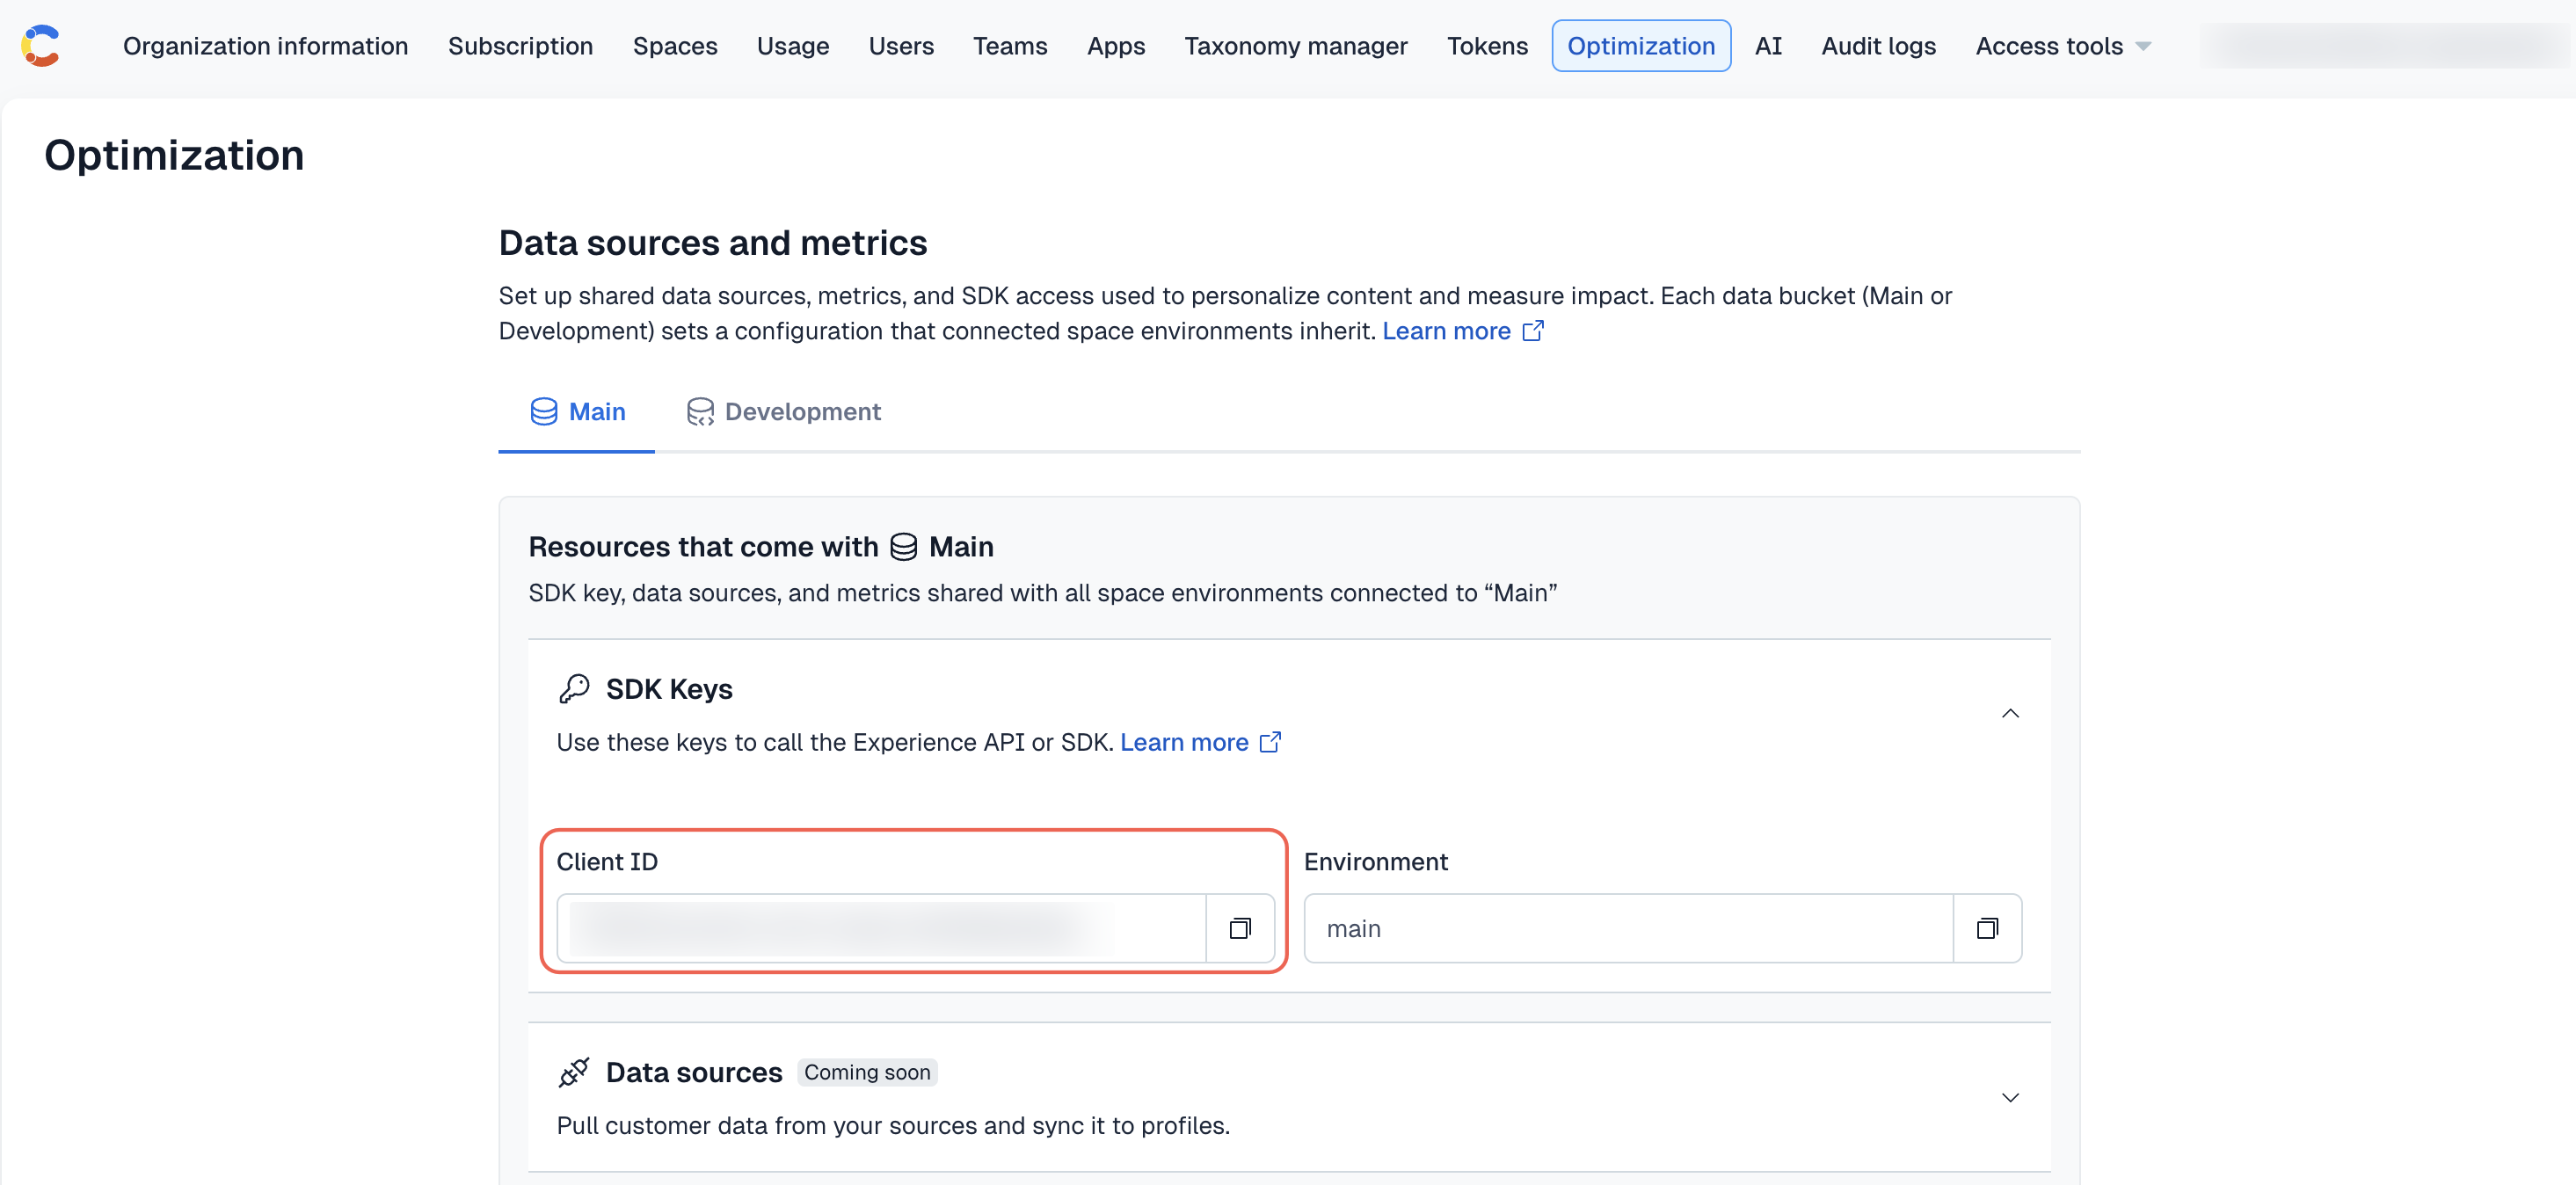
Your environment will be either main or development.
If you're using the JavaScript SDK, you have to ensure the rest of your application can access your created instance. Our React, Next.js, and Gatsby SDKs do this through a React context provider.
For more information about the steps specific to your front-end, see Create an instance.
c. Create and update profiles with events
Profiles are objects that indicate the Ninetailed Audiences to which they belong. They are created and updated via page , track , and identify events sent to the Contentful Personalization Experience API from your web application or connected data source.
Your application should call page on every route change so that it receives a profile from the Experience API on first page visit and so content authors can use most Ninetailed Audience rules right away.
Adding the Next.js <NinetailedProvider> in a Next.js Pages router project or the Contentful Personalization Gatsby Plugin in a Gatsby project, automatically hooks into the routers of those frameworks to call page for you on each route change. For all other implementations, consider how to call page on each route change within your chosen library or framework's routing solution. At the bare minimum, your application should call page, track, or identify at least once, typically on first page load, to receive a profile.
For more information, see Send events and Audience rules.
d. Render Experiences
React-based Contentful Personalization SDKs provide an <Experience /> component that wraps the React component you want to use to render out the selected content variant. It ingests formatted content from your connected content source to determine what Ninetailed Experience and variant to render.
The <Experience> component requires your content source data to be mapped to a specific format. You have to use a Contentful Personalization Utility library to ensure that your content source Experience data is mapped correctly.
For more information, see Render Experiences.
Step 4: Configure Insights and/or other Analytics
Contentful Personalization displays analytics of your Audiences, the content entries your Audiences have seen, and the performance of your Experiences inside of the CMS. These are Audience Insights, Component Insights, and Experience Insights, respectively.
Audience Insights are automatically populated after publishing an Audience. Component and Experience Insights require installing the Insights Plugin, which sends impression events of Experiences to Contentful Personalization. You also have to send at least one track event to log a conversion event you're interested in for Experience Insights to provide meaningful data.
Additionally, you can send Experience impression events to destinations like Google Tag Manager and Segment with Contentful Personalization plugins. In combination with your existing conversion event data in your systems, you can get started with analysis of experiments immediately using tools you're already familiar with.
Step 5: Publish an Audience and Experience
Now that a connection is established and your codebase can support rendering experiences, it's time to create content. The segments (Ninetailed Audiences), experiments and personalizations (Ninetailed Experiences), and variations of content are all content entries that you create in your content source.
Your content entry structure will look like this:
- Your baseline content entry will be a entry using one of your existing content types.
- It will reference a list of Ninetailed Experience entries.
- Each Ninetailed Experience will reference a Ninetailed Audience, indicating to whom to show the Experience, and a list of a components that will show different content when the Experience is active.
- Each component will show the baseline and variant content.
- Variants are simply content entries within your content source based on your existing content types.
For a step-by-step guide, watch the following video.
Next steps
This guide suggested extending one content type with Contentful Personalization. You can extend additional content types so they can also be personalized or experimented with.
Plugins are useful for extending the capabilities of Contentful Personalization. Many Contentful Personalization users choose to instrument the Preview Plugin to allow their content authors to preview Experiences before they are published. The Preview Plugin also integrates with CMS live preview product features for powerful auditing workflows.
