Set up Audit logs
Overview
Audit logs allow customers to track and view all the changes made in their organization. They provide visibility and are useful for investigating an incident or getting a detailed report on relevant events (such as changes to roles and permissions, users invited, spaces deleted, etc.).
The audit logs feature securely transfers this information to your own storage (an AWS S3 bucket or Azure Blob Store), ensuring that you have a clear and accessible history of actions for monitoring and analysis purposes.
Audit log delivery
Audit logs are shipped to your AWS S3 bucket, Azure Blob Store or Google Cloud bucket. Maintaining audit logs in your own storage gives you full control over how long they’re kept and how they’re managed. This setup helps you meet your organization’s retention needs and offers the following benefits:
- Consistency: This way you can apply the same rules and policies to this as you do for other similar data. You can control who has access to it.
- Data retention: This enables you to store it for as long as you need to maintain compliance for your company.
- Data analysis: It allows you to serve this data to the tools you already use for analysis.
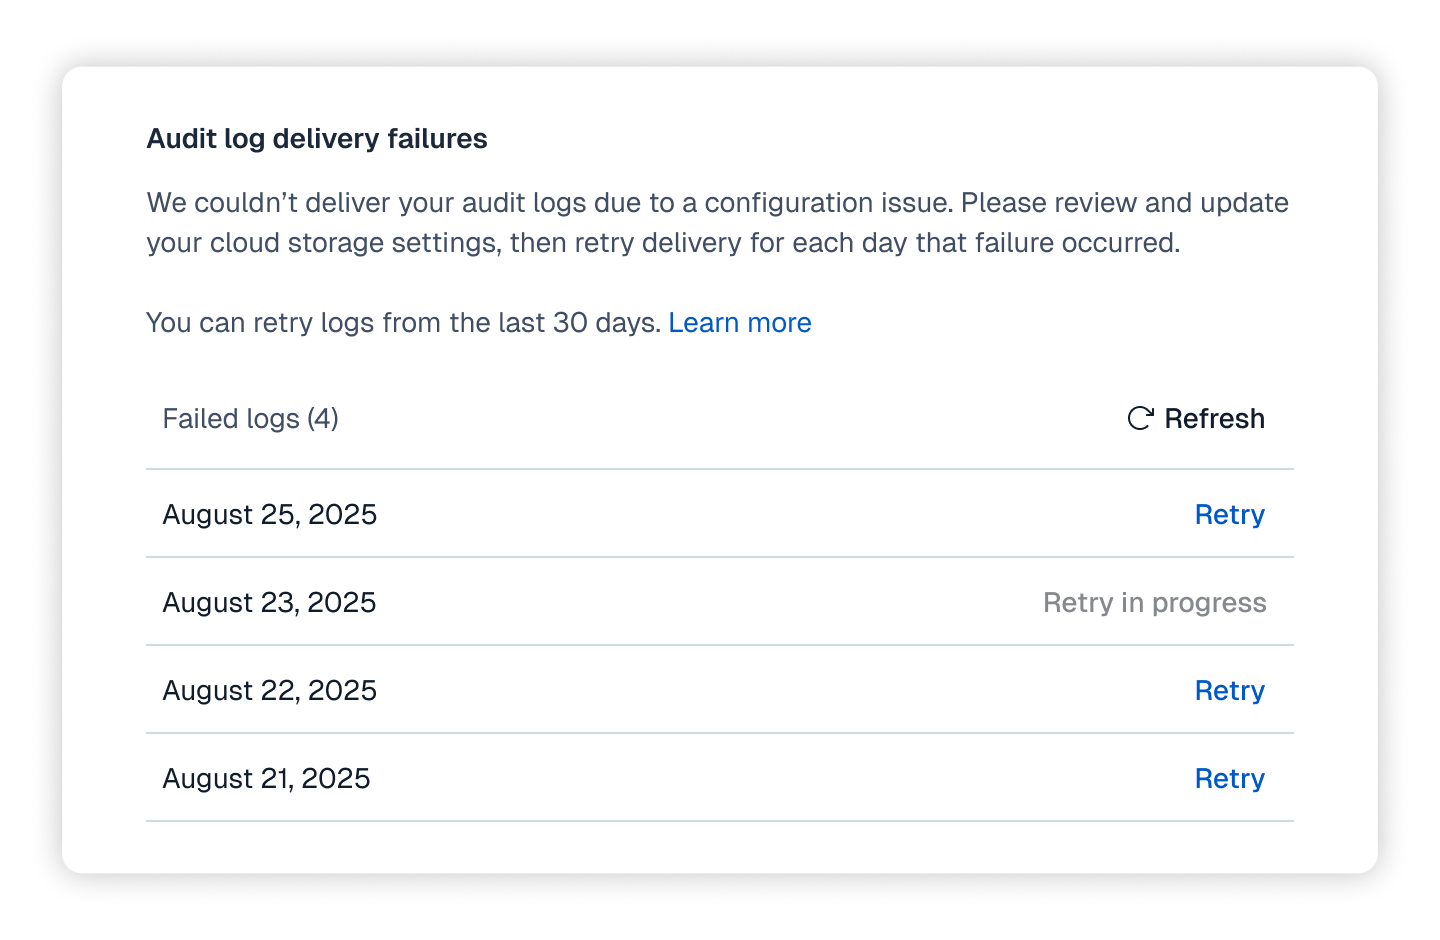
Audit log delivery failures
Audit log deliveries can fail when Contentful cannot deliver audit logs to your configured cloud storage provider. These issues occur entirely on the customer side and usually relate to authentication, permissions, or storage configuration.
Every time an audit log delivery failure occurs, an email notification is sent to the organization admins and owners, and a list of failed days is displayed on the “Audit logs” page of the Contentful web app.
Potential causes
Audit log delivery failures can occur for several reasons, including but not limited to the following:
- Expired or invalid access credentials. For example, an expired SAS token or other authentication key that needs renewal.
- Insufficient permissions on your storage destination. For example, the used credentials don’t have write access for the specified bucket, container, or storage path.
- Cross-account or trust-relationship configuration errors. For example, access policies or trust relationships between accounts or services are misconfigured, preventing write access.
- Transient cloud service issues. Occasionally, cloud providers may return temporary errors even if your configuration is correct. If you suspect this, retry the delivery with your existing configuration.
How to resolve delivery failures
To resolve delivery failures:
- Review your cloud storage configuration in your provider’s console (AWS S3 bucket, Azure Blob Store or Google Cloud).
- Check that your credentials are valid and have write access to the configured destination.
- Update any expired tokens or incorrect policy settings.
- Return to the “Audit logs” page in the organization settings of the Contentful web app and retry delivery for each failed day.
Events captured by the audit log
Audit logs capture all changes made through the Content Management API, focusing on actions and modifications across the entire Contentful organization. This includes any content that has been recently created, updates, deletions, and configuration adjustments performed by users or apps interacting with the CMA.
Audit log file naming convention
Each audit log file received by customers follows a standardized naming format to provide essential details at a glance. The file name structure is as follows:
contentful-audit-{organization_id}-{datetime}.json
Components of the file name
contentful-audit: Prefix indicating the file type as an audit log.{organization_id}: Unique identifier for the organization. This ensures the file is specific to your Contentful organization.{datetime}: Each log file is given a name containing a data-time timestamp in the ISO variationYYYYMMDDTHHMMSSsssZformat. It usually represents the export date-time but it also serves as an identifier indicating the file contains the audit log data for the previous day (not including the date in filename). Given the current per day audit data delivery frequency, this file name convention should make it easy to infer the contents of the file..json: File extension, indicating the file format as JSON.
Example file name
contentful-audit-7BLDDu2FYCNoN4QIWys1BR-20251009T040839978Z.json
In this example:
7BLDDu2FYCNoN4QIWys1BRis the organization ID.20251009T040839978Zis the export{datetime}timestamp, also serving as an identifier for the file data content, the data covered is for the previous day (in this case, 8th of October 2025).
Data retention period
Contentful sends daily audit log files to the customer’s configured storage location (e.g., S3 bucket or Azure Blob storage). This ensures that customers always have access to a daily record of audit logs in their own storage environment. In their own storage, customers have full control over how long they want to retain the data.
If a customer needs to recover logs due to an issue, Contentful can re-send audit log files for actions that occurred within the past 30 days.
Static IP addresses for audit logs
Contentful uses static IP addresses to deliver audit logs, ensuring consistent and secure communication with your systems. You can use these IPs to configure allowlists or firewall rules for uninterrupted log delivery.
If your organization requires IP allowlisting, you can configure your firewall or network settings to include the following static IP addresses used by Contentful for audit log delivery. The addresses vary by data residency region.
Default data residency Static IP addresses
EU data residency Static IP addresses
For organizations with EU data residency, audit logs are delivered from the following IP addresses:
Event details
Audit event logs adhere to the OCSF standard. Currently all logs are logged under the Application Activity category and more specifically the Web Resource Activity sub-category. This enables seamless integrations and will be the stable schema from now on, meaning these logs are safe to use in integrations. An example of an audit log when an entry is updated can be found below.
How to read an audit log
Since audit logs abide by the OCSF standards some common parameters will always be the same. However, some properties have specific nuances due to being generated from the Contentful platform. The following guide will explain what each piece of the audit logs means and how to read it.
Activity
The properties prefixed with activity describe the type of event that occurred, and whether a resource (e.g. a space, environment, or locales) was updated, created, or deleted. Below is a table mapping the IDs to their names as well as their descriptions.
Category
The category properties refer to the OCSF categories and subcategories under which a specific log falls. As stated earlier at this moment all audit logs fall under the Application Activity category and more specifically the Web Resource Activity sub-category this may expand in the future but for now integrations can be built around this type of log specifically. Below is a description for each property that is relevant to the category in this log.
Actor details
The actor object provides metadata about the entity that performed the action captured in the audit log event. This can be either a user or an app. The structure follows the Open Cybersecurity Schema Framework (OCSF) for actor and user objects.
Included fields:
user.email_addr: The user’s email address. Only present if actor type is “User”.user.full_name: The user’s full name. Only present if actor type is “User”.user.type: Type of actor (“User”, “App”).user.type_id: Numeric ID representing the actor type. This follows the OCSF standard.user.uid: Unique identifier of the actor.
Note: actor.type and actor.id are top-level fields currently present in the actor object. They are being deprecated in favor of the nested user structure, which aligns with the Open Cybersecurity Schema Framework (OCSF). Please migrate to using user.type and user.uid.
Example:
Severity
As quoted in the OCSF documentation the severity_id is “The normalized severity is a measurement of the effort and expense required to manage and resolve an event or incident. Smaller numerical values represent lower impact events, and larger numerical values represent higher impact events.” Below is a table mapping each ID to its description.
0 severity as we look to gather feedback and overtime identify the estimated severity of each request.HTTP Request
The http_request object describes the original HTTP request that resulted in the log, the below table provides further details on what each property means.
HTTP Response
This http_response object contains the code referring to the HTTP Response code that the query resulted allowing for it to be established if the request was successful or not.
Enrichments
The enrichments property provides an array of objects that enrich other properties in the logs. More details can be found in the OCSF docs. Given the example log above each property would mean the following:
Web Resources
The web_resources property contains an array of entities that were affected by this request these can be environments, locales, content types or entries, etc. The properties of the objects contained in the array are as described below:
Metadata
The metadata property contains miscellaneous data that doesn’t fit well in the rest of the log but may still be useful. At this moment only two properties can be found in this object and the below table describes them.
Requirements
AWS or Azure account: An active AWS or Azure account is necessary.
Stopping the audit logs delivery
To stop the delivery of the audit logs, please contact our support
Audit logs set up
To set up your infrastructure to receive Audit Logs, you will need to make some configuration changes and share some information with Contentful.
Security of your configuration and credentials
Credentials provided for audit log delivery (such as AWS IAM Role ARN, Azure SAS tokens, or Google Cloud service account keys) are encrypted both in transit and at rest.
Access to decrypt and use these credentials is strictly scoped to systems responsible for delivering audit logs, following Contentful’s internal security controls and standard access management practices. These controls align with industry expectations for cloud-native infrastructure and enterprise-grade data handling.
Audit logs Google Cloud Storage configuration
To set up streaming to Google Cloud storage, create a service account in Google Cloud with the appropriate credentials and permissions, then configure audit log streaming in Contentful using the service account’s credentials for authentication.
Prerequisites
- A Google Cloud project with permissions to create and manage service accounts and storage buckets.
- Google Cloud Storage API enabled in your project.
Step 1: Create a GCS bucket
You can create a new GCS bucket to hold the logs, or you can use an existing bucket. Be sure to note the name of the bucket as you will need it later. To learn how to create a GCS bucket, refer to Google’s guide on creating a bucket.
Step 2: Create a service account
Google Cloud Storage (GCS) uses service accounts for third-party application authentication and role-based access to Google Cloud resources. To create a new service account, follow the instructions in the Google Cloud documentation.
Step 3: Create a JSON key
Create a JSON key for the service account, and store the key securely. See Creating and managing service account keys in the Google Cloud documentation.
Step 4: Assign the Storage Object Creator role
Give the service account the Storage Object Creator role for the bucket. See Using Cloud IAM permissions in the Google Cloud documentation.
- Go to Cloud Storage > Buckets and select the bucket you created in Step 1.
- Navigate to the “Permissions” tab, click Grant access.
- In the “Add principals” section, add the service account’s email (e.g.,
contentful-audit-logs@your-project.iam.gserviceaccount.com). - Under “Assign roles,” select the role: Cloud Storage > Storage Object User.
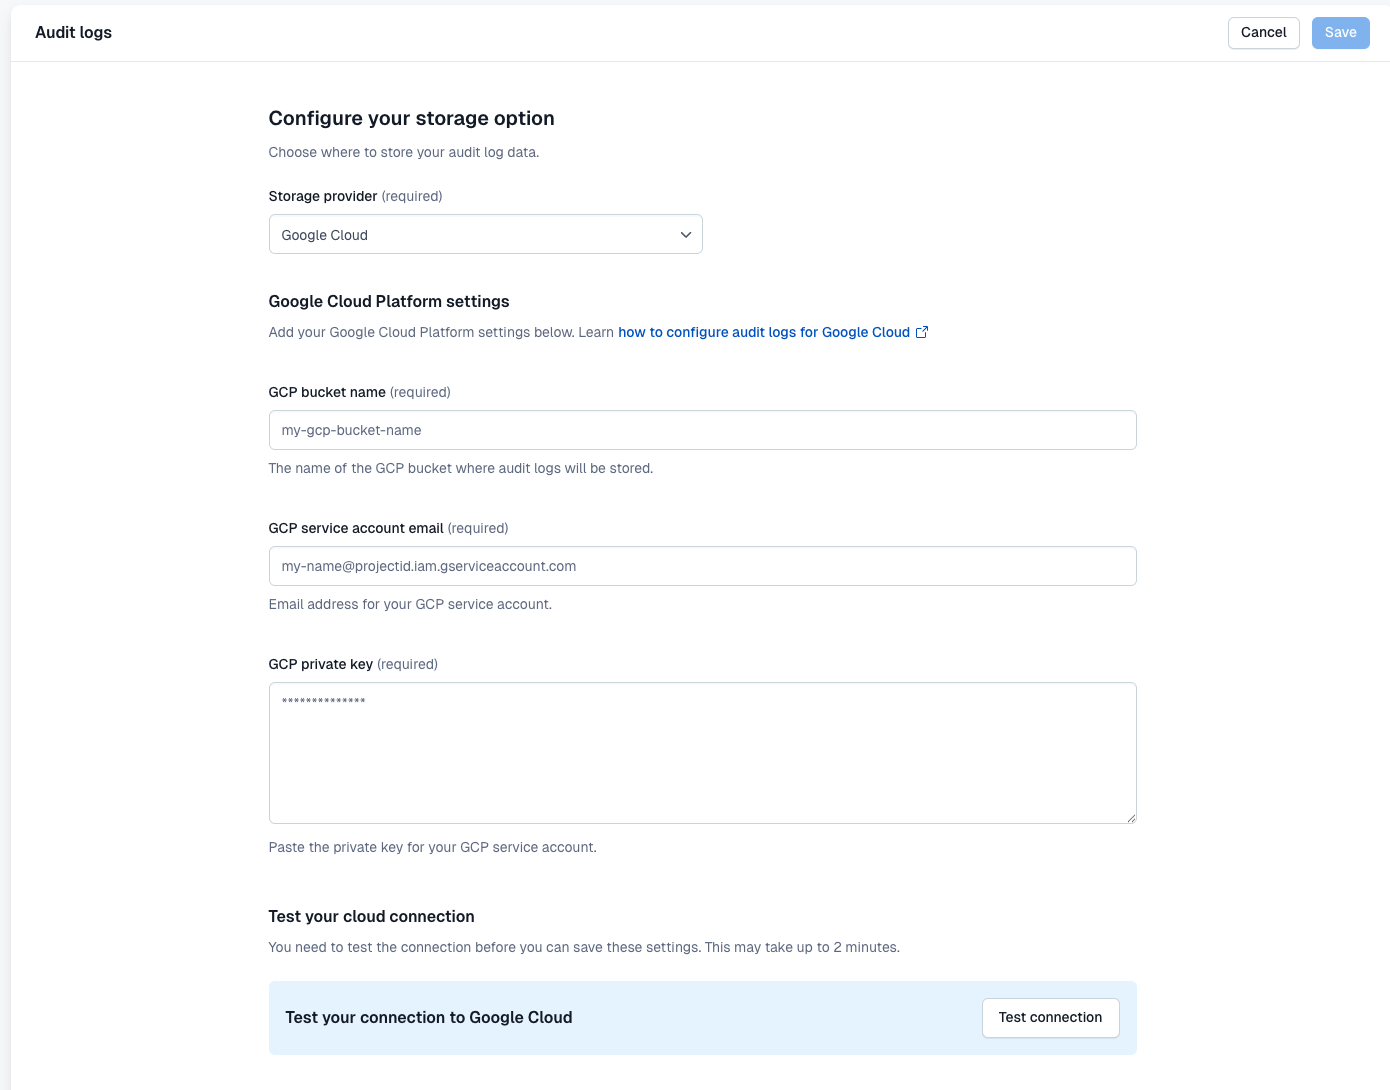
Step 5: Configure Google Cloud Storage in Contentful
NOTE: Only organization owners and admins can configure storage settings.
- In Contentful, go to “Organization settings > Audit logs”.
- Select Google Cloud as your storage provider.
- Fill out the form with the following:
- Google Cloud bucket name: name of the bucket you created.
- GCP email: the service account’s email address.
- GCP private key: the private key from your downloaded JSON key file.
- Click Test connection to verify access. Contentful will upload a test file to your bucket.
- If test is successful, click Save to complete the configuration.
If the test is unsuccessful, check if:
- The service account has the Storage Object User role.
- The bucket name is correct.
- The private key is valid and corresponds to the correct service account.
Audit logs AWS Configuration
As part of enabling audit log shipping to your AWS S3 bucket, you need to create an AWS IAM role that Contentful can assume. This will allow Contentful to securely transfer audit logs to your AWS S3 bucket without the need to store any credentials.
Security of IAM role assumption
Contentful uses AWS IAM role assumption to securely deliver audit logs to your specified S3 bucket. This approach follows AWS’s recommended best practices for granting third-party access to your resources. With IAM role assumption:
- No credentials are shared: Contentful does not require or store your AWS credentials. Instead, a secure trust relationship is established through the IAM role.
- Explicit permissions: You maintain full control by explicitly defining which actions Contentful can perform (e.g.,
s3:PutObject) and on which resources (e.g., specific S3 buckets). - Control over the trust policy: The trust policy for the IAM role allows access only to Contentful’s AWS account and requires an external ID for added security.
- Industry standard: Role assumption is widely adopted by leading SaaS platforms, ensuring a secure, scalable, and traceable approach.
For more details, refer to the AWS IAM documentation.
Prerequisites
- An AWS account with permissions to create IAM roles and edit S3 bucket policies.
- Contentful’s AWS account IDs:
- For US customers:
606137763417 - For EU data residency customers:
101997328120
- For US customers:
Step 1: Create an S3 Bucket
- Log in to your AWS Management Console.
- Navigate to S3, click Create bucket.
- Enter a unique bucket name and select the region where you want the bucket to reside. Note: you will need to enter this name later.
- Configure options as required (e.g., versioning, logging, tags, object lock).
- Review and create the bucket.
Step 2: Create a New IAM Policy
- Log in to your AWS Management Console.
- Navigate to IAM -> Policies -> Create policy.
- Select the JSON tab and paste the following policy, replacing
<Your-S3-Bucket-Name>with the name of your S3 bucket (from Step 1). Make sure to keep the/*at the end:
- Click Next, give it a meaningful name and description, and then click Create.
Step 3: Create a New IAM Role for Cross-Account Access
- In the IAM dashboard, go to Roles -> Create role.
- Select AWS Account under the “Trusted entity type” section, then in the section below select Another AWS account and enter Contentful’s AWS account ID:
- For US customers:
606137763417 - For EU data residency customers:
101997328120
- For US customers:
- Enable the option Require external ID and insert your Contentful organization ID. The primary function of the external ID is to address and prevent the confused deputy problem. You can find the organization ID in the Contentful web app.
- Click Next, skip attaching permissions policies now (we will attach the policy created in Step 2).
- Review, name the role, and then create it.
Step 4: Attach the Policy to the IAM Role
- Go to the newly created role in IAM -> Roles.
- Under “Permissions” in the Add permissions dropdown, click Attach policies.
- Find the policy you created in Step 2, select it, and then click Add permission.
Step 5: Configure Your S3 Bucket Policy
- Go to S3, find your bucket from Step 1, and then click Permissions.
- Edit the Bucket policy and add the following statement, replacing
<Your-IAM-Role-ARN>with the ARN of the IAM role you created in Step 3 and<Your-S3-Bucket-Name>with the name of your S3 bucket. Make sure to keep the/*at the end of the bucket ARN:
- Save the changes.
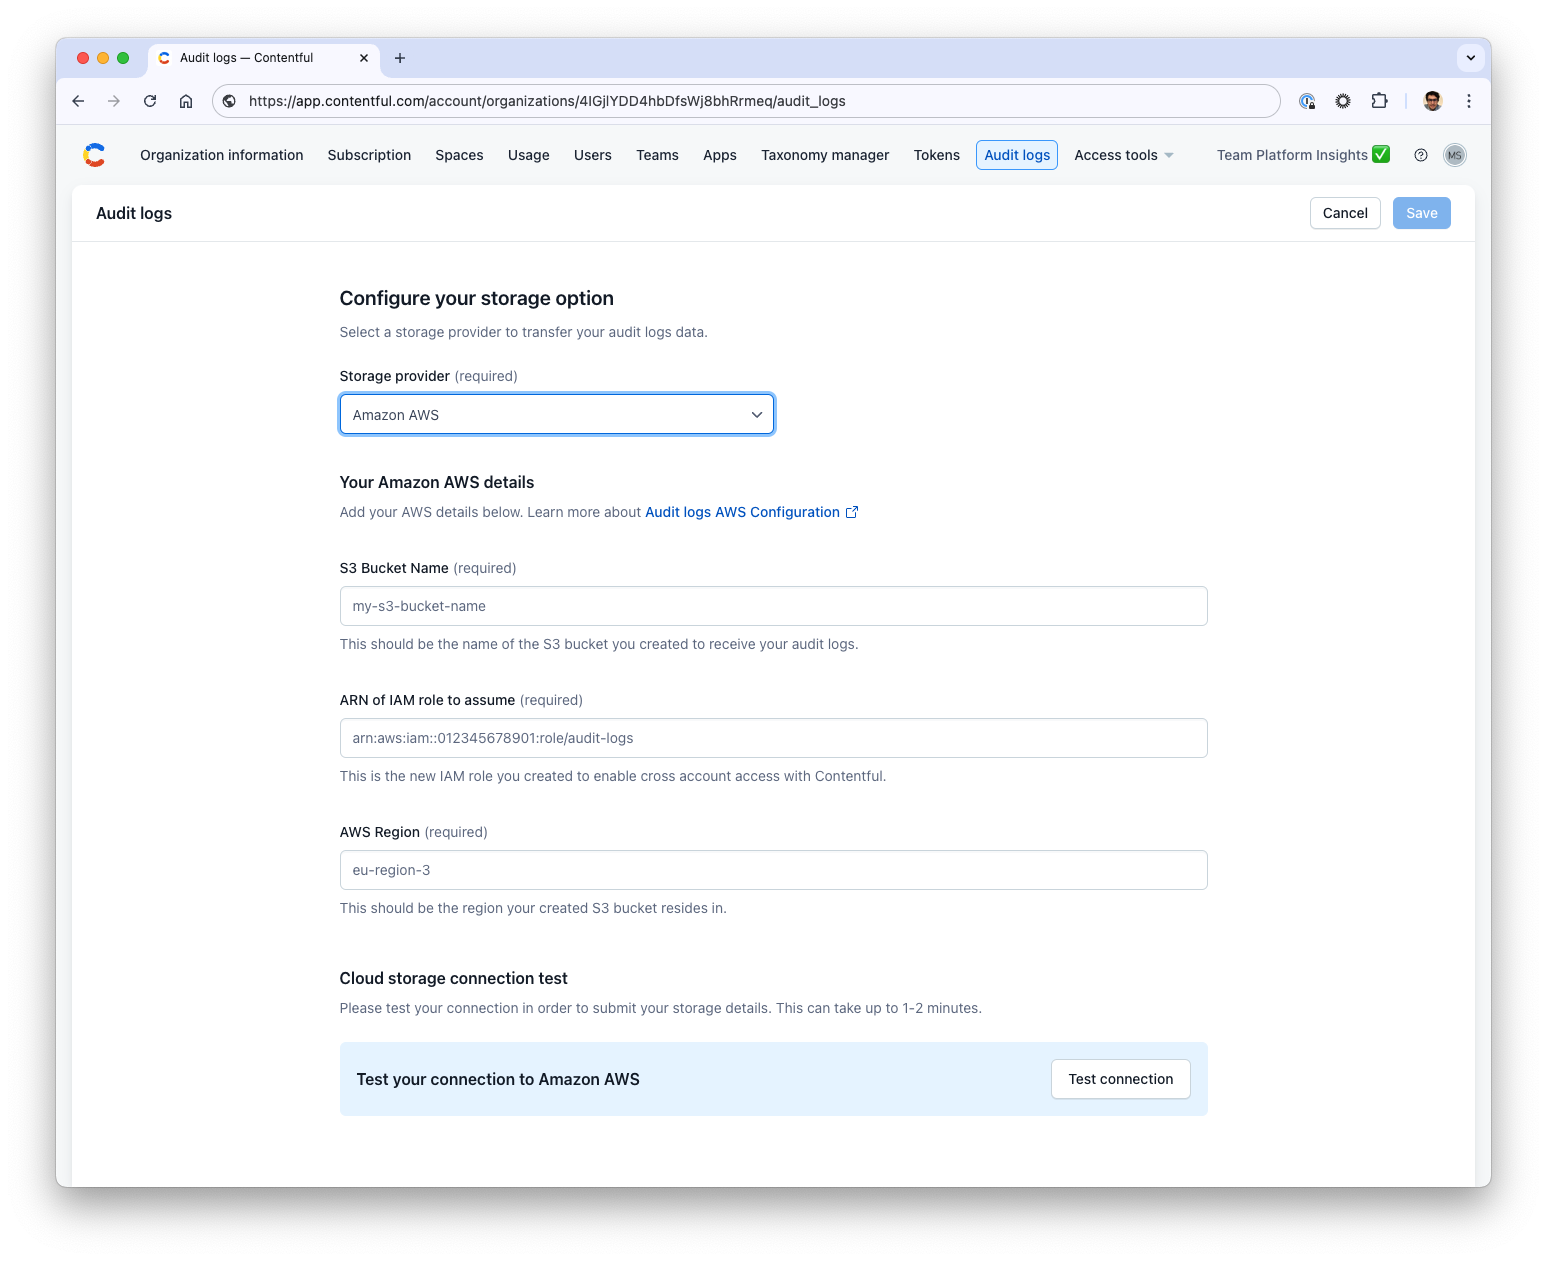
Step 6: Configure AWS S3 storage in the Contentful web application
Note: Only organization owners and organization admins can add and edit the storage details in Contentful.
- In Contentful, navigate to Organization settings -> Audit logs.
- Select Amazon AWS as a Storage provider option and fill in the form with the following details:
- S3 bucket name: The name of the S3 bucket you’ve created for storing audit logs.
- ARN of IAM Role: The Amazon Resource Name (ARN) of the IAM role that Contentful will assume to send logs to your bucket.
- AWS Region: The AWS region where your S3 bucket is located.
- Click Test connection to verify that the connection to your AWS S3 bucket is working correctly. During this test, Contentful sends a file to ensure the configuration is valid. If the test succeeds, you’ll see a confirmation message.
- If the connection test is successful, click Save to finalize the configuration.
Note: If the test fails, double-check that your bucket permissions, IAM Role, and policy configurations match the requirements outlined earlier in this guide.
By following these steps, you’ve securely enabled Contentful to ship logs to your AWS S3 bucket. Contentful will use AWS STS to assume the role you’ve created, ensuring a secure and efficient transfer of audit log data.
Audit logs Azure configuration
As part of enabling audit log shipping to your Azure Blob Storage container, you need to create a Shared Access Signature (SAS) user that Contentful can use. This will allow Contentful to securely transfer audit logs directly to your Azure Storage Account container. This guide will help you create a Shared Access Signature (SAS) user specifically for Contentful.
A shared access signature (SAS) provides secure delegated access to resources in your storage account. With a SAS, you have granular control over how a client can access your data. For example:
-
What resources the client may access
-
What permissions they have to those resources
-
How long the SAS is valid
Prerequisites
An Azure account with access to create a Blob Store and a SAS Token.
Step 1: Create an Azure Storage Account
-
Log in to your Azure Portal.
-
Navigate to Storage Accounts -> Create
-
Select the Subscription under which to create the Storage Account.
-
Select or Create the Resource Group for the Storage Account.
-
Enter a unique storage account name and select the region where you want the account to reside. Note this name, you will need it later.
-
Configure options as required (e.g., performance, redundancy, etc).
-
Click Review + create
-
On the Review + create page check that everything correct and if you’re satisfied click Create to create the storage account.
Step 2: Create a Container
-
Log in to your Azure Portal.
-
Navigate to Storage Accounts and click the one you created in Step 1 to open it.
-
On the left sidebar, under Data storage, click Containers.
-
In the top toolbar click the + Container button to create a new container.
-
Enter a unique container name.
-
Configure options as required (e.g., encryption scope, versioning, etc).
-
Review and click Create to create the container.
Step 3: Create the SAS Token
-
Log in to your Azure Portal.
-
Navigate to Storage Accounts and click the one you created in Step 1 to open it.
-
On the left sidebar, under Data storage, click Containers.
-
Click the name of the container you create in the steps above.
-
On the left sidebar, under Settings, click Shared access tokens
-
Select the Permissions dropdown, deselect Read, then select Create and Write.
-
Set an expiry date that complies with your secret rotation policy.
-
Click Generate SAS token and URL
-
Copy the value of the Blob SAS URL field that’s displayed. You will use this URL in the next steps.
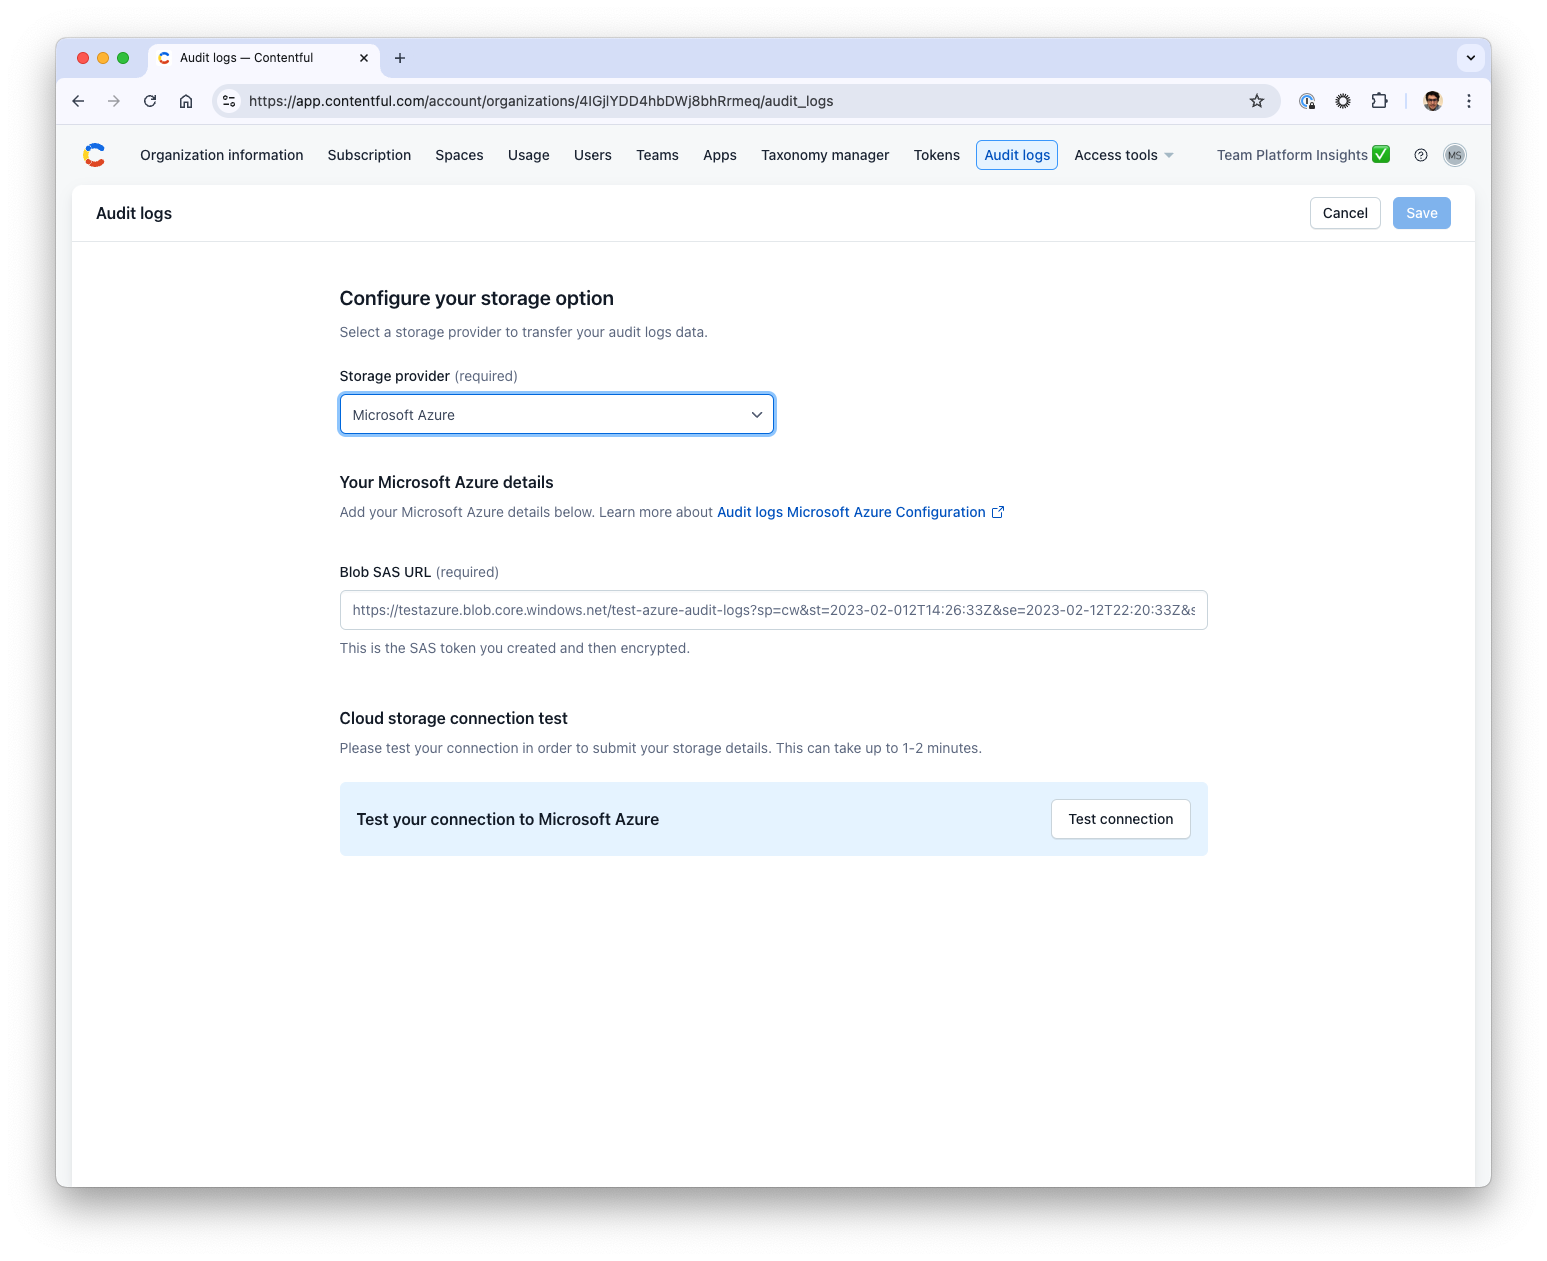
Step 4: Configure Microsoft Azure storage in the Contentful web application
Note: Only organization owners and organization admins can add and edit the storage details in Contentful.
- In Contentful, navigate to Organization settings -> Audit logs.
- Select Microsoft Azure as a Storage provider option.
- Paste the Blob SAS URL from the previous step into Blob SAS URL field.
- Click Test the connection to verify that the connection to your Microsoft Azure storage is working correctly. During this test, Contentful sends a file to ensure the configuration is valid. If the test succeeds, you’ll see a confirmation message.
- If the connection test is successful, click Save to finalize the configuration.
Enrichments in audit logs
The enrichments section of the audit event (defined by OCSF standard) is a flexible way to add various additional context data and information that can enhance the audit event. It allows us to add more information that does not fit in the prescribed OCSF event structure (as example, see the AI actions enrichment below). An audit event can have many enrichments (i.e. the enrichments property itself is an array of objects).
Generally, the enrichment objects you will find in our events will each have a type, type_version, and data. We recommend using the type value as a hint for processing the data section (as the shape of data is not fixed by OCSF and will vary by type). Additionally, the type_version can be used as well, but we recommend only matching the major version part of it and not the full version (non-major changes should be backwards compatible).
AI Actions enrichment
Provides traceability for AI-generated content changes by capturing metadata about each AI Action invocation, including model used and affected entries. This helps with compliance, observability, and accountability when adopting AI in content operations.
Included fields:
invocationId: Unique ID for the AI Action execution.createdBy: User who initiated the AI Action (in Link object format).entryAffected: Entry ID, field ID, source locale.aiActionId: The ID and version of the AI Action used.modelName: Model used for AI generation (e.g.claude-3-sonnet).modelProvider: Provider for the model (e.g.aws_bedrock).modelTemperature: Temperature value used for generation.outputFormat: Format of the output content (e.g. Markdown).
Example:
Bulk Actions enrichment
Bulk actions (e.g. publish/unpublish) capture metadata showing the action taken and which entries or assets were affected. This helps security teams and developers trace content workflows at scale and analyze the impact of changes across multiple entities.
Included fields:
action: one ofpublish,unpublishandvalidate.entities: array of impacted entries or assets, each as a sys Link object.
Example: