Getting started with embargoed assets
Embargoed assets is a feature that enables you to protect your asset files against unauthorized access. Asset files served by Contentful are available to anyone who has the asset URL. An access token is not required. This is fine for most users because these URLs are random and infeasible to guess.
When you enable embargoed assets, your asset URLs are protected with an additional layer of security, requiring a cryptographic signature in order to successfully fetch an asset file.
The ability to control access to specific assets individually allows you to use Contentful in a variety of situations, such as:
- Intranet portals
- Extranet portals
- Product launches and campaigns
- Paywalled content
Embargoed assets is an advanced feature and requires careful consideration and implementation. This document is an in-depth tutorial that explains how the embargoed assets feature functions, and guides you through setup and implementation of services to support this feature for your application.
Table of contents
- Why embargoed assets?
- Enabling embargoed assets
- Recommended service setup
- Implementing the services
- Adjusting to specific use-cases
Why embargoed assets?
The first step to understanding embargoed assets is understanding regular assets. When you upload an asset to Contentful, we store the asset file and assign it a unique random URL. Future requests to retrieve asset metadata from Contentful's Delivery, Management, or Preview APIs will return this asset URL.
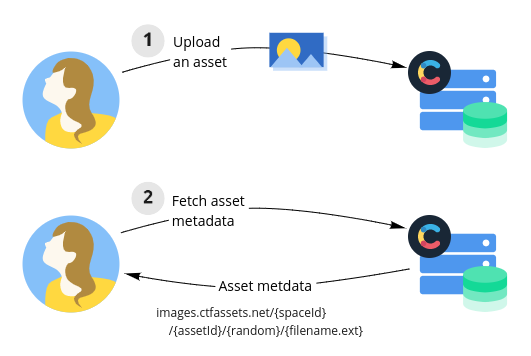
Although this URL is randomly generated and infeasible to guess, if this URL is leaked (by accident or intentionally) it can be used to access the asset file directly without any authentication. In other words, there is no access control when fetching an asset file except for the difficulty of guessing the asset URL.
This works just fine for the majority of Contentful customers and use-cases. However, some customers need stronger security guarantees. For example, customers who have highly sensitive product launches, who want to launch an intranet site built on Contentful, or who wish to restrict access to paywalled content may require the strict access control that the embargoed assets feature provides.
What embargoed assets does differently
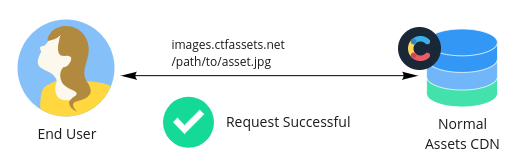
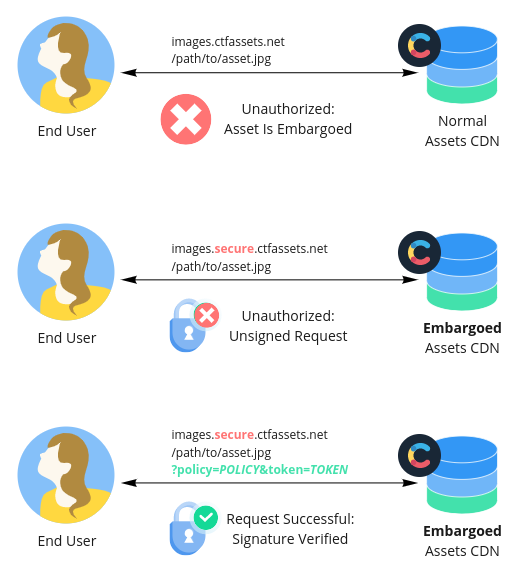
Before enabling embargoed assets, your asset files are available on the public assets CDN with no authorization.
Generally speaking, when you enable embargoed assets for your space, assets are no longer available on Contentful's public asset domains (e.g. images.ctfassets.net). Instead, when you retrieve asset metadata from the Delivery, Management, or Preview APIs, all asset URLs will point to the embargoed asset domains (e.g. images.secure.ctfassets.net).
If you attempt to access these asset URLs directly, your request will be immediately rejected. For a request to succeed, the URLs must first be cryptographically signed with a secret that only you and Contentful know. This signature is affixed as a query parameter to the URL (not supplied as an HTTP header), is time-limited (up to 48 hours), and grants access to a single URL alone. This allows you to share signed asset URLs with your users without fear of leaking access to every asset in a space.
In contrast, Contentful API access tokens grant much broader access to a space's contents, which makes them unsuitable for controlling access to individual assets.
Learn more about the different components of this feature here.
Enabling embargoed assets
Embargoed assets is not enabled by default. To begin using this feature, you or a space administrator can enable embargoed assets in the space settings (Settings ➡ Embargoed assets). By clicking "Get started" you will put your space into "preparation mode". Your space and its public assets will continue functioning as normal, but you will also be able to generate and use signed embargoed asset URLs.
Once you have confirmed that your application and tooling works with embargoed asset URLs, or if you're working in a new space with no existing tooling, you can fully enable embargoed assets from the embargoed assets setting screen. You will need to select between protected either all assets or just unpublished assets. You can learn about all protection modes here.
You should be aware that any assets that were uploaded before fully enabling embargoed assets (in "all protected" or "unpublished protected" modes) may still have cached copies available from our normal assets CDN for up to 48 hours. This caveat does not apply to assets that were uploaded after fully enabling embargoed assets.
Recommended service setup
Embargoed assets provide you with great flexibility to protect assets in a manner suitable to your project. This flexibility is achieved by the feature's modular design, but it requires you to implement certain services and logic within your application. This section proposes our recommended service setup for maximum flexibility when using embargoed assets, and explains the reasoning behind each component.
We recommend the following service setup. Note that these services do not need to be distinct applications but are described as conceptually separate components for clarity.
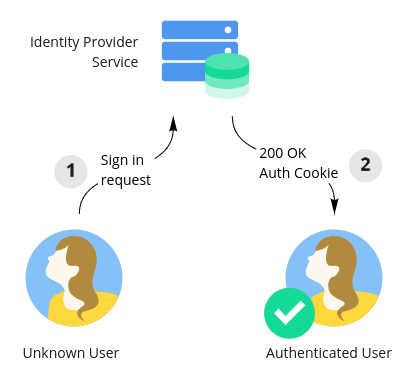
- An identity provider service that is responsible for logging in your end-users and assigning them an authenticated session, for example using browser cookies.
- An authorization service that can authorize requests from authenticated end-users for content and assets.
- A content service that performs three functions:
- It authorizes requests using the authorization service.
- It fetches and compiles content from Contentful's Content Delivery API.
- It rewrites the asset URLs returned by Contentful's Content Delivery API to point to your asset service before returning them to the requesting user.
- Optionally, steps 2 and 3 could be performed as part of a static build process. Dynamic fetching and rewriting is not required.
- An asset service that performs three functions:
- It authorizes user requests using the authorization service.
- It rewrites asset URLs back into Contentful asset URLs, and then cryptographically signs those URLs with a short expiry.
- It either returns an HTTP 302 redirect to the signed URL or fully proxies the request to Contentful.
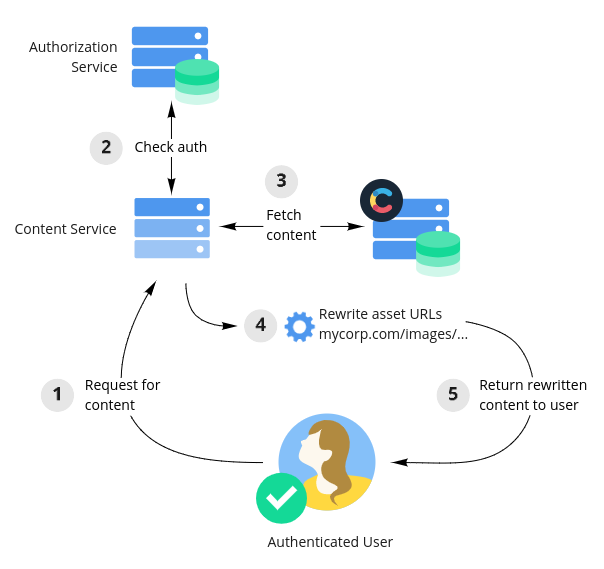
A typical request flow
Imagine the flow of a user's browser downloading a webpage and related assets that you want to expose only to authorized users. Given the above service setup, the flow would go something like this:
First, end-users need to be able to sign into your website. This capability is provided by the identity provider service and persisted as an authenticated session in the user's browser by way of a browser cookie.
Once logged in, the user's authenticated session will be sent as a cookie with every request. When the user requests content from the content service, it will check with the authorization service to determine if the current user is allowed to view that content. If the user is authorized, the content is fetched from Contentful. Importantly, at this moment your content service should rewrite any asset URLs to point to your own asset service before returning them to the user.
For example, it might rewrite the following embargoed asset URL:
https://images.secure.ctfassets.net/<spaceId>/<assetId>/<random>/image.png
To point to your own asset service:
https://assets.mycorp.com/images/<spaceId>/<assetId>/<random>/image.png
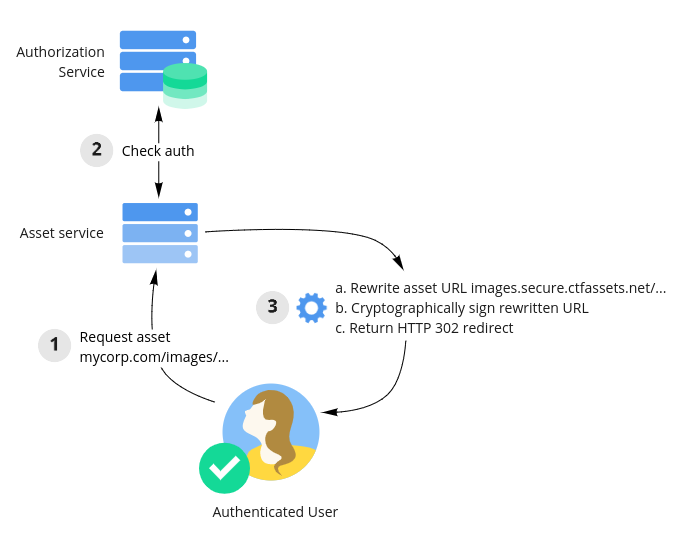
As part of rendering a webpage, the user's browser will request the content (as HTML) and subsequently attempt to download other assets such as images and videos. These will be fetched using the rewritten URLs pointing at your asset service. The asset service will authorize the request for any given asset using the authorization service. If everything checks out, the asset service will rewrite the incoming URL back to its original Contentful embargoed asset URL. It will then sign the URL with a short expiry, then return an HTTP 302 redirect to the signed URL to the user.
Upon receiving this redirect the user's browser will then attempt to fetch the signed asset URL from Contentful's asset servers. Our servers will check that the incoming URL is correctly signed and not yet expired before sending the asset file back to the user.
Why implement my own authorization service?
Your site may have millions of users, hundreds of roles, and arbitrarily complex authorization logic guarding individual pieces of content. If you're already running a site with access-control needs, you probably already have such an authorization service in place.
Rather than requiring you to fit your end-user authorization logic into a system we design, you can use your own authorization layer in front of embargoed assets. The ability to sign URLs individually allows you to control access on a per-asset basis.
You may be wondering why you cannot use Contentful's users, roles, and permissions to define your authorization rules. Contentful’s built-in access controls are intended to be used for controlling access for content professionals within your organization that use Contentful. They are not built to manage access for your end-users: a Contentful Delivery API access token can be scoped to restrict access to a particular environment in a space, but not tighter than that.
Why an asset service? Why rewrite URLs?
Why rewrite and use an asset service at all? Why not sign the URLs immediately in the content service and return them to the user instead?
The primary reason is that signed URLs are short-lived, with a recommended expiry of seconds (and a hard limit of 48 hours). This is enough time for a user's browser to follow a redirect, or for some asynchronous task to fetch a URL, but not enough time to store and use the URLs for any arbitrary period of time. In contrast, by rewriting asset URLs to point at your asset service, those rewritten URLs are valid forever: any authorized request to your asset service will return a redirect to a new, valid signed URL.
As an example of why this is important, imagine a situation where your site lazy-loads images as a user scrolls down the page. If the user leaves a page open in their browser for a few days, it's possible when they come back and scroll down that the signed URLs will no longer be valid: your lazy-loaded images are now broken! With non-expiring URLs pointing at the asset service your images will continue to function.
The benefit of this setup is that you can still rely upon Contentful's global asset delivery network to cache and deliver assets to your users. You don't need to worry about fully proxying requests to Contentful in order to ensure the privacy of your Delivery API access token, because any accidentally leaked signed asset URL would have a lifetime of seconds. (Of course, you still have the option to fully proxy requests in the most security-demanding circumstances.)
We understand that implementing the necessary services requires extra work by our customers. To ease this process, this guide steps you through the basic steps of building portions of the content service and asset service.
Implementing the services
Now that we've described all of the different components in the recommended embargoed assets setup, we'll show how you might use the feature in your own application.
Of the four components listed in the Recommended service setup section, we will be focusing on a small portion of the content service and the asset service. The remaining services — the identity provider service and the authorization service — are implementation-dependent and won't be described in detail here. You may build one yourself, or integrate with hosted or managed solutions such as Okta, Auth0, ActiveDirectory, or OneLogin.
The content service
As described above, the content service is responsible for authorizing incoming requests for content against the authorization service, fetching that content from Contentful (or from a local static store), rewriting any asset URLs to point at your asset service, and then returning the content to the requesting user.
Since authorization is implementation-dependent and fetching content from Contentful is covered in our Content Delivery API Documentation, we will only describe how to rewrite URLs to point at your asset service.
Rewriting a single asset URL
When we rewrite asset URLs, we want to do so in such a way that the original asset URLs can be inferred by the asset service. As an example, given an asset URL such as:
https://images.secure.ctfassets.net/0x2re2jc33h0/1Ag6exGrOEyW6a0iY2MmW8/e4b06eb1f2957682e5202313868427a6/company-logo.jpg
We want to rewrite the URL to point at our asset service instead. Notice that the asset subdomain returned by Contentful may be images (as above), assets, downloads, or videos. When rewriting the URL we want to maintain this information. If our asset service lives at assets.mycorp.com, we can use simple transformation rule. Given the following URL:
https://{subdomain}.secure.ctfassets.net/{space_id}/{...rest}
We transform it to become:
https://assets.mycorp.com/{subdomain}/{space_id}/{...rest}
By a similar inverse transformation, our asset service will be able to change any requested URL into its original URL.
In Node.js, a simple function that can easily accomplish the initial transformation is:
// rewrite-asset-urls.js, part 1/2

/**
 * Rewrites a Contentful asset URL to point at the asset service
 *
 * @param assetUrl string the original asset url
 * @returns string an asset URL pointing at the asset service
 */
function rewriteAssetUrl(assetUrl) {
    const parsedUrl = new URL(assetUrl, 'https://ctfassets.net') // accepts URLs with and without scheme
    const subdomain = parsedUrl.hostname.split('.')[0] // images, downloads, assets, videos
    parsedUrl.hostname = 'assets.mycorp.com' // Your asset service's hostname goes here
    parsedUrl.pathname = `/${subdomain}${parsedUrl.pathname}`
    return parsedUrl.toString()
}
Note: When your space is in preparation mode for embargoed assets, all asset metadata returned by Contentful APIs will continue to return un-embargoed asset URLs. These URLs do not have a leading scheme, e.g.
https:. They are Protocol-Relative URLs. Since embargoed assets must be requested over HTTPS they always include anhttps:scheme.Furthermore, the domains returned will be e.g.,
images.ctfassets.netrather thanimages.secure.ctfassets.net.For these reasons, when you are in preparation mode, getting ready to use embargoed assets in your application, you should handle both of these cases. The above code example handles these cases.
Rewriting all asset URLs for a single asset
Asset metadata retrieved from Contentful looks like this:
{
  "sys": {
    ... omitted for clarity ...
  },
  "fields": {
    "title": {
      "en-US": "Company Logo"
    },
    "description": {
      "en-US": "CloudCorp Logo"
    },
    "file": {
      "en-US": {
        "url": "https://images.secure.ctfassets.net/0x2re2jc33h0/1Ag6exGrOEyW6a0iY2MmW8/e4b06eb1f2957682e5202313868427a6/company-logo.jpg",
        "details": {
          "size": 163914,
          "image": {
            "width": 1020,
            "height": 582
          }
        },
        "fileName": "company-logo.jpg",
        "contentType": "image/jpeg"
      }
    }
  }
}
You're probably familiar with this layout. The fields attribute of the asset metadata will have a file subattribute. For each locale, the file attribute will have an object with separate asset urls. To correctly rewrite all asset URLs for a given asset, we need to iterate through its locales and rewrite each URL.
Given the rewriteAssetUrl function presented above, example code to handle this might be:
// rewrite-asset-urls.js, part 2/2

/**
 * Rewrites all of the URLs in an asset's metadata to point at the asset service.
 * Does not mutate its inputs.
 *
 * @param assetMetadata object the asset metadata fetched from Contentful
 * @returns object a copy of the asset metadata with urls rewritten
 */
function rewriteAllAssetUrls(assetMetadata) {
    if (!assetMetadata.fields || !assetMetadata.fields.file) {
        return assetMetadata
    }

    // Shallow clone "file" field
    const fileField = { ...assetMetadata.fields.file }

    for (const [locale, fileData] of Object.entries(fileField)) {
        if (fileData.url) {
            fileField[locale] = {
                ...fileData,
                url: rewriteAssetUrl(fileData.url)
            }
        }
    }

    return {
        ...assetMetadata,
        fields: {
            ...assetMetadata.fields,
            file: fileField
        }
    }
}
The asset service
As described above, the asset service performs the following operations: it authorizes the incoming request against the authorization service, rewrites the incoming URL back to its original Contentful asset URL, signs the asset URL, and returns an HTTP 302 redirect to the signed URL.
This section describes how to sign the asset URL and ends with an example Node.js Express server that performs URL rewriting, signing, and redirection.
Signing an embargoed asset URL: overview
Signing an embargoed asset URL requires several steps. Given an unsigned URL, you need to do the following:
Create an asset key. You exchange a Management/Delivery/Preview API access token for a JSON document consisting of a signing secret and policy. These can and should be cached for the duration of their validity (up to 48h).
Generate a token (which is a JSON Web Token) by specifying an asset URL and an expiration time, signed it with the secret from step 1.
Attach the policy from step 1, and the token from step 2 as query parameters to the unsigned URL.
The result is a signed embargoed asset URL that can be used until it has expired.
Additional query parameters can be attached to the signed URL after the token and policy parameters. These will not impact the validity of the signed URL, and make it possible to easily use the Images API even with signed URLs.
Note: Be careful to attach image transformations correctly! Your existing code may assume that your image URLs have no query parameters, and so attach an image transformation with a leading
?(e.g.,?w=100) blindly. You must take care to attach these using an&instead (e.g.&w=100).In JavaScript, this can be accomplished like so:
function appendQueryParams(url, qs) {
  const parsedUrl = new URL(url, 'https://ctfassets.net')
  for (const [name, value] of Object.entries(qs)) {
    parsedUrl.searchParams.append(name, `${value}`)
  }
  return parsedUrl.toString()
}

// Example usage:
appendQueryParams('https://images.ctfassets.net/spaceId/assetId/randId/filename.jpg?token=token', { w: 100 })
// 'https://images.ctfassets.net/spaceId/assetId/randId/filename.jpg?token=token&w=100'
Creating an asset key
An asset key is a JSON document consisting of a policy and a secret. Asset keys must be created from Contentful's Delivery, Management, or Preview APIs: when created from the Delivery API it can only sign URLs of published assets, whereas when created from the Management or Preview APIs it can sign URLs of both published and unpublished assets.
An asset key can be created from the API-appropriate asset key generation endpoint using an HTTP POST request. See the Content Management API Documentation, Content Delivery API Documentation, or Content Preview API Documentation for more details.
Warning: Just as a Delivery API access token is able to request any published content in your space, you are also able to use a CDA acecss token to create an asset key that can sign URLs for any published asset in your space. If you are using embargoed assets, it is essential that you keep your API access tokens private.
As an example, to create an asset key using a Delivery API access token, you would pick a desired expiration up to 48h in the future, expressed as a Unix timestamp, and POST to the Delivery API's asset keys endpoint:
POST https://cdn.contentful.com/spaces/{space_id}/environments/{environment_id}/asset_keys
Content-Type: application/json
Authorization: Bearer {cda_token}

{ "expiresAt": 1612362953 }
In response, you'll receive a JSON document:
{
    "policy": "eyJhbGciOiJIUzI1NiIsInR5cCI6IkpXVCIsImtpZCI6IjE6MSJ9.eyJleHAiOjE2MTIyODE0MTEsInN1YiI6Inl6MjJwOGZzeGhpNiIsImF1ZCI6ImFkbiIsImp0aSI6ImQ1NWI2YmM1LTkyMGEtNDRjNi1hNmQ0LTM0YzRhYmIyYjdkNiIsImN0Zjp1bnB1YiI6dHJ1ZX0",
    "secret": "-jE6hqytutc_dygbjShVq0PijvDn80SdT0EWD1mNHgc"
}
Asset keys can be used to sign any number of embargoed asset URLs with an expiry until the expiresAt time specified when creating the asset key. For this reason, we strongly recommend that you cache and reuse asset keys (see the next section, Cache your asset keys, in this document). This will improve the responsiveness and resiliency of your asset service.
Example code to create an asset key from the Delivery, Management, or Preview APIs is shown below:
// sign-url.js, part 1/5

// This example uses the node-fetch HTTP library. You're free to
// use any HTTP library you'd like.
const fetch = require('node-fetch')

/**
 * Creates an asset key from Contentful
 *
 * @param host string which Contentful API host to use
 * @param accessToken string the Contentful API access token to use
 * @param spaceId string the ID of the space
 * @param environmentId string the ID of the environment
 * @param expiresAtMs number (optional) the JS Unix timestamp (in ms) when the token
 *     should expire. Maximum value of now + 48h.
 * @returns an object with `policy` and `secret` keys
 */
async function createAssetKey(host, accessToken, spaceId, environmentId, expiresAtMs) {
    if (expiresAtMs === undefined) {
        // If no expiry is specified, default to longest expiry: 48h
        expiresAtMs = Date.now() + 48 * 60 * 60 * 1000
    }
    const response = await fetch(`https://${host}/spaces/${spaceId}/environments/${environmentId}/asset_keys`, {
        method: 'POST',
        body: JSON.stringify({
            expiresAt: Math.floor(expiresAtMs / 1000) // in seconds
        }),
        headers: {
            'Content-Type': 'application/json',
            'Authorization': `Bearer ${accessToken}`
        }
    })
    if (!response.ok) {
        throw new Error(`Failed to create asset key: ${response.status}`)
    }
    return await response.json()
}

const createDeliveryAssetKey = (...args) => createAssetKey('cdn.contentful.com', ...args)
const createManagementAssetKey = (...args) => createAssetKey('api.contentful.com', ...args)
const createPreviewAssetKey = (...args) => createAssetKey('preview.contentful.com', ...args)
The above code could be used like so:
// Example usage:

const hoursFromNow = (hrs) => Date.now() + hrs * 60 * 60 * 1000

const { token, policy } = await createDeliveryAssetKey(
  CONTENTFUL_CDA_TOKEN, mySpaceId, 'master', hoursFromNow(24))
Important: After generation, asset keys are not tied to the Management, Delivery, or Preview API access tokens used to generate them. For example, if you generate an asset key using a particular API access token and then delete that access token from your space or user, the asset key will continue to function until its own expiry, as will any URLs that you sign using this asset key.
We currently provide no mechanism to revoke generated asset keys or signed URLs, which is why they are limited to a maximum lifespan of 48 hours.
Cache your asset keys
For the resiliency of your asset service, we strongly recommend that you cache asset keys. This will make signing URLs much quicker on average, and should help prevent any problems running into rate-limits making calls to Contentful APIs.
A simple caching function might look something like this:
// sign-url.js, part 2/5

const assetKeyCache = new Map()

/**
 * Creates an asset key with a cache. If an asset key is already available, it will
 * be returned immediately. Otherwise, a fresh asset key will be created and cached.
 * Asset keys are always fetched with the greated possible expiry. This allows
 * multiple requests for shorter expiries to be collapsed into one request.
 *
 * @param host string the Contentful API host to contact
 * @param accessToken string the Contentful API access token to use
 * @param spaceId string the space ID for the asset key
 * @param environmentId string the environment ID for the asset key
 * @param minExpiresAtMs number a JS Unix timestamp (in ms) that is the minimum expiry
 *     time that you require for signing
 * @returns a Promise resolving to an asset key with `policy` and `secret` properties
 */
function createCachedAssetKey(host, accessToken, spaceId, environmentId, minExpiresAtMs) {
    const cacheKey = `${host}:${spaceId}:${environmentId}`
    let cacheItem = assetKeyCache.get(cacheKey)
    if (!cacheItem || cacheItem.expiresAtMs < minExpiresAtMs) {
        // Create a new key at the maximum validity, 48h
        const expiresAtMs = Date.now() + 48 * 60 * 60 * 1000
        if (minExpiresAtMs > expiresAtMs) {
          throw new Error(`Cannot fetch an asset key so far in the future: ${minExpiresAtMs} > ${expiresAtMs}`)
        }
        const promise = createAssetKey(
            host,
            accessToken,
            spaceId,
            environmentId,
            expiresAtMs
        ).catch(err => {
            // If we encounter an error, make sure to clear the cache item if
            // this is the most recent fetch.
            const curCacheItem = assetKeyCache.get(cacheKey)
            if (curCacheItem === cacheItem) {
                assetKeyCache.delete(cacheKey)
            }
            return Promise.reject(err)
        })
        cacheItem = { expiresAtMs, promise }
        assetKeyCache.set(cacheKey, cacheItem)
    }
    return cacheItem.promise
}

const createCachedDeliveryAssetKey = (...args) => createCachedAssetKey('cdn.contentful.com', ...args)
const createCachedManagementAssetKey = (...args) => createCachedAssetKey('api.contentful.com', ...args)
const createCachedPreviewAssetKey = (...args) => createCachedAssetKey('preview.contentful.com', ...args)
The above code can be used in exactly the same manner as the create...AssetKey functions in the previous section, Creating an asset key.
Note that you may want to additionally handle rate-limiting or server errors (HTTP 429 and HTTP > 500, respectively) with retry logic suitable to your application. That logic is not included here.
Generating a token
A token is a JSON Web Token (JWT) that you generate for a particular URL you'd like to sign. The token JWT has two fields:
The JWT subject,
sub: this should be set to the URL you wish to sign, without any query parameters. This field is required.(Optional) The JWT expiry,
exp: this Unix-timestamp specifies when this particular signed URL should be valid until. If not specified, or if it exceeds the expiry time of the asset key itself, theexpiresAttime of the asset key will be used instead.
The JWT must be signed using the HMAC-SHA256 algorithm with the secret from the asset key.
Example token generation code might look like this:
// sign-url.js, part 3/5

// This example uses auth0's jsonwebtoken library. You're free
// to use any JWT library you'd like.
const jwt = require('jsonwebtoken')

/**
 * Generates a signed "token" for an embargoed asset
 *
 * @param secret string the secret retrieved from the asset_keys endpoint
 * @param urlWithoutQueryParams string a url, without query parameters
 *   attached, that you'd like to sign
 * @param expiresAtMs number (optional) the JS Unix timestamp (in ms) of
 *   when the signed URL should expire
 * @returns string the signed url
 */
function generateSignedToken(secret, urlWithoutQueryParams, expiresAtMs) {
    // Convert expiresAtMs to seconds, if defined
    const exp = expiresAtMs ? Math.floor(expiresAtMs / 1000) : undefined
    return jwt.sign({
        sub: urlWithoutQueryParams,
        exp,
    }, secret, { algorithm: 'HS256' })
}
Attaching the policy and token
After creating an asset key (policy and secret) and generating a token, you must attach the policy and token as query parameters to the original URL. The result will be a signed URL.
This process is fairly straightforward in Node.js version 10 and later:
// An example of how to safely attach query parameters in Node.js
const assetUrl = '...'
const token = '...'
const policy = '...'

const parsedUrl = new URL(assetUrl)
parsedUrl.searchParams.set('token', token)
parsedUrl.searchParams.set('policy', policy)
const signedUrl = parsedUrl.toString()
Since the token must be generated for an asset URL without any query parameters attached, it's probably worthwhile to parse the URL only once and generate the signed token at the same time. The following function can accomplish that:
// sign-url.js, part 4/5

/**
 * Generates a signed URL, given a policy, secret, and expiry time.
 *
 * @param policy string the policy returned as part of an asset key
 * @param secret string the secret returned as part of an asset key
 * @param url string the url to be signed (may have query parameters)
 * @param expiresAtMs number the JS Unix timestamp (in ms) when this signed
 *     url should expire
 * @returns string the signed url
 */
function generateSignedUrl(policy, secret, url, expiresAtMs) {
    const parsedUrl = new URL(url)

    const urlWithoutQueryParams = parsedUrl.origin + parsedUrl.pathname
    // See previous section for "generateSignedToken" code
    const token = generateSignedToken(secret, urlWithoutQueryParams, expiresAtMs)

    parsedUrl.searchParams.set('token', token)
    parsedUrl.searchParams.set('policy', policy)

    return parsedUrl.toString()
}
With all of the above in place, we can abstract creating an asset key and signing a URL into a single signUrl function:
// sign-url.js, part 5/5

/**
 * Creates/uses a cached asset key to sign an asset URL
 *
 * @param host string the Contentful api host to use
 * @param accessToken string the Contentful API access token to use
 * @param spaceId string the space ID from which the asset key should be created
 * @param environmentId string the environment ID form which the asset key should be created
 * @param url string the fully-qualified asset url to sign
 * @param expiresAtMs number a JS Unix timestamp (in ms) when this signed
 *     url should expire
 * @returns string a signed url
 */
async function signUrl(host, accessToken, spaceId, environmentId, url, expiresAtMs) {
    const { policy, secret } = await createCachedAssetKey(host, accessToken, spaceId, environmentId, expiresAtMs)
    return generateSignedUrl(policy, secret, url, expiresAtMs)
}

module.exports = { signUrl }
Putting it all together: an example asset service
With all of the above worked out, we can build our asset service. For this example, we'll be using Express as an HTTP server. The application will do the following:
- Accept requests for URLs such as those described in the Rewriting a single asset URL section, above.
- Authorize the incoming call using a stubbed-out authorization function, ready for your own authorization logic.
- Rewrite the incoming URL to point at Contentful's asset servers.
- Sign the URL using the
signUrlfunction, described in the Attaching the policy and token section, above. - Return an HTTP 302 redirect to the user to the signed URL.
All of the above is accomplished with the following code:
// server.js
const express = require('express')

// From code examples, above
const { signUrl } = require('./sign-url')

// Configuration options

// The Contentful API host:
//   For the CDA: cdn.contentful.com
//   For the CPA: preview.contentful.com
//   For the CMA: api.contentful.com
const CONTENTFUL_API_HOST = process.env.CONTENTFUL_API_HOST
// Your Contentful access token:
//   For the CDA, use a delivery access token
//   For the CPA, use a preview access token
//   For the CMA, use a personal access token
const ACCESS_TOKEN        = process.env.CONTENTFUL_ACCESS_TOKEN
// The space ID that the access token has access to.
const SPACE_ID            = process.env.CONTENTFUL_SPACE_ID
// The environment ID. This only matters for CDA and CPA tokens.
// "master" is the default environment ID
const ENVIRONMENT_ID      = process.env.CONTENTFUL_ENVIRONMENT_ID || 'master'
// The port the asset service should run
const PORT                = parseInt(process.env.PORT || '8080', 10)
// The host (or blank for all public interfaces) the service should run on
const HOST                = process.env.HOST || ''

// The default signed URL lifetime
const URL_LIFETIME = 10 * 1000 // 10 seconds

// An authorization function that checks if a user is allowed to view
// a given path. Replace with your own authorization logic for a given URL.
function canFetch(req) {
    // For example, you might check for the presence of a signed cookie
    // identifying the current user and check the requested URL against
    //  that user's access rights
    return true
}

// Middleware that checks if the current user can retrieve the current path
function authorizeRequest(req, res, next) {
    if (!canFetch(req)) {
        next(new Error('Unauthorized'))
    } else {
        next()
    }
}

// Creates a sign-and-redirect handler for a given asset subdomain
function handlerForSubdomain(subdomain) {
    return express.Router().get('/:spaceId/*', authorizeRequest, async (req, res, next) => {
        // req.path does not include the /images, /assets etc router mount point,
        // only the path that comes after (including a leading /)
        const path = req.path

        // This simple service can only sign URLs for the configured space. All
        // other URLs should 404.
        if (req.params.spaceId !== SPACE_ID) {
            return res.sendStatus(404)
        }

        try {
            // Rewrite the path to point to the original URL
            const unsignedUrl = new URL(
                path,
                `https://${subdomain}.secure.ctfassets.net`
            )
            // Re-set the query params from this request on the rewritten URL,
            // for example for image transformations
            for (const [key, values] of Object.entries(req.query)) {
              if (Array.isArray(values)) {
                for (const value of values) {
                  unsignedUrl.searchParams.append(key, value)
                }
              } else {
                unsignedUrl.searchParams.set(key, values)
              }
            }
            // Sign the url...
            const signedUrl = await signUrl(
                CONTENTFUL_API_HOST,
                ACCESS_TOKEN,
                SPACE_ID,
                ENVIRONMENT_ID,
                unsignedUrl.toString(),
                Date.now() + URL_LIFETIME
            )
            // ... and redirect the user's browser to it
            res.redirect(signedUrl)
        } catch (err) {
            res.sendStatus(500)
        }
    })
}

const app = express()

app.use('/images', handlerForSubdomain('images'))
app.use('/assets', handlerForSubdomain('assets'))
app.use('/downloads', handlerForSubdomain('downloads'))
app.use('/videos', handlerForSubdomain('videos'))

const server = app.listen(PORT, HOST, (err) => {
    console.log(`Asset service running on ${HOST}:${PORT}`)
})

process.on('SIGTERM', () => server.close())
process.on('SIGINT', () => server.close())
To run the sample server, you need to ensure several environment variables are set. For example, to run against the Contentful Delivery API, you would set:
env \
  CONTENTFUL_API_HOST="cdn.contentful.com"  `# CDA api host` \
  CONTENTFUL_ACCESS_TOKEN="access-token"    `# a CDA access token` \
  CONTENTFUL_SPACE_ID="abc123def456"        `# space ID` \
  CONTENTFUL_ENVIRONMENT_ID="master"        `# env ID` \
  PORT=8080                                 `# port to listen on` \
  node server.js
This will run the server on port 8080 on the local machine. If you have everything configured correctly, you can request a URL like:
curl -v -L 'http://localhost:8080/images/abc123def456/6Rnlwgf94lPsGMUuS3fMzV/9ead245488f2ee01f75e39d678afd1b2/company-logo.jpg'(Obviously, you'll need to choose a URL that works for your space.) A functioning server will then redirect to Contentful, for example you might see curl output:
Found. Redirecting to https://images.secure.ctfassets.net/abc123def456/6Rnlwgf94lPsGMUuS3fMzV/9ead245488f2ee01f75e39d678afd1b2/company-logo.jpg?token=...&policy=...Voila! You have a functioning redirecting asset service. Where you take your application from here is up to you: implement an internal portal, paywall specific content for your users, whatever you need.
Adjusting to specific use-cases
This section describes a variety of specific use-cases, and how you might modify the above Recommended service setup to suit each.
Transitioning an existing space to embargoed assets
You may already have a space that you wish to transition to embargoed assets. This poses some challenges: your site — and all assets on it — should continue working while you're testing embargoed assets. Some users may still find it easier to create an alternate space with embargoed assets enabled from the beginning, but others may need to transition to embargoed assets in-place.
To safely enable this transition, Contentful allows you to put your space into embargoed assets' preparation mode. In this mode:
- All Delivery, Management, and Preview requests for asset metadata will continue to return non-embargoed asset URLs.
- All non-embargoed asset URLs will continue to function as though embargoed assets was not enabled.
- You will be able to create asset-keys from Delivery, Management, or Preview APIs.
- You will be able to fetch signed URLs from the embargoed assets CDN.
In this way, you can validate all of the behaviors required to sign and fetch embargoed assets in a staging environment without risk to your production site. Once you have validated that your staging site functions correctly, you or a space administrator can enable embargoed assets in the space settings (Settings -> Embargoed assets).
While it may be straightforward to test your site in a staging context, you may have other, less visible tooling that relies upon the behavior of non-embargoed assets. Please take care to ensure that all of your pipeline and tooling is ready for embargoed assets.
Modifications to the above example code
The primary challenge when transitioning using preparation mode is that Contentful APIs will continue to return non-embargoed asset URLs. This is essential for your production site to continue to function as expected. Furthermore, non-embargoed asset URLs cannot be signed: attempting to fetch a signed non-embargoed asset URL will result in an error.
Fortunately, if you use the above example service setup and code as your guide, you should face no large challenges.
If your production site uses normal non-embargoed asset URLs directly, and your staging site follows the URL-rewriting behavior described in Rewriting a single asset URL to point asset URLs at your asset service, the example code should work as desired. This is because the rewriteAssetUrl function (duplicated below) works with both embargoed and non-embargoed asset URLs:
// rewrite-asset-urls.js, part 1/2

/**
 * Rewrites a Contentful asset URL to point at the asset service
 *
 * @param assetUrl string the original asset url
 * @returns string an asset URL pointing at the asset service
 */
function rewriteAssetUrl(assetUrl) {
    const parsedUrl = new URL(assetUrl, 'https://ctfassets.net') // accepts URLs with and without scheme
    const subdomain = parsedUrl.hostname.split('.')[0] // images, downloads, assets, videos
    parsedUrl.hostname = 'assets.mycorp.com' // Your asset service's hostname goes here
    parsedUrl.pathname = `/${subdomain}${parsedUrl.pathname}`
    return parsedUrl.toString()
}
Whether called with a non-embargoed asset URL (//images.ctfassets.net/...rest) or an embargoed asset URL (https://images.secure.ctfassets.net/...rest), the above code will redirect to the same target: https://assets.mycorp.com/images/...rest.
You should still take care that your production site continues using non-embargoed asset URLs, and not your asset service, until you are certain that your asset service is properly functioning.
Protecting statically built sites
Static sites offer great benefits: ease of scalability, largely "serverless", ahead-of-time "compilation" of content, etc. However, there is an inherent tension between serving statically built sites and protecting these sites with authorization logic. Fully static sites struggle with authorization, often relying upon client-side code to secure content. While a motivated user can easily bypass these restrictions, this may be sufficient security for some sites. If this level of authorization is sufficient for your use-case, then embargoed assets may not be an appropriate solution.
Embargoed assets is intended for use-cases where authorization is important enough that it must be performed server-side before every request. Some server-side logic is therefore required.
The recommended service setup for a static use-case remains mostly the same:
- If you need to protect access to particular pieces of content, you will still need dynamic user-authorization before requests to your content service.
- The actual content you serve from your content-service can be statically built, or pre-rendered. The statically built site's asset URLs should point to your asset service.
- A dynamically hosted asset service is still required to perform authorization, signing, and redirection.
Given that these services can be largely stateless and geo-distributed, the benefits of a statically built site are still achievable.
Note: If you are using embargoed assets you must be careful to protect your Contentful access tokens. Some users embed their CDA access token in their front-end code. Exposing your CDA access token allows anyone to fetch an asset key and sign embargoed asset URLs, negating the security benefits of using embargoed assets.
Embargoed unpublished assets: protecting preview sites
When enabling embargoed assets you can choose to protect only unpublished assets. This mode allows you to more easily protect preview sites.
In this mode, the CDA will return public asset URLs. These URLs will be retrievable without signing. The CMA and CPA, however, will return unsigned embargoed asset URLs. These URLs must be signed before use.
Note: Embargoed assets are not environment-aware. If an asset (identified by its ID) has been published in any environment in a space, any asset files uploaded with that asset ID are retrievable through public asset URLs. Please be aware of this limitation if you are using multiple environments or environment aliases as part of your publishing workflow.
For the purposes of preview sites, the recommended service setup still applies. The major difference is that you only need to rewrite URLs when you are displaying the preview version of your site. When returning content for the published version of your site you should return public asset URLs to your users.
It may also be feasible, for the use of preview sites, to immediately sign URLs and return them to your users rather than using an asset service. Be aware that if you are building static preview sites with pre-signed URLs, however, that these URLs have a maximum lifespan of 48 hours. Signed URL expiration cannot exceed the expiry of the asset key used when signing.
