Deploying changes with environment aliases
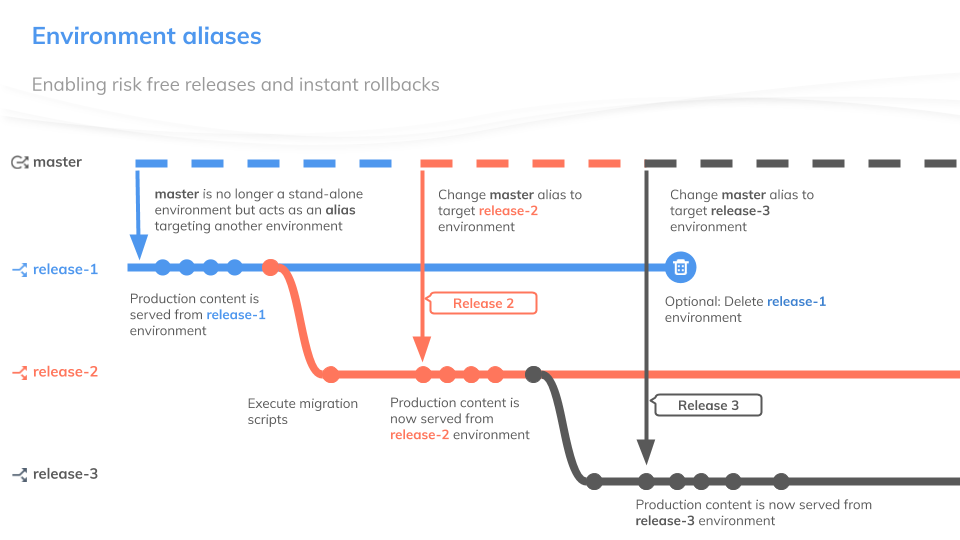
An environment alias lets developers access and modify the data of an environment, called the target environment, through a different static identifier. The target environment can be quickly changed, allowing teams to quickly swap environments powering content in production.
Environment aliases enable teams to enhance their development and deployment workflows in several ways:
- Safely apply content model changes and test them in isolation before rolling out the changes to production
- Quickly roll back the changes if they cause problems in production
- Use environments as part of an automated CI/CD deployment pipeline
Below, we provide an overview of two popular approaches to deploying changes by leveraging environment aliases.
Deploying changes using environment aliases
In a typical scenario, a developer clones the master environment to create a sandbox development environment to build and test the new feature with a copy of production data. Once the feature is ready, they create a migration script containing necessary changes to the content model and prepare to deploy these changes to production.
Developing a new feature can take anywhere from hours to weeks. Meanwhile, the master environment undergoes constant changes that include new content created by the editorial team, changes to the content model introduced by other developers, or organizational settings managed by the space administrator.
Creating a release environment
To ensure that none of these changes are lost in deploying the latest feature, the next step in the deployment process is for developers to make a fresh copy of the master environment (the so-called release environment) and run the migration script against it. This step simply ensures that the environment about to be promoted contains the right content structure and production content.
Testing & promotion to master
Next developers test the changes for regressions and deploy them to production:
- Teams that work with automated deployment pipelines rely on the continuous integration (CI) suite to verify the changes by running predefined tests. If all tests pass, the
masteralias can be automatically updated to point to thereleaseenvironment thus deploying the new feature to production. - Teams that test changes manually, run the necessary tests and manually point the
masteralias to thereleaseenvironment when the new feature is ready to be shipped.
While changes to the master alias are instantaneous (< 250 ms); applying migration scripts and running follow-up tests might require a bit more time. Our benchmarks indicate that developers can expect small deployments to take between one to two minutes to execute.
Impact on editorial workflow
Developers should be aware that once the master alias is updated, the editorial team is prompted to refresh the web app to gain access to the new master environment. The editorial content should always be authored within the master environment. Development environments are designed to be used exclusively by developers building new features, refactoring content structure and testing their changes.
Rollback (optional step)
If the team discovers that the deployment broke the production website/app, it’s simple to revert to the previous working state by updating the master alias to point to the previous master environment. When things go well, it’s up to the team to decide how long to retain the previous master environment. Contentful puts no expiration dates on development environments, which means that development teams potentially can create multiple restore points.
Creating backups
Some development teams prefer to work with a fixed number of environments, where each environment is assigned an explicit permanent role (master, staging, QA, development). In this setup, developers apply content model changes by running migration scripts against all the environments starting with the development environment. If all goes well, the migration script is run against the QA, then the staging, and finally the master environment.
The sequential approach adopted by teams with static environments helps them spot and fix errors early on. Thus by the time new changes hit the master environment, the team is confident that they won’t cause any hiccups in production.
The master alias, however, provides an extra level of safety. Developers should create a backup development environment just before running the migration against the master environment. If the migration process fails for any reason — or worse, corrupts master content — developers can use the backup environment to initiate an instant recovery.
Setting up and using environment aliases
By default, environment aliases within spaces are not activated. To enable the master alias, space administrators need to click on the button “set up your first alias” and provide a name for their current master environment.
Since developers may be using different environments to power production content in the future, it makes sense to always give the current production environment a unique name like master-jan-10-2020, fall-20-release, or production-copy-with-search-functionality.
Once the space admin activates the master alias, developers can easily determine which environment powers the production application by checking if their current environment carries the green “master” label in the top left corner of the web app.
To manually promote environments, developers have to navigate to the Settings > Environments section and click on the “change alias target” in the Aliases section of the screen. This will open a dialogue listing all environments within the space and allow developers to pick a new environment to act as the master environment.
It is important to note that once created, the master alias cannot be deactivated.
Resources
Further guides and tutorials for working with environment aliases: