Content Management API
Introduction
Contentful's Content Management API (CMA) helps you manage content in your spaces. To learn more about how to model your content, read our modeling guide.
NOTE: You can use the CMA to deliver and manage content, but you shouldn't use it to deliver large amounts of content and instead use the Content Delivery API. The structure of responses from the CMA differs from the CDA as GET responses retrieve the entirety of items (i.e. all localized and unpublished content).
Basic API information
https://api.contentful.comAuthentication
You access the API securely via HTTPS, and it will be available to clients authenticating with an access token.
Learn about authenticating to the CMA and get your access token from the developer center.
Resource IDs
When creating resources, you can specify an ID or let the API generate a random ID for you. If you choose an ID yourself it must adhere to the following rules:
It has a length between 1 and 64 characters.
It only includes alphanumeric characters, dots
., hyphens-or underscores_.
Represented as a regular expression, this is /^[a-zA-Z0-9-_.]{1,64}$/.
Updating content
Contentful doesn't merge changes made to content, so when updating content, you need to send the entire body of an entry. If you update content with a subset of properties, you will lose all existing properties not included in that update.
You should always update resources in the following order:
Fetch current resource.
Make changes to the current resource.
Update the resource by passing the changed resource along with current version number.
This way no unseen changes are overridden and unexpected conflicts are unlikely to occur.
Note: You can't update any of the sys property fields, including sys.id.
Updating and version locking
Contentful uses optimistic locking. When updating an existing resource, you need to specify its current version with the X-Contentful-Version HTTP header (this header is automatically set when using our official client libraries). Contentful compares this version with the current version stored to ensure that a client doesn't overwrite a resource that has since been updated. If the version changed in-between, Contentful would reject the update.
API rate limits
API Rate limits specify the number of requests a client can make to Contentful APIs in a specific time frame. Every request counts against a per second rate limit.
By default the Contentful Management API enforces rate limits of 7 requests per second. Higher rate limits may apply depending on your current plan.
The following table lists all headers returned in every response by the Content Management API which give a client information on rate limiting:
| Header | Description |
|---|---|
X-Contentful-RateLimit-Second-Limit |
The maximum amount of requests which can be made in a second. |
X-Contentful-RateLimit-Second-Remaining |
The remaining amount of requests which can be made until the next secondly reset. |
X-Contentful-RateLimit-Reset |
The number of seconds until the next request can be made. |
Here is a part of a Contentful Management API response example showing the headers for rate limiting:
X-Contentful-RateLimit-Reset: 0
X-Contentful-RateLimit-Second-Limit: 7
X-Contentful-RateLimit-Second-Remaining: 9
When a client gets rate limited, the API responds with the 429 Too Many Requests HTTP status code and sets the value X-Contentful-RateLimit-Reset header to an integer specifying the time before the limit resets and another request will be accepted.
As the client is rate limited per second, the header will return 1, which means the next second.
Examples:
The current rate limits for a client are the default 7 per second.
Example 1
Client: 5 requests in 1 second
HTTP/1.1 2xx
X-Contentful-RateLimit-Reset: 0
Meaning: not rate limited. More requests are allowed.
Example 2
Client: 11 requests in 1 second
HTTP/1.1 429
X-Contentful-RateLimit-Reset: 1
Meaning: wait 1 second before making more requests.
Example 3
Client: 9000 requests in 15 minutes, 9000 requests in following 15 minutes, 9000 requests in following 15 minutes, 9000 requests in following 15 minutes
HTTP/1.1 429
X-Contentful-RateLimit-Reset: 900
Meaning: wait 15 minutes before making more requests (which frees up 9000 requests - 15 minutes later 9000 requests get freed up and so on).
Common Resource Attributes
Every resource returned by the API includes a sys property. The sys object contains system managed and resource dependent information. At minimum sys defines the sys.type property.
During entity creation, the value of sys.id is either automatically generated or can be specified in the URL (e.g. /environments/master/entries/my-custom-id) of the initial PUT request. The only entity which always uses generated sys.id values is spaces.
Note: sys metadata fields can not be changed programmatically.
The sys.id property is defined for every resource that is not a collection. For example, a Space resource will have a sys.type and sys.id:
{
  "sys": {
    "type": "Space",
    "id": "yadj1kx9rmg0"
  }
}| Field | Type | Description | Applies to |
|---|---|---|---|
| sys.type | String | Type of a resource. | All |
| sys.linkType | String | Type of an entity the link is referring to. | Links |
| sys.id | String | Unique ID of a resource. | All except arrays |
| sys.space | Link | Link to a resource's space. | Entries, assets, content types |
| sys.environment | Link | Link to a resource's environment. | Entries, assets, content types |
| sys.contentType | Link | Link to an entry's content type. | Entries |
| sys.publishedCounter | Integer | Number of times a resource was published. | Entries, assets, content types |
| sys.publishedVersion | Integer | Published version of a resource. | Entries, assets, content types |
| sys.version | Integer | Current version of a resource. | Entries, assets, content types |
| sys.firstPublishedAt | Date | Date and time a resource was published for the first time. | Entries, assets, content types |
| sys.createdAt | Date | Date and time a resource was generated in the system. | Entries, assets, content types |
| sys.createdBy | Link | Link to creating a user. | Entries, assets, content types |
| sys.publishedAt | Date | Date and time a resource was published after an update. | Entries, assets, content types |
| sys.publishedBy | Link | Link to publishing a user. | Entries, assets, content types |
| sys.updatedAt | Date | Date and time a resource was updated in the system. | Entries, assets, content types |
| sys.updatedBy | Link | Link to updating a user. | Entries, assets, content types |
Some of sys properties, while having the same label, render different kinds of data depending on the API. Please see the descriptions of these properties per API in the table below:
| Property name per API | Description | ||
|---|---|---|---|
| CMA | CDA | CPA | |
| firstPublishedAt | createdAt | - | Date and time a resource was published for the first time. |
| publishedAt | updatedAt | - | Date and time a resource was published after an update. |
| createdAt | - | createdAt | Date and time a resource was generated in the system. |
| updatedAt | - | updatedAt | Date and time a resource was updated in the system. |
Date and time format
Date and time must be formatted according to ISO 8601.
The table below displays the supported date and time formatting:
| Data type | Format | Examples |
|---|---|---|
| Date only | "YYYY-MM-DD" | "2015-11-06" |
| Date + time | "YYYY-MM-DDThh:mm:ss" "YYYY-MM-DDThh:mm:ss.sss" |
"2015-11-06T09:45" |
| Date + time + timezone | "YYYY-MM-DDThh:mm:ssZ" "YYYY-MM-DDThh:mm:ss±[hh:mm]" |
"2015-11-06T09:45:27Z" "2015-11-06T09:45:27+00:00" "2015-11-06T09:45:27-08:00" |
Collection resources and pagination
Contentful returns collections of resources in a wrapper object that contains extra information useful for paginating over large result sets:
{
  "sys": { "type": "Array" },
  "skip": 0,
  "limit": 100,
  "total": 1256,
  "items": [ /* 100 individual resources */ ]
}
In the above example, a client retrieves the next 100 resources by repeating the same request, changing the skip query parameter to 100. You can use the order parameter when paging through larger result sets to keep ordering predictable. For example, order=sys.createdAt will order results by the time the resource was first published.
API versioning
All API requests should specify a Content-Type header of application/vnd.contentful.management.v1+json.
If not specified, Contentful will route your request to the latest version of the API. This could break clients which expect the outdated API version. To be certain, always specify the Content-Type header.
Reference
Spaces
Spaces collection
Spaces are containers for content types and content, and API clients can fetch data from one or more spaces. You can be a member of multiple organizations, and owner and admin roles in the organization can create spaces in organizations.
When you sign up to Contentul for the first time, you create a new organization. When you're invited to an existing organization, you become a member of that organization.
Note: If you have a single organization, any space you create will be automatically associated with that organization. If you're an admin or an owner in multiple organizations you need to pass the ID of the organization with the X-Contentful-Organization header that you want to create the space in.
Note: If you are on our latest pricing model and have plans attached to your spaces, creating a new space via the API will assign the smallest available plan to it. If you've reached your limit of free spaces and have no payment details on file, you won't be able to create more spaces until you add payment details.
Get all spaces an account has access to
Create a space
Create a new space, specifying attributes in the request body.
Space
Get a space
Update a space name
The X-Contentful-Organization header is optional if an account belongs to one organization. Attributes are sent in the body of the request as a JSON payload, and you need to set the X-Contentful-Version to the Contentul API version you are using.
Delete a space
You delete an existing space by issuing a DELETE request to /spaces/ID. Deleting a space will remove all its resources, including content types, entries and assets. This action can not be undone.
Environments
Environments allow you to develop and test changes to data in isolation from other environments. You can use them for all purposes in your development process like QA, staging environments or in continuous integration.
Environments are resources in a space and can be accessed by a unique identifier. This means that two spaces can have an environment with the same name.
A space can have multiple environments. A space has a minimum of one environment, which is called master. The master environment cannot be changed, deleted or renamed.
When cloning environments, please note that it is a heavy duty process that takes time proportionate to the amount of data contained in the source environment.
For a best practice explanation on how to use environments in your development workflow, please read the Managing multiple environments article.
Creating environments
To create other environments next to master, you need to have the default space admin role or a role, which allows you to manage and use all sandbox environments in this space. While creating an environment, you need to understand that it can only be a copy of the current state of the master environment. See the Environment aware Resources chapter below for more information on what resources are copied to an environment. It is not possible to create or have empty environments or environments based on older versions of a master environment.
To create an environment, make a request to PUT /spaces/<id>/environments/staging specifying the name in the payload like {"name": "My staging environment"}. After this request got a successful response, please query the single endpoint of that environment to check if the environment is already available.
You can also create an environment with any other environment as a source by providing the X-Contentful-Source-Environment header and providing it with the environment ID for the desired source environment.
Access content in an environment
To request content from an environment, you need to provide another fragment in the url. For example to get all entries from the previously created staging environment, use /spaces/<id>/environments/staging/entries.
Requests to /spaces/<id>/entries without the environment fragment will implicitly request content from the master environment.
Environment aware resources
The following resources are environment aware. This means upon creation of an environment, the following resources are copied from the master environment to the environment you want to create:
App Installations
Assets
Content Types
Editor Interfaces
Entries
Extensions
Locales
Releases
Scheduled Actions
Upon copying, all resources maintain their original metadata like sys.id or createdAt.
All other resources are available on a space level only. Personal access tokens allow access according to your role. This means if you have access to a space and have the default space admin role or a role, which allows to manage and use all sandbox environments in this space, you can use your PAT to access all environments. For CDA/CPA API key pairs, you can select the environments for which they have access, please refer to the API keys section in this document for more information.
Environment states
An environment can have different states determined by the sys.state property.
| Status | Description |
|---|---|
| queued | The environment was queued successfully and will be created soon. |
| inProgress | The environment is currently being created. |
| ready | The environment is ready to use. |
| failed | The environment failed to get to a ready state. |
The master environment is always in state ready.
Environments and rate limiting
All requests to environments in a space count against the organizations rate limits bucket.
Environments and webhooks
Webhooks can be triggered for one or multiple environments by using the filters property of a
webhook. Supported scenarios are:
trigger only for specific environments by specifying environment constraints in the
filtersproperty (e.g.{"filters": [{"equals": [{"doc": "sys.environment.sys.id"}, "some-env-id"]}]})trigger for all environments by not setting any environment filters (e.g.
{"filters": []})trigger only for the
masterenvironment by omitting thefiltersproperty or setting its value tonull. This scenario handles webhooks created prior to introduction of environments in a backwards compatible manner.
Please refer the webhooks reference for more details.
There are no events for creating or deleting an environment.
Environments and snapshots
Snapshots are only available for entries and content types belonging to the master environment. Snapshots are not available in the sandbox environments.
Environment collection
Get all environments of a space
Create an environment
Create an environment with an auto-generated sys.id.
Create an environment from a specified environment
Create a new environment with an auto-generated sys.id from a specified environment (not master).
Environment
Get a single environment
Create an environment with ID
Create an environment with ID from a specified environment
Create a new environment with a specified sys.id from a specified environment (not master).
Update an environment
Notes: When updating an existing environment, you need to specify the last version of the environment you are updating with X-Contentful-Version.
Delete an environment
Environment aliases
An environment alias allows you to access and modify the data of an environment, called the target environment, through a different static identifier.
You must opt-in to this feature in the Contentful web app on the Settings > Environments page. During this opt-in process, we create a default alias with the ID master. This alias cannot be renamed or deleted. Once you've opted in, you can create up to two more aliases. Only space admins can opt-in and manage environment aliases.
Aliases and target environments can be used to enhance your development and deployment workflows. For example, you can safely apply content model changes and roll them back when necessary or use them in your CI/CD pipelines.
Check out the concepts section to find out more about environment aliases.
Creating environment aliases
When you set up this feature for your space, we create a default master environment alias for you. You can also create up to two more aliases by sending a PUT request to spaces/<id>/environment_aliases/<alias_id> and specifying the target environment in the payload as described below.
Aliases must always target an existing environment. Environments targeted by aliases cannot be deleted. The master environment alias cannot be deleted.
Updating environment aliases
To change the target environment of an environment alias, you need to be a space admin. Similar to environments, you cannot change an environment alias id.
You do this by sending a PUT request to /spaces/<id>/environment_aliases/<alias_id> specifying the target environment in the payload as described below.
Deleting environment aliases
You can delete an environment alias by sending a DELETE request to /spaces/<id>/environment_aliases/<alias_id>. It is not possible to delete the master alias or its target environment.
Accessing data using an environment alias
To request data using the environment alias, specify the alias ID instead of the ID of the target environment.
For example, if the master alias targets an environment with ID target-environment, you can access its data from /spaces/<id>/environments/master/....
Master alias
Requests without the environment alias fragment will be treated like requests to the master environment alias.
For example, requests to /spaces/<id>/entries will have the same outcome as requests to /spaces/<id>/environments/master/entries.
New environment properties when using aliases
Fetching an environment can now be done through the environment's ID or alias ID.
New properties are introduced on environments that are targeted by aliases.
- Fetching the environment using the environment identifier e.g.
target-environment
GET /spaces/{space_id}/environments/{environment_id}
#  Sample response body
{
  "name": "target-environment",
  "sys": {
    "type": "Environment",
    "id": "target-environment",
    "version": 1,
    "space": { ... },
    },
    # NEW - list of environment aliases that target this environment
    "aliases": [{
      "sys": {
        "type": "Link",
        "linkType": "EnvironmentAlias",
        "id": "master"
      }
    }],

    "status": { ... },
    "createdBy": { ... },
    "createdAt": "2018-10-08T09:07:03Z",
    "updatedBy": { ... },
    "updatedAt": "2018-10-08T09:07:03Z"
  }
}- Fetching the environment using the environment alias identifier
master
GET /spaces/{space_id}/environments/{environment_alias_id}
# Sample response body
{
  "name": "master",
  "sys": {
    "type": "Environment",
    "id": "master",
    "version": 1,
    "space": { ... },
    # NEW - the targeted environment
    "aliasedEnvironment": {
      "sys": {
        "type": "Link",
        "linkType": "Environment",
        "id": "target-environment"
      }
    },
    # NEW - list of environment aliases that target this environment
    # for consistency we also return the aliases
    "aliases": [{
      "sys": {
        "type": "Link",
        "linkType": "EnvironmentAlias",
        "id": "master"
      }
    }],

    "status": { ... },
    "createdBy": { ... },
    "createdAt": "2018-10-08T09:07:03Z",
    "updatedBy": { ... },
    "updatedAt": "2018-10-08T09:07:03Z"
  }
}
Environment alias collection
Get all environment aliases of a space
Environment alias
Get a single environment alias
Create/Update an environment alias
Use this endpoint to create a new environment alias or change the environment which the environment alias references.
Note that when updating an environment alias, the following headers need to be specified:
X-Contentful-Version, you need to specify the last version of the environment alias you are updating with
Delete an environment alias
Organizations
Organizations are the top level entity in Contentfuls hierarchy, consisting of spaces, users and a subscription plan, which defines the limits for the Organization. They allow the management of projects with separate pricing as well as an additional permission system, which manages users' roles within the Organization.
Organizations collection
Get all organizations an account has access to
Organization
Get an organization id an admin or owner has access to
Put an organization id an admin or owner has access to
Organization access grant
Get an organization access grant
This endpoint allows you to verify whether the token has access permissions for this organization.
Security Contacts
Security contacts collection
Get an organization security contacts an admin or owner has access to
Post an organization security contacts an admin or owner has access to
Security Contact
Update an organization security contact an admin or owner has access to
Delete an organization security contact an admin or owner has access to
Content types
Defining a content type is a fundamental step in powering your applications with Contentful. A content type consists of a set of fields and other information, read this guide to learn more about modeling your content.
Content type collection
Get all content types of a space
Create a content type with POST
Whilst it's possible to create content types with POST, it's strongly discouraged.
When you use this endpoint, the API will automatically generate an ID for the created content type and return it with the response.
Using the method outlined below allows you to control the ID of the created content type. This is important for content type IDs as they are often used as parameters in code.
Content type
Create a content type with PUT
Update a content type
Use this endpoint to create a new content type with the specified ID, or to update a specific content type using its ID.
X-Contentful-Version.
Validations
When creating or updating a content type, you can add or remove validations to the fields in the content type schema by specifying the validations property of a field.
| Validation | Description | Applicable to | Example |
|---|---|---|---|
linkContentType |
Takes an array of content type ids and validates that the link points to an entry of that content type. | Links to entries | {"linkContentType": ["post","doc","product"]} |
in |
Takes an array of values and validates that the field value is in this array. | Text, Symbol, Integer, Number | {"in": ["General", "iOS", "Android"]} |
linkMimetypeGroup |
Takes a MIME type group name and validates that the link points to an asset of this group. | Links to assets | {"linkMimetypeGroup": ["image"]} |
size |
Takes min and/or max parameters and validates the size of the array (number of objects in it). | Arrays, Text, Symbol, Rich Text | {"size": { "min": 5, "max": 20}} |
range |
Takes min and/or max parameters and validates the range of a value. | Number, Integer | {"range": { "min": 5, "max": 20}} |
regexp |
Takes a string that reflects a JS regex and flags, validates against a string. See JS reference for the parameters. | Text, Symbol | {"regexp": {"pattern": "^such", "flags": "im"}} |
prohibitRegexp |
Inverse of regexp: Takes a string that reflects a JS regex and flags, validates against a string and expects to not match. |
Text, Symbol | {"prohibitRegexp": {"pattern": "(bad|word|list)", "flags": "iu"}} |
unique |
Validates that there are no other entries that have the same field value at the time of publication. | Symbol, Integer, Number | {"unique": true} |
dateRange |
Validates that a value falls within a certain range of dates. | Date | {"dateRange": {"min": "2017-05-01","max": "2020-05-01"}} |
assetImageDimensions |
Validates that an image asset is of a certain image dimension. | Links to assets | {"assetImageDimensions": {"width": {"min": 100,"max": 1000},"height": {"min": 200,"max": 2300}}} |
assetFileSize |
Validates that an asset is of a certain file size. | Links to assets | {"assetFileSize": {"min": 1048576,"max": 8388608}} |
enabledNodeTypes |
Constraints the allowed node types for Rich Text. | Rich Text | {"enabledNodeTypes": ["heading-1", "quote", "embedded-entry-block"]} |
enabledMarks |
Constraints the allowed marks for Rich Text. | Rich Text | {"enabledMarks": ["bold", "italic"]} |
To remove a specific validation, update the content type leaving that validation out of the field's validations collection. To remove all the validations applied to a field, update the content type schema removing the validations property.
Update a content type with validations
Validations for hidden and required fields
disabled: true and required: true but is left empty, a validation error occurs and you cannot publish the content type. Fields that have a default value set are not considered empty and can still be published.
To continue publishing entries with hidden and required fields, change the validation of these fields to optional required: false. You can manually update the validation for each field, or run the following script to make the changes in bulk:
import contentfulManagement from 'contentful-management';

const SPACE_ID = process.env.SPACE_ID ?? 'your_space_id';
const ENVIRONMENT_ID = process.env.ENVIRONMENT_ID ?? 'your_environment_id';
const ACCESS_TOKEN = process.env.ACCESS_TOKEN ?? 'your_access_token';

const client = contentfulManagement.createClient({
  accessToken: ACCESS_TOKEN,
});

const isRequiredAndHidden = (field) =>
  field.required === true && field.disabled === true;

async function makeHiddenFieldsOptional() {
  const space = await client.getSpace(SPACE_ID);
  const environment = await space.getEnvironment(ENVIRONMENT_ID);
  const contentTypes = await environment.getContentTypes();

  for (const contentType of contentTypes.items) {
    const requiredAndHiddenFields =
      contentType.fields.filter(isRequiredAndHidden);

    if (requiredAndHiddenFields.length === 0) {
      continue;
    }

    requiredAndHiddenFields.forEach((field) => (field.required = false));

    try {
      const updatedContentType = await contentType.update();
      await updatedContentType.publish();
      console.log(`Update content type: ${contentType.name}`);
    } catch (error) {
      console.error(
        `Failed to update content type: ${contentType.name}`,
        error,
      );
    }
  }

  console.log('Done');
}

makeHiddenFieldsOptional().catch(console.error);
Rich text node type validations
| Validation | Description | Applicable to | Example |
|---|---|---|---|
linkContentType |
Takes an array of content type ids and validates that the link points to an entry of that content type. | embedded-entry-block, embedded-entry-inline, entry-hyperlink |
{"linkContentType": ["post","doc","product"]} |
size |
Takes min and/or max parameters and validates the number of entries. | asset-hyperlink, embedded-asset-block, embedded-entry-block, embedded-entry-inline, entry-hyperlink, embedded-resource-block, embedded-resource-inline, resource-hyperlink |
{"size": { "min": 5, "max": 20}} |
allowedResources |
Defines the entities that can be referenced by the field. It is only used for cross-space references. | embedded-resource-block, embedded-resource-inline, resource-hyperlink |
{"allowedResources": []} |
Rich text node type validations contain validations and allowed resources for the specified node type. See the example below:
{
  "nodes":{
    "embedded-entry-block":[
      {
        "size":{
          "min":1,
          "max":5
        },
        "message":"..."
      },
      {
        "linkContentType":[
          "foo"
        ],
        "message":"..."
      }
    ],
    "embedded-resource-block":{
      "validations":[
        {
            "size": {
                "min": 0,
                "max": 10
            },
            "message": "..."
        }
      ],
      "allowedResources":[
        {
          "type":"Contentful:Entry",
          "source":"crn:contentful:::content:spaces/<spaceId>/environments/<environmentId>",
          "contentTypes":[
            "foo",
            "bar"
          ]
        }
      ]
    }
  }
}
For details about allowedResources see Cross-space referencess.
Default values
Using the defaultValue property of a field, you can define a value that is applied when entries are created.
If defaultValue is omitted the field will not be pre-filled with any value. See the example below:
{
  "name": "foo",
  "fields": [
    {
      "id": "title",
      "name": "Title",
      "type": "Text",
      "defaultValue": {
        "en-US": "default title",
        "it-IT": "titolo predefinito",
        "fr-FR": null
      },
      "localized": true
    },
    {
      "id": "color",
      "name": "Color",
      "type": "Symbol",
      "defaultValue": {
        "en-US": "blue"
      },
      "localized": false
    },
    {
      "id": "labels",
      "name": "Labels",
      "type": "Array",
      "localized": false,
      "items": {
        "type": "Symbol"
      },
      "defaultValue": {
        "en-US": ["quick_read", "easy"]
      }
    },
    {
      "id": "breaking_news",
      "name": "Breaking news",
      "localized": true
    }
  ]
}
You can localize default values by providing separate values for each locale. When the value is omitted, in the entry creation request, then the configured default value is applied and the entry saved with it. In case of a non-localized field, only the default value targeting the default locale will be applied to the new entry.
You can set the default value for a locale to be null. This can be helpful to interrupt the locale fallback and
see your field empty after the entry is created.
Default values are not validated according to the field validations property. This means that they are applied to new entries even if they are invalid.
In this case, those entries can't be published until the field value is fixed.
Limitations: If the default locale of an environment changes, the default value configuration is not modified. So the value targeting the previous default locale will still be applied to it. Currently not all the field types support default values. The supported field ones are:
{type: "Symbol"}{type: "Text"}{type: "Integer"}{type: "Number"}{type: "Date"}{type: "Boolean"}{type: "Array", items: {type: "Symbol"}}only short texts arrays are supported
Annotations
Annotations provide you with means to attach semantic metadata to a content type or parts of it. Once assigned, they can be interpreted by applications and services to adjust their behaviour accordingly.
For example, in Compose an annotation can be assigned to any content type. Once assigned, this content type will be available for use as a page type in Compose, making all entries of that content type available for editing.
We provide a small set of system annotations to drive the behaviour of Experiences and Compose. You can find a list of the annotations below.
| Annotation ID | Can be assigned to | Description |
|---|---|---|
Contentful:ExperienceType |
Content type | A content type with this annotation defines the data structure for Experiences. Learn more |
Contentful:AggregateRoot |
Content type | Adding this annotation to a content type will make it available as a page type in Compose. Learn more |
Contentful:AggregateComponent |
Content type fields of type Link pointing to an entry (single and multiple references) |
Adding this annotation to a field will turn it into a page component in Compose. Learn more |
Some of the annotations are assigned automatically. You can find a list of them below.
| Annotation ID | Is assigned to | Description |
|---|---|---|
Contentful:ManagedByEnvironmentTemplate |
Content type | This annotation is automatically assigned to every content type installed by Content model templates. It indicates which content types are managed by a template by showing a small icon in the Contentful web app and Compose. |
Contentful:GraphQLFieldResolver |
Field | When the "Resolve content on delivery" checkbox is selected in the field settings under the appearance tab in the content model editor, an annotation is automatically assigned to that field. This annotation specifies the app responsible for resolving third party content in GraphQL queries. |
Assigning annotations
By adding a metadata.annotations property to the payload, you can assign annotations to either the content type itself
or individual fields of that content type. Annotations that can be assigned to individual fields will usually have additional
restrictions to which type of field they can be assigned (see Contentful:AggregateComponent above).
The example payload below shows you how to assign annotations to a sample content type. It will do the following things:
Assign the
Contentful:AggregateRootannotation to the content type itselfAssign the
Contentful:AggregateComponentannotation the the reference fieldsections
{
  "name": "Page",
  "displayField": "title",
  "fields": [
    {
      "id": "title",
      "name": "Name",
      "type": "Symbol"
    },
    {
      "id": "slug",
      "name": "Slug",
      "type": "Symbol"
    },
    {
      "id": "sections",
      "name": "Sections",
      "type": "Array",
      "items": {
        "type": "Link",
        "linkType": "Entry"
      }
    }
  ],
  "metadata": {
    "annotations": {
      "ContentType": [
        {
          "sys": {
            "id": "Contentful:AggregateRoot",
            "type": "Link",
            "linkType": "Annotation"
          }
        }
      ],
      "ContentTypeField": {
        "sections": [
          {
            "sys": {
              "id": "Contentful:AggregateComponent",
              "type": "Link",
              "linkType": "Annotation"
            }
          }
        ]
      }
    }
  }
}
Changing field IDs
You can change the ID of a content type field in the Contentful web app. You can also change it via the API, by sending the newId property in the field's payload to override the current ID.
The API will return different data after this change, and this might break your existing code base. Read more about managing changes to content structure in our multiple environments guide.
Update a content type with field ID
Omitting fields
If you have fields in your content type and entries you don't want to distribute to end users (e.g. workflow states), you can omit fields from the CDA and CPA responses. To do so, update the content type with the omitted property set to true in the chosen field and activate it.
The field will still be available as part of the CMA responses and in the web app but skipped in the CDA and CPA.
To revert this, repeat this but with omitted set to false.
Deleting fields
To delete fields you no longer need, first, omit the field you're targeting for deletion and activate the content type. This step is mandatory to avoid accidental data loss. It allows you to try whether your client applications can handle the deletion and provides an easy way to revert that change.
Once you have confirmed it's safe to delete the field, update your content type with the corresponding field removed from the payload, or with the deleted property set to true on the content type field you intend to delete. The deletion becomes final after you once again activate the content type. This action is permanent and cannot be undone.
Get a single content type
Delete a content type
Before you can delete a content type you need to deactivate it.
Content type activation
Activate a content type
Deactivate a content type
Activated content type collection
Get all activated content types of a space
Retrieves the activated versions of content types, ignoring any changes made since the last activation.
UI Config
UI Config describes views and folders in the Contentful web app. A view is a list of filters and sorting behavior that refines the content list according to different criteria.
You can set UI Config for all members in an environment, or just for the current user.
contentTypeIds. However, contentTypeId is still supported.
When both properties are present, they need to be aligned and refer to the same content type ID.
UI Config
Get the UI Config
This endpoint returns the available UI Config in the current environment.
Update the UI Config
You can use this endpoint to update the UI Config in your environment. These settings are visible to everyone in the environment.
User UI Config
To update the UI Config of the current user only, you can set the User UI Config. Changing the User UI Config won't affect other members in the environment.
Get the User UI Config
Update the User UI Config
You can use this endpoint to update your User UI Config.
Content model templates
Templates allow you to create, compose and replicate configurations of content models across your multi-space set-ups. You can build templates from your existing content models and install them in other spaces and environments.
To support installations of content model templates across multiple spaces, the EnvironmentTemplateInstallation domain type has been implemented. The EnvironmentTemplateInstallation entity represents the installation of one template in a specific environment. In their current form, templates can only be used to distribute content types and editor interfaces.
Templates are managed at organizational level.
Get all environment templates
Get all environment templates
Create an environment template
This action returns a collection with all the environment templates in the organization repository. The templates are ordered by creation date descending.
Create an environment template
Return one environment template
This action returns a specific environment template in the organization repository. The returned template is also the latest version in the /versions endpoint.
Return one environment template
Update an environment template
This action updates an environment template in the organization repository. It implicitly creates a new version of the template.
Update an environment template
Delete an environment template
This action deletes an environment template in the organization repository. It also removes all versions of this template. Entities that were created by this template through installations will not be affected and remain in the environments the template was installed in.
Delete an environment template
Return all versions of an environment template
This action returns all the versions of an environment template. The versions are ordered by version number descending.
Return all versions of an environment template
Return a version of an environment template
This action returns a certain version of an environment template.
Return a version of an environment template
Return a collection of all installations of an environment template
This action returns a collection with all installations of an environment template in the organization.
Return a collection of all installations of an environment template
Return a collection with all the installation objects for a given template
This action returns a collection with all the installation objects for a given template in the environment. An installation object is a document that links an environment and a template. It is created upon every request to install or update a template in an environment. Templates are versioned. Version updates or failed installations result in new installation objects so there can be more than an installation object for one template in an environment. Template installations can be used to trace the history and evolution of the template in the environment. The template installations are ordered by creation date descending.
Return a collection with all the installation objects for a given template
Install a template in the environment
This action installs a template in the environment. Every successful call to this endpoint creates a new installation object. The version number can be specified in the JSON payload. When no version is specified, it defaults to the latest version.
Install a template in the environment
Validate a template version for installation
This action validates a template version for installation in the environment.
Validate a template version for installation
Validate the latest template version for installation
This action validates the latest version of a template for installation in the environment.
Validate the latest template version for installation
Cross-space references
Cross-space references (formerly known as References across spaces) allow you to link content across multiple spaces. Using cross-space references, you can create reusable content and update multiple spaces with the same piece of content.
To accommodate referencing across multiple spaces, the ResourceLink field type has been added. The ResourceLink field carries references to entities in separate spaces. All ResourceLink fields are configured in the ContentType definitions as usual fields and accept the allowedResources validation rule. This validation restricts the entities that can be linked by the field.
Supported field properties: localized, required, omitted and disabled.
Contentful Resource Names
With cross-space references, the Contentful Resource Name (crn) API identifier is used.
A crn is a formatted string used to describe an object in the API domain. It uses a shared syntax that can be resolved across Contentful services.
Currently, crn is only used in the context of cross-space references to recognize a Contentful space, environment, or entry.
The respective syntax templates are:
crn:contentful:::content:spaces/<:spaceId>
crn:contentful:::content:spaces/<:spaceId>/environments/<:environmentId>
crn:contentful:::content:spaces/<:spaceId>/entries/<:entryId>
crn:contentful:::content:spaces/<:spaceId>/environments/<:environmentId>/entries/<:entryId>
The <:spaceId>, <:environmentId>, and <:entryId> portions must contain standard resource IDs. In the following snippets, the "{crn}" placeholder will be used where one of these is needed.
crn is equivalent to referencing the master environment.
Create a content type with a ResourceLink field
Use this endpoint to create a content type that includes the ResourceLink field type.
Create a content type with a ResourceLink field
Update a content type with a ResourceLink field
Use this endpoint to add a ResourceLink field to a content type or update an existing ResourceLink field.
Update a content type with a ResourceLink field
Create an entry with a ResourceLink field
Use this endpoint to create an entry with a ResourceLink field.
Create an entry with a ResourceLink field
Update an entry with a ResourceLink field
Use this endpoint to add a ResourceLink field to an entry or update an existing ResourceLink field.
Update an entry with a ResourceLink field
Native external references
Similar to cross-space references that allow you to link content across multiple spaces, Native external references allow you to integrate content from external sources using the Contentful App Framework.
To model the data from third-party systems, the following entity types have been introduced:
Resource Provider- a third-party system that provides resources. Each provider can have multiple resource types.Resource Type- a specific type of resource (not the resource itself) that is provided by a resource provider.Resource- a representation of real data in an external system.
Resource Provider
Create, return or delete a Resource Provider for a given App Definition in a given Organization.
Create a resource provider
PUT will fail if an app already has an associated resource provider.
function property which is an array of functions the app can run (currently limited to only one function). The
function.sys.id of the PUT request must be identical to the value of functions[0].id in the app's manifest file.
Get a resource provider
Delete a resource provider
Resource Type
Create, return or delete a Resource Type for a given App Definition in a given Organization.
Create a resource type
PUT will fail if an app has no associated Resource Provider.
Get a resource type
Delete a resource type
Resource Type Collection
Return all Resource Types for a given App Definition in a given Organization.
Get all resource types
Resource Type Collection In Environment
Return all Resource Types from the most recent app installed in a given Space and Environment.
Get all resource types in an environment
Resource
Return all Resources of a Resource Type in a given Space and Environment.
Get all resources in an environment
Space Enablements
Manage enablements for a given space
Get the enablements for a space
This endpoint returns the enablement status of all features in a space.
Note: If you request an enablements document for a space that does not have one already, a default with all items set to false will be created.
Update the enablements for a space
This endpoint allows you to enable or change features for a given space.
Note: You need to specify the last version of the space enablement document you are updating with X-Contentful-Version.
If no document exists yet you can specify 1.
Note: spaceTemplates and crossSpaceLinks must either both be set to true or both be set to false.
Get all space enablements for an organization
Get all enablements for an organization
This endpoint allows you to get all the enablements in your spaces across your organization.
Note: If you request an enablements document for a space that does not have one already, a default with all items set to false will be created.
Organization Enablements
Manage enablements for a given organization
Get the enablements for an organization
This endpoint returns the enablement status of all features in an organization.
false will be created.
Update the enablements for an organization
This endpoint allows you to enable or change features for a given organization.
X-Contentful-Version. If no document exists yet, you can specify 1.
Editor interface
An editor interface represents the look and feel of an entry in the Contentful web app.
Editor interface collection
Get all editor interfaces of a space
Editor interface
An editor interface is a singleton resource of a content type, that means that there can only be one editor interface per content type at a time. If a content type is not activated yet, the API will return a 404 response. An editor interface is created automatically on the first activation of a content type and updated when a content type field is added, removed or renamed.
Read more about how the web app uses editor interfaces.
Get the editor interface
Update the editor interface
You can use this endpoint to update an existing editor interface. You will need to specify its last version with X-Contentful-Version.
UI Extensions
We recommend creating apps instead of UI extensions. Read the app FAQ to learn why.
UI Extensions allow you to customize and extend the functionality of the Contentful web app's entry editor. Extensions can be simple user interface controls, such as a dropdown, or more complex micro applications such as our Markdown editor.
To get started with UI extensions please refer to our dedicated extensibility section.
An extension resource describes to which fields your extension can be applied and where its code can be found. The following is a list of the properties of an extension resource:
| Property | Required | Type | Description |
|---|---|---|---|
| name | true | String | Extension name |
| fieldTypes | false | Array[Object] * | Field types where an extension can be used |
| src | ** | String | URL where the root HTML document of the extension can be found |
| srcdoc | ** | String | String representation of the extension (e.g. inline HTML code) |
| sidebar | false | Boolean | Controls the location of the extension. If true it will be rendered on the sidebar instead of replacing the field's editing control |
| parameters | false | Object | Definitions of configuration parameters |
* Valid field types are:
{type: "Symbol"}{type: "Text"}{type: "RichText"}{type: "Integer"}{type: "Number"}{type: "Date"}{type: "Boolean"}{type: "Location"}{type: "Object"}{type: "Link", linkType: "Asset"}{type: "Link", linkType: "Entry"}{type: "Array", items: {type: "Symbol"}}{type: "Array", items: {type: "Link", linkType: "Entry"}}{type: "Array", items: {type: "Link", linkType: "Asset"}}
** One of src or srcdoc has to be present:
Use
srcdocif you want to host the extension code in Contentful. Note that extensions hosted in Contentful have a size limit of 200KB.Use
srcif you host the extension yourself. Note that on this case your extension must be hosted on a HTTPS domain with CORS enabled.
Extensions collection
Get all extensions of a space
Create an extension
Extension
Use this endpoint to create a new extension with a specified ID, or to update a specific extension via its ID. When updating an existing extension, you need to specify the last version of the extension you are updating with X-Contentful-Version.
Create/update an extension
Get a single extension
Delete an extension
Entries
Entry object description
Entry object consists of the following top-level properties:
| Field | Type | Description |
|---|---|---|
| metadata | Metadata | User-controlled metadata. Note: Currently holds tags and concepts property, which contains lists of tags and taxonomy concepts assigned to an entry, respectively. |
| sys | Sys | Common system properties. For detailed description of properties, please refer to Common resource attributes. |
| fields | Object | Fields that are custom defined by a user through the definition of content types.fields object in CMA always includes locale. |
Entries collection
Entries represent text content in a space, and the data structure of an entry must adhere to a certain content type.
Get all entries of a space
To fetch specific entries like e.g. entries of a particular content type use query search parameters.
Create an entry
Before you can create an entry you need to create and activate a content type as outlined above.
When creating a new entry, you need to pass the ID of the desired content type as the X-Contentful-Content-Type header and pass the field data as a JSON payload.
When using this endpoint, an ID will be automatically generated for the created entry and returned in the response.
If default values are set for some field of the content type, they will be applied at entry creation, if the corresponding field isn't provided in the request body. Default values don't affect entry updates.
Published Entries collection
Use this endpoint to get all published entries of a given space.
Get all published entries of a space
Entry
Create an entry
Use this endpoint to create a new entry with a specified ID. When creating a new entry, you need to pass the ID of the entry's desired content type as the X-Contentful-Content-Type header.
Update an entry
Use this endpoint to update a specific entry via its ID. When updating an existing entry, you need to specify the last version of the entry you are updating with X-Contentful-Version.
You do not need to pass the ID of the entry's content type.
Patch an entry
Use this endpoint to update a specific entry via its ID using JSON Patch format. When patching an entry, you need to specify the current version of the entry you are updating with X-Contentful-Version.
// may result in the validation error if `description` field is undefined:
[{"op": "add", "path": "/fields/description/en-US", "value": "initial value"}]

// if `description` field is not defined on Entry, but defined in the Content Type, make sure to provide the locale in the payload:
[{"op": "add", "path": "/fields/description", "value": {"en-US": "initial value"}}]
Get a single entry
Use this endpoint to fetch an entry with a specified ID. All empty entry fields are omitted from the response, that means if the field is empty its key is not going to be presented in the response. If the entry has no set fields the corresponding key is missing as well. In order to update the entry with empty fields all keys that need to be updated should be added to the entry object.
Delete an entry
Entry references
Recursively collects references of an entry and their descendants, up to 10 levels deep, and returns them.
Limitations
Collect all descendants, up to 10 levels deep.
The maximum size of includes array is 1000.
Get entry references
Entry publishing
After publishing the entry, it will be available via the Content Delivery API.
Publish an entry
Unpublish an entry
Locale-based publishing
Publish or unpublish entry's fields in certain locales.
Publish entry locales
Unpublish entry locales
Entry archiving
You can only archive an entry when it's not published.
Archive an entry
Unarchive an entry
Uploads
The Upload API, available at upload.contentful.com, provides Contentful SDKs with a direct file upload service. You can upload any binary data (including images, videos and text files) and associate the uploaded files with different Assets within a Space.
The Upload API enables the uploading of files to remote storage. To complete an upload, the uploaded file must be associated with an Asset and that asset must be processed. If the association and processing steps are not executed successfully within 24 hours after uploading, the file and its metadata will expire and be deleted from the storage area. The expiration date of the file is indicated in the API response data as expiresAt.
You can associate an Upload resource with more than one Asset and/or locale
Uploading a file
To upload a file, you send a POST request to the create upload endpoint with the binary data in the request body, and include Content-Type: application/octet-stream in the request headers. Depending on the size of your file, a success response may take some time to return. Once the upload finishes, you will receive an Upload resource in the response body.
Associating an upload with an asset
When the upload request is successful you will receive an Upload resource containing an upload_id within the sys.id field that references the uploaded file. You need to use the upload_id to associate the Upload resource with an Asset.
To associate an Upload resource with an Asset, you need to pass upload_id to the asset creation end point of the CMA with the following structure:
{
  "fields": {
      "title": {
          "en-US": "My cute cat pic"
      },
      "file": {
          "en-US": {
              "contentType": "image/png",
              "fileName": "cute_cat.png",
              "uploadFrom": {
                  "sys": {
                    "type": "Link",
                    "linkType": "Upload",
                    "id": "<use sys.id of an upload resource response here>"
                  }
              }
          }
      }
  }
}
Maximum file size
The maximum file size should not exceed 1000MB per uploaded asset. See our Fair Usage Policy for more information. If you try to upload a larger file you will receive a Request Timeout error from the API.
Resumability
The current version of the Upload API doesn't support resumability. If you encounter an error during the upload process, you need to begin the process from the beginning. It's the client's responsibility to take recovery actions in case of an error.
Upload resource
The JSON structure for an Upload has the following structure:
"sys": {
    "id": "73DfxdBnwyhQNy95A8dvSf",
    "type": "Upload",
    "createdAt": "2017-02-21T07:49:25.000Z",
    "expiresAt": "2017-02-23T00:00:00.000Z",
    "space": {
        "sys": {
            "type": "Link",
            "linkType": "Space",
            "id": "qa65bkvd5q1q"
        }
    },
    "createdBy": {
        "sys": {
            "type": "Link",
            "linkType": "User",
            "id": "1QaAgxMYKvdas32K4v319F"
        }
    }
}
Upload a file
https://upload.contentful.com.
Uploads a file to temporary file storage. Include the binary data you want to send in the request body, and Content-Type: application/octet-stream in the headers.
Creating an upload resource
Retrieving an upload
https://upload.contentful.com.
Retrieves an unmodified image. This is the same URL from an asset's file.url field, containing the token ids and image name.
Retrieve an upload
Deleting an upload
https://upload.contentful.com.
Deletes a file from temporary data storage and all the metadata associated with the given upload_id.
By default, all uploaded files are automatically deleted after 24 hours starting from when first upload request is issued.
Delete an upload
Assets
Assets collection
Assets represent files in a space. An asset can be any file, including an image, a video, an audio file, or PDF. Assets are usually attached to entries with links.
You can localize assets by providing separate files for each locale. Assets which are not localized provide a single file under the default locale.
Creating an asset requires three steps and API calls:
Create an asset.
Process an asset.
Publish an asset.
Get all assets of a space
To fetch specific assets use query search parameter.
Create an asset
When using this endpoint, an ID will be automatically generated for the created asset and returned with the response.
Published assets collection
Get all published assets of a space
Retrieves the published versions of all assets in a space.
Asset
Create/update an asset
Use this endpoint to create a new asset with a specified ID, or update an existing asset with its ID.
Get a single asset
Delete an asset
Deleting an asset will remove the current asset and all previously referenced files on the CDN. It can take up to 48 hours until these files will be made unavailable from (assets|images|downloads|videos).ctfassets.net.
Asset processing
To publish an asset, or to preview it within the Contentful web app (under the "Media" tab), you need to process it before. This step is fetching the image from the given location to Contentful's system. This request might return before the asset processing is finished. The asset will have a fields.file.url for the respective locale if processing completed successfully.
Due to security considerations we forbid users to upload and process files with mime type text/html or text/javascript.
If you want to store HTML files in Contentful, please use application/octet-stream as the contentType. Keep in mind that these files will not be rendered by browsers by default.
Process an asset
Asset publishing
Publish an asset
After publishing the asset, it will be available via the Content Delivery API. It will also be available from our asset domain assets.ctfassets.net as specified in the fields.file.url of the asset or if it is an image, it is available from images.ctfassets.net. In this case, you can use query parameters to define the image size, cropping parameters and other options. Find out more in our Images API reference. Published assets do not need any authentication on the Images or Assets API.
Unpublish an asset
Unpublishing will put the asset back into draft state.
Locale-based publishing
Publish or unpublish asset's fields in certain locales.
Publish asset locales
Unpublish asset locales
Asset archiving
You can only archive an asset when it's unpublished.
Archive an asset
Archiving an asset will remove the current asset and all previously referenced files on the CDN. It can take up to 48 hours until these files will be made unavailable from (assets|images|downloads|videos).ctfassets.net.
Unarchive an asset
Unarchiving an asset will bring back the asset, the current and all previously referenced files into a draft state. It can take up to an hour for the files to be available on the CDN again.
Asset keys
Asset keys are used when signing Embargoed Asset URLs. This feature is only enabled on specific plans. Reach out to your Sales representative for more information about feature availability.
Asset key
Create an asset key
To sign embargoed asset URLs, you need to create an asset key. Secure asset URLs delivered by the CDA, CMA, or CPA will have a host of (images,assets,videos,downloads).secure.ctfassets.net. They cannot be accessed without first signing the URL.
Signing an embargoed asset URL is accomplished by the following steps:
Create an asset key for the space the asset URL belongs to. You must specify an
expiresAtvalue, a Unix epoch timestamp in seconds, and this can be no more than 48 hours in the future.Create a JWT with the embargoed asset URL as the
sub(JWT subject). Sign the JWT with the asset key'ssecret.Affix to the original embargoed asset URL the following query parameters:
policy- the asset key's policytoken- the JWT created in step 2
You may affix other query parameters as well, for example when using the Images API. These do not impact the validity of the signed URL.
By default, a signed asset URL will stop functioning after the expiresAt value that was specified when creating the asset key. When generating the JWT, you may optionally specify an exp (expiry) that will cause the signed URL to be unusable at the specified expiry time. If a per-URL expiry is greater than the expiresAt value specified when creating the asset key, the asset key's expiresAt value will be used instead.
Locales
Locales allow you to define translatable content for assets and entries. A locale includes the following properties:
name: A human readable identifier for a locale. For example, 'British English'.code: An identifier used to differentiate translated content in API responses. For example, 'en-GB'.fallbackCode: The code of the locale to use if there is no translated content for the requested locale. For example,en-US. You can set it tonullif you don't want a default locale. This can only be set via the API, and not with the web app or client libraries.
Locale collection
Get all locales of a space
The locales endpoint returns a list of all created locales. One will have the flag default set to true and is the locale used in the CDA, and you specified no other locale in the request.
Create a locale
Use this endpoint to create a new locale for the specified space. You cannot create two locales with the same locale code.
Locale
Get a locale
This endpoint returns a single locale and its metadata.
Update a locale
Use this endpoint to update existing locales in the specified space.
A space's default locale is permanent. This means you cannot change a locale's default property.
Deleting a locale
This endpoint deletes an existing locale. It's not possible to recover from this action, all content associated with this specific locale will be deleted and cannot be recreated by creating the same locale again.
Deleting a locale used as a fallback is not allowed. You first have to ensure that a locale is not used as a fallback before being able to delete it.
Taxonomy
Concept
Return, update or delete a single concept.
Get a concept
Update a concept
Update a single concept using JSON Patch format. When patching a concept, you need to specify the current version of the concept you are updating with X-Contentful-Version.
// may result in a validation error if `note` field is undefined:
[{"op": "add", "path": "/note/en-US", "value": "Some note"}]

// if the `note` field is undefined, provide the locale in the payload:
[{"op": "add", "path": "/note", "value": {"en-US": "Some note"}}]
Delete a concept
Deleting concepts does not remove existing references to them in content type validations, or entries.
Create a concept
Create a single taxonomy concept.
Create a concept
Create a concept with user-defined ID
Creates a single taxonomy concept with a user-defined ID.
Create a concept with user-defined ID
Concept collection
Return a list of taxonomy concepts for an organization.
Get concepts
Filters
There are following filters available on this endpoint:
| Filter | Description |
|---|---|
limit |
Limits the maximum number of concepts returned (per page) |
pageNext |
Pagination cursor from which to return the next page of concepts. Alternatively, just call the url at pages.next in the previous response |
pagePrev |
Pagination cursor from which to return the previous page of concepts. Alternatively, just use the full url from pages.prev in the previous response |
order |
Returns results ordered by the value specified. Supports sys.updatedAt, sys.createdAt, prefLabel |
conceptScheme |
Return only concepts belonging to the specified concept scheme |
query |
Filter results using a full-text search query, looking at prefLabel, altLabels, hiddenLabels and notations fields |
Descendants
Return a taxonomy concept's list of descendants.
Get descendants of a concept
Ancestors
Return a taxonomy concept's list of ancestors.
Get ancestors of a concept
Total concepts
Return the number of taxonomy concepts in an organization.
Get number of concepts
Concept scheme
Return a single a taxonomy concept scheme.
Get a concept scheme
Update a concept scheme
Update a single concept scheme using JSON Patch format. When patching a concept scheme, you need to specify the current version of the concept scheme you are updating with X-Contentful-Version.
// may result in a validation error if `definition` field is undefined:
[{"op": "add", "path": "/definition/en-US", "value": "Some definition"}]

// if the `definition` field is undefined, provide the locale in the payload:
[{"op": "add", "path": "/definition", "value": {"en-US": "Some definition"}}]
Delete a concept scheme
Create a concept scheme
Creates a new taxonomy concept scheme.
Create a concept scheme
Create a concept scheme with user-defined ID
Creates a new taxonomy concept scheme with a user-defined ID.
Create a concept scheme with user-defined ID
Concept scheme collection
Return a list of taxonomy concept schemes.
Get concept schemes
Total concept schemes
Return the number of taxonomy concept schemes in an organization.
Get number of concept schemes
Querying content based on a set of concepts
The query parameter starts with metadata.concepts.sys.id with operator [all].
Retrieve entries that match a set of concepts values
Returns a list of entries according to one or more of the specified concept IDs.
Querying content based on one or more concepts
The query parameter starts with metadata.concepts.sys.id with operator [in].
Retrieve entries that match at least one of the specified concepts values
Returns a list of entries according to the specified set of concept IDs.
Querying content based on one or more concepts and their descendants
The query parameter starts with metadata.concepts.descendants with operator [in].
Retrieve entries that match at least one of the specified concepts values or their descendants
Returns a list of entries according to the specified set of concept IDs and their descendant concepts.
Taxonomy on content types
Once a concept or concept scheme is created on the organization, users can define taxonomy validations on content types within an environment. This allows users to assign/change or remove concepts on entries.
Note:
- Content types payload comes with a
metadataproperty. This metadata property has as its value ataxonomylist. The taxonomy list contains links to all the concepts and concept schemes assigned to that content type.
Add a concept or concept scheme to a content type
Returns a specified content type with a new metadata property. The metadata property holds the list of concepts added.
Remove a concept or concept scheme from a content type
Returns a specified content type with a new metadata property. The metadata property holds the list of concepts updated.
Concepts on entries
Once a concept or concept scheme has been assigned to a content type within an environment, users can assign/remove concepts on entries.
Note:
Entries payload come with a
metadataproperty. This metadata property has as its value aconceptslist. The concepts list contains links to all the concepts assigned to that entry.You can query for entries by their concepts. For entries, the search is across content types.
Add a concept to an entry
Returns a specified entry with a new metadata property. The metadata property holds the list of concepts added.
Remove a concept from an entry
Returns a specified entry with a new metadata property. The metadata property holds the list of concepts updated.
Concepts on assets
Once a concept has been created, users can assign/remove concepts on assets.
Note:
Assets payload come with a
metadataproperty. This metadata property has as its value aconceptslist. The concepts list contains links to all the concepts assigned to that entry.You can query for assets by their concepts.
Add a concept to an asset
Returns a specified asset with a new metadata property. The metadata property holds the list of concepts added.
Remove a concept from an asset
Returns a specified asset with a new metadata property. The metadata property holds the list of concepts updated.
Tags
Tags are assigned to entries and assets to group them in your environment. Tags help you to easily search and organize content.
Tags are environment-scoped which means that they exist within and are unique to an environment. All tags are available via the Content Management API.
To learn how to use tags in the web app, please refer to our Tags category in our Help Center.
A tag includes the following properties:
name: A human-readable unique identifier for the tag
id: A unique identifier for referencing the tag
visibility: A sys property with value of
publicorprivatethat determines if a tag is publicly accessible or not
Note: Only space admins and users with permission to manage tags can create and manage tags.
Tag visibility
There are two visibility options for Tags:
private: Tags with this visibility option are only available via the Content Management API to all users with relevant permissions within the space. This is the default visibility.
public: Tags with this visibility option are available via all our APIs (CDA, CMA and CPA).
{
    "name": "Tag Name",
    "sys": {
        "visibility": "public | private", // The new visibility property
        "id": "TagID",
        ... // Other sys properties
    }
}Note: The tag visibility cannot be changed after the tag is created.
Tag collection
Get all tags
Returns all the tags that exist in a given environment.
Tag
Create a tag
Creates a new tag and returns it.
Note:
Both name and ID must be unique to each environment. Tag names can be modified after creation, but the tag ID cannot.
The tag visibility can be set in the header with
X-Contentful-Tag-Visibility. The visibility value set in the header overrides that in the payload.The tag visibility is set to
privateif there's no visibility specified in the payload or the header.
Get a single tag
Returns a single tag based on the given identifier.
Update a tag
Returns an updated tag.
Delete a tag
Deletes a tag from the entries and/or assets that reference it.
Querying tags
Tags can be queried by the name, ID sys.id or visibility sys.visibility of the tag.
Query tag by visibility
Returns all tags that have the same visibility type.
Tags on entries and assets
Once a tag is created in an environment, users can add the tag to entries and/or assets within that environment. They can also remove the tag from the entries and/or assets.
Note:
Entries and assets payload come with a
metadataproperty. This metadata property has as its value atagslist. The tags list contains links to all the tags that exist on the entry or asset.You can query for entries and assets by their tags. For entries, the search is across content types.
Add a tag to an entry
Returns a specified entry with a new metadata property. The metadata property holds the list of tags added.
The same behavior applies for assets.
Remove a tag from an entry
Returns a specific entry with a metadata property. If no other tags exist on the entry, the metadata property will hold an empty list of tags.
The same behavior applies for assets.
Querying content based on a set of tags
The query parameter starts with metadata.tags.sys.id with operator [all].
Retrieve entries or assets that match a specific set of tag values
Returns a list of entries according to the specified set of tag IDs.
Querying content based on one or more tags
The query parameter starts with metadata.tags.sys.id with operator [in].
Retrieve entries or assets that match at least one of the specified tag values
Returns a list of entries according to one or more of the specified tag IDs.
Querying content based on the tag presence
The query parameter starts with metadata.tags with operator [exists].
Check the presence of a tag on entries or assets
Returns all entries that are assigned with tags.
This parameter value is case sensitive: “True” or “False” are not valid values.
AI Actions
An AI Action is an entity that can be used to specify a configurable instruction that is later processed by a Language Learning Model (LLM). AI Actions are space-scoped, whereas invoking an AI Action takes place in the context of an entire environment.
AI Action configuration
Variables
Variables are configuration parameters for AI Actions that accept dynamic input when the action is executed. Each AI Action can define multiple variables of different types.
| Variable Type | Description |
|---|---|
Text |
Accepts plain text input from the user. Can be configured with predefined options using the in: ['option1', 'option2', ...] parameter to create dropdown selection behaviour, with strict: true a validation runs for the variable, enforcing one of the defined values. |
Locale |
Enables selection of a locale configured in the current space |
MediaReference |
Allows selection of media assets such as images or documents |
Reference |
Enables selection of existing entry or a field from entry |
StandardInput |
Default system input mechanism |
Model configuration
AI Actions can be configured with different language models and parameters that affect the model's behavior.
Available models
| Provider | Description |
|---|---|
| Anthropic Claude | Premium AI models optimized for natural language understanding and generation |
| OpenAI GPT | Advanced GPT models for versatile text processing and generation |
| Custom Models | Support for integrating third-party models via custom endpoints |
Temperature Configuration
The temperature parameter controls the randomness and creativity of AI-generated outputs:
| Setting | Value | Recommended Use Cases |
|---|---|---|
| Low | 0.1 | Content requiring precision: translations, factual summaries, technical documentation |
| High | 0.7 | Creative content: storytelling, marketing copy, idea generation |
| Custom | User-defined | Specialized use cases requiring fine-tuned output characteristics |
When creating or updating an AI Action, these configuration options can be specified in the request body.
AI Actions collection
Get all AI Actions
Returns all the AI Actions that exist in a given space.
Create AI Action
Use this endpoint to create a new AI Action for a specified space.
Query AI Actions
Query AI Actions
This endpoint allows to query ai actions with certain filters. The filters are defined as query parameters which are described in the endpoint specifications.
AI Action
Read AI Action
Use this endpoint to read an AI Action for a specified space.
Update AI Action
Use this endpoint to update an AI Action for a specified space.
Delete AI Action
Use this endpoint to delete an AI Action for a specified space.
Publish AI Action
Publish AI Action
Use this endpoint to publish an AI Action for a specified space.
Unpublish AI Action
Use this endpoint to unpublish an AI Action for a specified space.
Invoke AI Action
Invoke AI Action
Use this endpoint to invoke an AI Action for a specified space and environment.
Reading result of AI Action Invocation
AI Action Invocation
Use this endpoint to obtain the result of an AI Action Invocation for a specified space, environment, AI Action and Invocation.
Search parameters
You can add search parameters to your query, read the reference documentation for the Content Delivery API for a full list of search parameters supported. There are however some differences:
The CMA does not support the
includeandlocaleparametersThe CMA supports
relevanceas an option for theorderparameter on entry collection queries, ordering search results based on how relevant they are to a vectorized interpretation of the given search term
With the introduction of tags, you can query for entries / assets by their tags via the CMA.
Webhooks
Webhooks notify a person or service when content has changed by calling a preconfigured HTTP endpoint. You can use this for notifications, static site generators or other forms of post-processing sourced from Contentful.
Headers
Every webhook request includes the following predefined headers:
| Header Name | Value |
|---|---|
X-Contentful-Topic |
ContentManagement.[Type].[Action] |
X-Contentful-Webhook-Name |
Webhook's name |
Content-Type |
application/vnd.contentful.management.v1+json |
Consuming services can use the X-Contentful-Topic header to determine the type of the payload included in the webhook call without looking into it. The topics depend on various actions which are described in the concepts section.
The X-Contentful-Topic header can have the following values:
ContentManagement.ContentType.createContentManagement.ContentType.saveContentManagement.ContentType.publishContentManagement.ContentType.unpublishContentManagement.ContentType.deleteContentManagement.Entry.createContentManagement.Entry.saveContentManagement.Entry.auto_saveContentManagement.Entry.archiveContentManagement.Entry.unarchiveContentManagement.Entry.publishContentManagement.Entry.unpublishContentManagement.Entry.deleteContentManagement.Asset.createContentManagement.Asset.saveContentManagement.Asset.auto_saveContentManagement.Asset.archiveContentManagement.Asset.unarchiveContentManagement.Asset.publishContentManagement.Asset.unpublishContentManagement.Asset.delete
Other event types
ContentManagement.BulkAction.createContentManagement.BulkAction.executeContentManagement.Release.createContentManagement.Release.saveContentManagement.Release.deleteContentManagement.ReleaseAction.createContentManagement.ReleaseAction.executeContentManagement.ScheduledAction.createContentManagement.ScheduledAction.saveContentManagement.ScheduledAction.delete
Contextual Event Headers
Additionally, extra headers may be emitted to provide context for an action, such as an entry being published by a scheduled action or as part of a release.
| Header Name | Value |
|---|---|
x-contentful-scheduled-action-id |
The sys.id of the ScheduledAction that was executed. Present only when executed via a scheduled action |
x-contentful-bulk-action-id |
The sys.id of the BulkAction that was executed. Present only when executed via a bulk action |
x-contentful-release-action-id |
The sys.id of the ReleaseAction that was executed. Present only when executed via a release action |
x-contentful-release-id |
The sys.id of the Release that contained this Entry or Asset. Present only when executed via a release action |
x-contentful-release-version |
The sys.version of the Release that contained this Entry or Asset at execution time. Present only when executed via a release action |
Consuming services can use these headers to correlate events across multiple webhook calls to group the calls into a single downstream action, such as debouncing a rebuild of a website
CRN Header
When triggered by an App Action call or an App Installation, Asset, or Entry event, the X-Contentful-CRN header is included.
This header provides the Contentful Resource Name (crn), an API identifier of the entity that triggered the webhook.
Custom headers
Besides these headers, you can configure webhooks to be called with a set of additional headers of your choice. When creating or updating a webhook, you can provide a list of headers that will be included in successive calls to that webhook.
For example assume that:
One of your entries has just been published.
The name of your webhook is 'Notify subscribers'.
You have defined two custom headers,
X-Notify: subscribersandAuthentication: subscribers.
The webhook would be called with the following set of headers:
X-Contentful-Topic: ContentManagement.Entry.publish
X-Contentful-Webhook-Name: Notify subscribers
X-Notify: subscribers
Authentication: subscribers
Custom headers are provided with the headers property of the Webhook Definition:
{
  ...,
  "headers": [
    { "key": "X-Notify", "value": "subscribers" },
    { "key": "Authentication", "value": "subscribers" }
  ]
}
You can mark a header as secret. Value of secret headers is hidden in the web app, API responses and logs. The first time you define a secret header you need to provide its value and the secret flag set to true:
{
  ...,
  "headers": [
    { "key": "X-Notify", "value": "subscribers" },
    { "key": "Authentication", "value": "subscribers", "secret": true }
  ]
}
Any consecutive update can omit the value property as long as the secret is true. Previously provided value will be used in this scenario:
{
  ...,
  "headers": [
    { "key": "X-Notify", "value": "updated subscribers" },
    { "key": "Authentication", "secret": true }
  ]
}
Header values may contain values from the original payload: see header transformation.
Signed Request Verification Headers
When you've configured a webhook signing secret in the webhook settings of your space, a signature will be generated for all webhook requests coming from events in that space. When a consuming service receives a request, it can compute a signature in the same way. If the secret is the same, the signatures will match too, thus verifying that the sender knows the secret. For this reason, it is also important to not share the secret with any third party.
This signature and some additional metadata is then added to the headers of the request before it is sent. The headers look like this:
| Header Name | Value |
|---|---|
x-contentful-signature |
The computed signature of an individual request. |
x-contentful-signed-headers |
A comma-separated list of headers included in the computed signature. |
x-contentful-timestamp |
Timestamp of when the request was signed. Can be used to ensure a TTL and avoid processing stale or replayed events. |
Consuming services can use these headers to verify the authenticity and integrity of incoming webhooks. See verifyRequest in node-apps-toolkit for more information.
Body
The payload received by a webhook will change depending on the action type:
For
Publishit will receive the latest published version. The same payload as the CDA with the exception that the payload for Entries and Assets will contain all locales, e.g. instead offields.namewill befields['en-US'].name.For
UnpublishandDeleteit will receive a deletion object. In the case of Entries, the deletions are extended with the id of their Content Type.For
Auto Save,Archive,UnarchiveandCreateit will receive the latest draft version at the time the webhook was triggered. That's the same payload as the one available through the Management API.
Error handling and retry policy
Contentful uses the HTTP response status code of the webhook call to decide whether it succeeded or failed:
Success: The webhook responded with an HTTP status code < 300.
Error: The webhook responded with an HTTP status code >= 300.
In case of an error with a status code 429 or >= 500, the webhook periodically retries its request.
Filtering webhook calls
In many use cases receiving a webhook call for all the events taking place in Contentful leads to complex filtering logic that has to be implemented on the receiving side. There are two mechanisms allowing webhook calls to be triggered conditionally:
selection of a triggering event(s)
filtering based on properties of a webhook payload
An event is a combination of the entity type and an action performed on it. For example the Entry.save event happens when an
entry is updated with the CMA. ContentManagement.Entry.save is the topic for this event.
To select which events should trigger a webhook call set the topics property of a webhook to one or more event names. You can use
a wildcard character * to indicate all entity types or actions should cause a webhook call. Please note that if you use the
wildcard character and we add new entity types or actions your webhook receiver will be called with new events.
Possible values for topics are:
["*.*"]will trigger a webhook call for all the supported events in Contentful["Entry.*"]will trigger a webhook call for all actions performed on entries["*.save"]will trigger a webhook call when any of supported entities is saved["Entry.save", "Entry.delete"]will trigger a webhook call only for the events listed
Once triggering events are selected webhook calls can be narrowed down further using webhook payload filtering.
There are 6 webhook payload properties you can filter on:
sys.id- entity IDsys.environment.sys.id- environment IDsys.contentType.sys.id- content type ID (applicable only to Entry events)sys.createdBy.sys.id- User ID, created by (not applicable to Unpublish and Delete events)sys.updated.sys.id- User ID, updated by (not applicable to Unpublish and Delete events)sys.deletedBy.sys.id- User ID, deleted by (only applicable to Unpublish and Delete events)
These properties can be used as doc in the filters. There are 6 filters available:
| Operator | Example | Behavior |
|---|---|---|
| equality | {"equals": [ |
will trigger only for entity with ID main_nav |
| negation of equality | {"not": {"equals": [ |
will trigger for all entities but entity with ID main_nav |
| inclusion | {"in": [ |
will trigger if environment of an entity is either qa or staging |
| negation of inclusion | {"not": {"in": [ |
will trigger if environment of an entity is neither qa nor staging |
| regular expression | {"regexp": [ |
will trigger for all environments prefixed with ci- |
| negation of regular expression | {"not": {"regexp": [ |
will trigger for all environments that are not prefixed with ci- |
The filters property of a webhook holds zero or more filters in an array. While deciding if a webhook should be called all
filters are joined with logical AND.
If there is no value for the filters property (or it is null) then by default a webhook will be triggered only in the master
environment.
Combining all the mechanisms together we can achieve fine-grained webhook calls. The following webhook will be triggered only for
(un)publish actions performed on entries with IDs main_nav or footer_nav in all environments prefixed with test-:
{
  "name": "My webhook",
  "url": "https://my-webhook-receiver.com/ping",
  "topics": [
    "Entry.publish",
    "Entry.unpublish"
  ],
  "filters": [
    {"in": [{"doc": "sys.id"}, ["main_nav", "footer_nav"]]},
    {"regexp": [{"doc": "sys.environment.sys.id"}, {"pattern": "^test-.+$"}]}
  ]
}
Transforming webhook calls
By default every webhook call:
uses the
POSTHTTP methodhas the
Content-Typeheader set toapplication/vnd.contentful.management.v1+jsondoes not have the
Content-Lengthheader setsends a predefined body depending on the triggering event (as described above)
If you control the code of your webhook receiver you can respond to the default webhook call appropriately by implementing a custom logic in your receiver. The situation is different if you try to call an API you don't control with a webhook: most likely the default webhook payload won't adhere to the format expected by the API.
The transformation property of a webhook definition allows you to define:
custom HTTP method
custom
Content-Typeheaderif automatically computed
Content-Lengthheader should be includedcustom webhook call body that may or may not make use of the default webhook body
The transformation property is an optional object containing the following properties. None of these properties is required.
transformation.method can be one of:
POST(default)GETPUTPATCHDELETE
transformation.contentType can be one of:
application/vnd.contentful.management.v1+json(default)application/vnd.contentful.management.v1+json; charset=utf-8application/jsonapplication/json; charset=utf-8application/x-www-form-urlencodedapplication/x-www-form-urlencoded; charset=utf-8
Using the last two options will convert the JSON body to URL encoded form data.
transformation.includeContentLength can be either true or false. If true the Content-Length header will be present with its value set to automatically computed byte length of the request body.
transformation.body can be any arbitrary JSON data structure. It will be used as the webhook call body.
It's possible to use values from the original webhook payload in the transformed body. This can be achieved by JSON pointers in the body JSON. Depending on the referenced data either whole values or strings are resolved.
URL transformation
Webhook URLs can contain JSON pointers that are resolved to values from the original payload. The value resolution always follow the string template resolution logic. For example a webhook defined as follows will result in a call to https://my-webhook-endpoint.com/my-entry-1 for an entity with ID my-entry-1.
{
  "name": "Dynamic URL",
  "url": "https://my-webhook-endpoint.com/{ /payload/sys/id }"
}
Header transformation
Custom header values can contain JSON pointers as described below. This is achieved by JSON pointers that are resolved using the string template resolution logic.
The following header definition
{
  ...,
  "headers": [
    { "key": "X-CTFL-Entity-ID", "value": "{ /payload/sys/id }" },
    { "key": "X-CTFL-Entity-Type", "value": "{ /payload/sys/type }" }
  ]
}
will result in two headers on the actual webhook call if the webhook was triggered by a change of entry 42:
X-CTFL-Entity-ID: 42
X-CTFL-Entity-Type: Entry
Secret and HTTP Basic Auth headers are not transformed. Also, the header keys are not transformed.
Resolution strategies
Resolving a whole value
In your data structure introduce a string value that starts with
{and ends with}in a place you want to resolve the original valueIn between curly braces put an absolute JSON pointer to the property you want to resolve; the original webhook body is stored in the
payloadtop-level namespaceThe string value containing a pointer will be replaced with the resolved value
For example, given the following original payload:
{
  "sys" {
    "id": "entry-id"
    "type": "Entry"
  },
  "fields": {
    "title": {
      "en-US": "hello world"
    }
  }
}
And the following body transformation:
{
  "entryId": "{ /payload/sys/id }",
  "title": "{ /payload/fields/title }"
}
Your webhook will be called with:
{
  "entryId": "entry-id",
  "title": {
    "en-US": "hello world"
  }
}
Using string templates
In your data structure introduce a string value that contains an absolute JSON pointer to the property you want to resolve, wrapped with
{and}The original webhook body is stored in the
payloadtop-level namespaceJSON pointers will be replaced with resolved values
All values, including complex ones, will be stringified
For example, given the following original payload:
{
  "sys": {
    "id": "entry-id",
    "type": "Entry"
  },
  "fields": {
    "title": {
      "en-US": "hello world"
    }
  }
}
And the following body transformation:
{
  "entityInfo": "Entity of type { /payload/sys/type } with ID { /payload/sys/id }",
  "title": "Entity title is { /payload/fields/title/en-US }",
  "stringified": "Let's try to stringify an object: { /payload/fields/title }"
}
Your webhook will be called with:
{
  "entityInfo": "Entity of type Entry with ID entry-id",
  "title": "Entity title is hello world",
  "stringified": "Let's try to stringify an object: {\"en-US\":\"hello world\"}"
}
Helpers
In some cases, there can be a need for trimming or slightly modifying certain fields before delivering them to the webhook target. Contentful provides numerous helpers that can be used at the transformation level. For example:
{
  "content": "{ first-paragraphs 2 /payload/fields/content/en-US }",
}
Above-mentioned example limits the content field with first 2 paragraphs. If the content field has more than two paragraphs, the rest of the text gets trimmed. In addition to
trimming content, helpers are useful in modifying or refining content. Following is another transformation, using the strip-stop-words helper:
{
  "keywords": "{ strip-stop-words /payload/fields/content }",
}
The above transform filters out stop words and delivers only the keywords in the content field. For example:
Art is the expression or application of human creative skill and imaginationbecomes:
art expression application human creative skill imaginationRefer the table below to see the full list of available functions:
| Helper name | Parameter | Description |
|---|---|---|
| first-chars | Number | Selects first n characters of the field. Example: { first-chars 6 /payload/fields/content/en-US } |
| first-words | Number | Selects first n words of the field. Example: { first-words 12 /payload/fields/content/en-US } |
| first-paragraphs | Number | Selects first n paragraphs of the field. Example: { first-paragraphs 3 /payload/fields/content/en-US } |
| strip-stop-words | - | Strip out stop words (only English is supported). Example: { strip-stop-words /payload/fields/content/en-US } |
| strip-markdown | - | Strip out Markdown markup. Example: { strip-markdown /payload/fields/content/en-US } |
| stringify | - | Stringify the value pointed to. Example: { stringify /payload/fields } |
Transformation context
When transforming request body, URL, and headers, JSON pointers are used to resolve values. Values are resolved from a context object. Currently the context object has three properties:
payloadcontains the original webhook payloadtopicis a string containing the webhook topicuseris a stripped-down version of aUserentity for the user who executed action triggering the webhook call; the only available pointer is{ /user/sys/id }
AWS Webhook Integration
AWS offers over 100 cloud services, with the most prominent examples being data stores (S3, DynamoDB), serverless engines (Lambda), queuing systems (SQS) and many more.
Most AWS services use AWS Signature Version 4 to authenticate requests to their APIs. Computing the signature requires a prepared canonical request (a request without the Authorization header) and AWS credentials. They are all used as the input for the AWS Signature Version 4 algorithm. Its output is a value that should be used as the Authorization header.
The headers and body values of a webhook are likely changing between individual requests. This means the canonical request will differ and previously computed Authorization headers will be invalid. The proxy that the AWS Webhook Integration is using will re-compute the signature for every request.
If you have AWS Webhook Integration enabled you can use its proxy within a webhook so all requests will be automatically signed. You can either start from a webhook template or follow these steps to configure it manually:
Create a webhook performing a canonical AWS request to the service you use. All standard features available for webhooks are available.
Replace
amazonaws.comwithawsproxy.contentful.comin the webhook URL.Set a
X-Contentful-AWS-Proxy-Key-Idheader with your AWS Access Key ID.Set a
X-Contentful-AWS-Proxy-Secretheader with your AWS Secret Access Key. Make sure it's marked as secret!Optionally you can set a
X-Contentful-AWS-Proxy-Content-Typeheader to a customContent-Typevalue if a service being called requires it (for exampleapplication/x-amz-json-1.0).
The proxy will automatically sign all requests using the credentials provided. Credentials have to have IAM role assigned allowing to perform selected action.
The proxy is an internal system and cannot be accessed from the public Internet. Only our webhook system can use this proxy.
Webhooks collection
Get all webhooks of a space
Create a webhook
Webhook
Create/update a webhook
Get a single Webhook
Delete a webhook
Webhook calls
You often need to analyze the exact request and response payloads and headers to verify that the setup is correct or to diagnose issues. To help with this, some API endpoints are available that expose this information.
Webhook call overview
This call returns a list of the most recent webhook calls made, their status, possible errors, and the target URL.
Get an overview of recent calls
Webhook call details
The call details provide detailed information about the outgoing request and the response, including headers, body and possible errors. Request and response body are currently truncated at 500kb and 200kb respectively.
Get the webhook call details
Webhook health
The health endpoint provides an overview of recently successful webhook calls:
Get webhook health
Webhook security
WebhookSigningSecret is an entity that represents a symmetric key shared between Contentful and a webhook receiver.
Contentful uses this secret to sign requests sent to a webhook receiver, which allows a webhook receiver to verify that requests it receives are made by legitimate users of the app through Contentful.
WebhookSigningSecrets are a Space-level resource and only one can be created per Space.
Storing a WebhookSigningSecret for a webhook in Contentful enables:
- All future webhook calls requests will be automatically signed using the secret. The receiving backend can decide whether it wants to validate this signature or not, so enabling this should not have any immediate effect until used.
There are two constraints on the secret:
It must be exactly 64 characters long.
It must match this regular expression:
/^[0-9a-zA-Z+/=_-]+$/. This also means secrets using the hex or base64 character set are allowed.
We recommend using a cryptographic pseudorandom number generator to generate a secret. See our guide on request verification for examples on how to generate a secret.
Webhook signing secret
This request creates (or replaces an existing) signing secret for all webhooks in the space.
Create a webhook signing secret
Get a webhook signing secret
Delete a webhook signing secret
Roles
Creating custom roles allows an administrator to restrict the access of users to certain resources. Roles follow an "allow list" approach, which means that you need to define everything a user is allowed to do. A role contains a name, description, permissions and policies.
Permissions can be basic rules which define whether a user can read or create content types, settings and entries.
The following permissions are supported:
| Permission | Purpose |
|---|---|
Settings |
Can modify space settings. This permission allows users to modify locales, webhooks, and the space name. It does not grant permission to update users roles or delete the space. |
ContentModel |
Can modify content types (the content type builder is only shown to users who have this permission). |
ContentDelivery |
Can create and update API keys for this space |
Environments |
Can manage and use all environments in this space. Content level permissions do not apply in non-master environments. |
EnvironmentAliases |
Can create environment aliases and change their target environment. |
Tags |
Can create and delete tags. (This does not control the ability to add/remove tags from entries and assets) |
and each of those permission can have the following values:
| Value | Effect |
|---|---|
null, [] |
Disable the permission |
[ "read" ] |
Allow only reading (not supported for Settings and Environments) |
[ "manage" ], "all" |
Allow reading and writing |
You can also create policies to allow or deny access to resources in fine-grained detail. With these polices you can, for example, limit read access to only entries of a specific content type or write access to only certain parts of an entry (e.g. a specific locale).
For information on how policies are specified, refer to the programmatic role management guide.
Roles collection
Get all roles
This endpoint returns a paginated list of roles for a given space. Each role contains a name, a description, permissions and policies, which describe what a user can and cannot do.
Create a role
Use this endpoint to create a custom role. The role name must be unique within the space.
Role
Get a single role
Use this endpoint to read an existing single role.
Update a single role
Use this endpoint to update an existing role. You cannot use the endpoint to create a new role with a specific id.
Delete a single role
Use this endpoint to delete an existing role. You can only delete roles if there is no user in the space with only that role assigned, i.e. a user must have at least one role.
Snapshots
Snapshots represent an entity at a given time in the past. A snapshot is automatically created each time an entry or a content type is published.
Snapshots are not available in the sandbox environments (not master environment). While this is true for sandbox environments, aliasing can effect how snapshots are created. For example, having a 'master' alias pointing to a sandbox environment will create snapshots for that environment which might conflict when entries with the same ID exist.
Each snapshot has two top level objects: sys and snapshot.
The sys object contains technical information about the snapshot and has the following nested properties:
| Field | Type | Description |
|---|---|---|
| type | String | Type of the resource. For snapshots it will always be Snapshot |
| createdAt | Date | Timestamp with the moment when the snapshot was created |
| createdBy | Link | A reference to the user who created the snapshot |
| id | String | The unique identifier for this snapshot |
| snapshotType | String | The type of snapshot. For now the only valid value is publish |
| snapshotEntityType | String | Type of the entity in the snapshot. Entry or ContentType |
The snapshot object contains the content of the entity at the moment the snapshot was taken (excluding the Entry.metadata field).
Note that snapshot object has two fields only, similar to the three-field structure of Entry:
snapshot.fields- holds the fields of the Entry at the time of the snapshotsnapshot.sys- holds the technical details of the Entry at the time of the snapshot
There is no snapshot.metadata field because when taking a snapshot of the Entry, the metadata field (usually containing user-defined tags) is not stored in the snapshot.
Collection filters
When querying large snapshots or large collections, the size in bytes of the resulting dataset may be quite large.
To avoid downloading large datasets with unnecessary data from the API, use the select operator.
With the select operator, you can instruct the API to only return specific fields from your dataset.
For example, to limit the returned dataset to fields representing snapshot id and snapshot creation time, use the select operator in the form of: select with the value of sys.id,sys.createdAt.
Note that using the select operator to query the Snapshots API is more flexible and permissive than the more restrictive behavior of querying the Content Delivery API with select. When using the select operator with the Snapshots API you can:
request properties with depths larger than 2. For example,
selectwith valuesys.id,snapshot.fields.title,snapshot.fields.description.request a field with given locale and specify it at the end of the property path. For example,
selectwith valuesys.id,snapshot.fields.description.es,snapshot.fields.description.en.query snapshots of a specific Entry without having to specify the
content-typeargument.
Entry Snapshots collection
Get all snapshots of an entry
Entry Snapshot
Get a snapshot of an entry
Content Type Snapshots collection
Get all snapshots of a content type
Content Type Snapshot
Get a snapshot of a content type
Space memberships
Space memberships collection
Get all space memberships
This endpoint returns a paginated list of all space memberships.
Create a space membership
Use this endpoint to create a space membership (or invite a user to a space). A user can and must be flagged as 'admin' or assigned to certain roles.
Space membership
Get a single space membership
This endpoint returns details about an existing space membership.
Update a single space membership
This endpoint allows you to change a space membership. Use this to assign additional roles or flag a user as 'admin'.
Delete a single space membership
This endpoint allows you to delete a space membership. It only changes if a user can access a space, and not the user record.
Teams for a space
Teams collection
Get all teams for a space
This endpoint returns a paginated list of all teams with access to a space.
API keys
These endpoints allow you to manage Content Delivery API (CDA) and Content Preview API (CPA) keys. These tokens provide read-only access to one or more environments. For each environment you want to access with a given token, you need to include a link to this environment in the environments property when creating or updating. Only the environments specified in this property can be accessed using this token and any CDA or CPA request using this token to access content from an environment not specified here will result in a 404 error. If the environments key is not specified, the token will have access to the master environment by default.
We recommend using different access tokens for different environments in your development process. For example, use one for your production environment and another for staging or continuous integration. This allows you to revoke them individually in the future and manage your delivery channels independently.
Delivery API keys collection
Get all Delivery API keys
Create a Delivery API key
This endpoint allows you to create a Delivery API key and its corresponding Preview API key.
Delivery API key
Get a single Delivery API key
This endpoint returns details about an existing Delivery API key.
Update a single Delivery API key
This endpoint allows you to update a Delivery API key and its corresponding Preview API key.
Delete a single Delivery API key
This endpoint allows you to delete a Delivery API key and its corresponding Preview API key.
Preview API keys collection
Even though they are accessed through a different endpoint, Preview API keys are handled together with Delivery API keys. This means that when you create a CDA key, the corresponding CPA key will be created. A Delivery API key object will contain a link to its corresponding CPA key, which will need to be resolved calling the appropriate endpoint. Preview API keys also cannot be deleted, as they will be deleted along with their Delivery API keys.
Get all Preview API keys
Preview API key
Get a single Preview API key
This endpoint returns details about an existing Preview API key.
Access tokens
This set of endpoints allows you to manage CMA tokens (Personal access tokens, CLI tokens, OAuth application tokens). These tokens provide you with access to the Content Management API (CMA) and are an alternative means of authentication to our existing OAuth 2.0 flow.
A CMA token inherits the same access rights as your Contentful account. In other words, if you have access to multiple spaces and organizations, your token will too.
Access tokens collection
Create a Personal access token
This endpoint allows you to create a Personal Access Token. When creating a token, you must specify at least one scope, which is used to limit a tokens access. The following scopes are supported:
content_management_read- Read-only accesscontent_management_manage- Read and write access
Since content_management_manage allows you to read and write, specifying
"scopes": ["content_management_manage"] is equivalent to:
"scopes": ["content_management_read", "content_management_manage"]
expiresIn – Time-to-live (TTL) of the token expressed in seconds. This is an optional field. If the field isn't passed, then TTL is not set. Therefore, the token will not auto-expire.
Get all access tokens
This endpoint will return all active CMA tokens, including revoked tokens. The possible types of tokens are PersonalAccessToken, CLIToken and OAuthApplication.
The following table contains all the filters (query params) available for this endpoint:
| Filter | Description |
|---|---|
| sys.type[in] | Filter tokens to those matching the comma-separated list of types (e.g. sys.type[in]=PersonalAccessToken,CLIToken,OAuthApplication) |
| sys.expiresAt[gt] | Filter tokens by expiresAt date greater then provided value in ISO 8601 format (e.g. sys.expiresAt[gt]=2023-08-17T09:00:00) |
| sys.expiresAt[lt] | Filter tokens by expiresAt date less then provided value in ISO 8601 format (e.g. sys.expiresAt[lt]=2023-08-17T09:00:00) |
| sys.expiresAt=NULL | Filter tokens by expiresAt date equals null, it returns all tokens without an expiration date. Also works with ommited value, for example ?sys.expiresAt |
| sys.revokedAt[gt] | Filter tokens by revokedAt date greater then provided value in ISO 8601 format (e.g. sys.revokedAt[gt]=2023-08-17T09:00:00) |
| sys.revokedAt[lt] | Filter tokens by revokedAt date less then provided value in ISO 8601 format (e.g. sys.revokedAt[lt]=2023-08-17T09:00:00) |
| sys.revokedAt=NULL | Filter tokens by revokedAt date equals null, it returns all tokens without an expiration date. Also works with ommited value, for example ?sys.revokedAt |
| sys.createdAt[gt] | Filter tokens by createdAt date greater then provided value in ISO 8601 format (e.g. sys.createdAt[gt]=2023-08-17T09:00:00) |
| sys.createdAt[lt] | Filter tokens by createdAt date less then provided value in ISO 8601 format (e.g. sys.createdAt[lt]=2023-08-17T09:00:00) |
| sys.lastUsedAt[gt] | Filter tokens by lastUsedAt date greater then provided value in ISO 8601 format (e.g. sys.lastUsedAt[gt]=2023-08-17T09:00:00) |
| sys.lastUsedAt[lt] | Filter tokens by lastUsedAt date less then provided value in ISO 8601 format (e.g. sys.lastUsedAt[lt]=2023-08-17T09:00:00) |
| order | Orders the query results. The available options include sys.createdAt, -sys.createdAt, sys.expiresAt and -sys.expiresAt |
| query | Search parameter. Search implemented by 4 last characters of the token or the name of the token (e.g. ?query=token,?query=bQrU) |
More examples with date range filters:
?sys.expiresAt[gt]=${now_as_iso_date}&revokedAt=null – Returns all active tokens.
?sys.expiresAt[lt]=${now_as_iso_date}&revokedAt=null – Returns all expired tokens.
?revokedAt[lt]=${now_as_iso_date} – Returns all revoked tokens.
Access token
Get a single access token
This endpoint returns details about an existing CMA token.
Token revoking
Revoke an access token
This endpoint allows you to revoke a CMA token. It will set revokedAt to the timestamp of when the request was received.
Admin view Access tokens collection
Get all access tokens
The endpoint should return redacted versions of all CMA tokens belonging to the users who are members of the given organization. This access is only available for admins and owners.
| Filter | Description |
|---|---|
| sys.type[in] | Filter tokens to those matching the comma-separated list of types (e.g. sys.type[in]=PersonalAccessToken,CLIToken,OAuthApplication) |
| sys.expiresAt[gt] | Filter tokens by expiresAt date greater then provided value in ISO 8601 format (e.g. sys.expiresAt[gt]=2023-08-17T09:00:00) |
| sys.expiresAt[lt] | Filter tokens by expiresAt date less then provided value in ISO 8601 format (e.g. sys.expiresAt[lt]=2023-08-17T09:00:00) |
| sys.expiresAt=NULL | Filter tokens by expiresAt date equals null, it returns all tokens without an expiration date. Also works with ommited value, for example ?sys.expiresAt |
| sys.revokedAt[gt] | Filter tokens by revokedAt date greater then provided value in ISO 8601 format (e.g. sys.revokedAt[gt]=2023-08-17T09:00:00) |
| sys.revokedAt[lt] | Filter tokens by revokedAt date less then provided value in ISO 8601 format (e.g. sys.revokedAt[lt]=2023-08-17T09:00:00) |
| sys.revokedAt=NULL | Filter tokens by revokedAt date equals null, it returns all tokens without an expiration date. Also works with ommited value, for example ?sys.revokedAt |
| sys.createdAt[gt] | Filter tokens by createdAt date greater then provided value in ISO 8601 format (e.g. sys.createdAt[gt]=2023-08-17T09:00:00) |
| sys.createdAt[lt] | Filter tokens by createdAt date less then provided value in ISO 8601 format (e.g. sys.createdAt[lt]=2023-08-17T09:00:00) |
| sys.lastUsedAt[gt] | Filter tokens by lastUsedAt date greater then provided value in ISO 8601 format (e.g. sys.lastUsedAt[gt]=2023-08-17T09:00:00) |
| sys.lastUsedAt[lt] | Filter tokens by lastUsedAt date less then provided value in ISO 8601 format (e.g. sys.lastUsedAt[lt]=2023-08-17T09:00:00) |
| order | Orders the query results. The available options include sys.createdAt, -sys.createdAt, sys.expiresAt, -sys.expiresAt, sys.lastUsedAt, -sys.lastUsedAt, sys.user.firstName, -sys.user.firstName, sys.user.lastName, -sys.user.lastName |
| query | Search parameter. Search implemented by 4 last characters of the token (e.g. ?query=bQrU) |
More examples with date range filters:
?sys.expiresAt[gt]=${now_as_iso_date}&revokedAt=null – Returns all active tokens.
?sys.expiresAt[lt]=${now_as_iso_date}&revokedAt=null – Returns all expired tokens.
?revokedAt[lt]=${now_as_iso_date} – Returns all revoked tokens.
OAuth Applications
An OAuth Application token is a type of content management token designed for building public integrations that require access to data from other Contentful users.
OAuth Application Collection
Get all OAuth Applications
This endpoint retrieves a list of OAuth applications associated with the current user.
Create OAuth Application
This endpoint creates a new OAuth application.
OAuth Application
Get a single OAuth Application
This endpoint retrieves details of a specific OAuth application.
Update an OAuth Application
This endpoint updates details of a specific OAuth application.
Delete an OAuth Application
This endpoint deletes a specific OAuth application.
Users
User
Get the authenticated user
This endpoint returns details about your Contentful user account.
Entry comments
Users can add comments to an entry. This allows for teams to collaborate and have conversations.
Availability
Comments are globally available for all customers.
Mentions in comments
Mentions in comments allow you to tag collaborators in the comments tab of an entry. By including the “@” followed by an individual's or team's name, you can directly engage in conversations regarding feedback, workflow statuses, or general comments.
Only when creating a comment that includes a mention of a collaborator, the mentioned recipient will receive an email notification. The following comments that do not include a mention of a user or team, such as replies or updates, will not be subject to notifications.
To mention users, you must provide a body in Contenful's rich-text format. There, include a node of type mention where you indicate the user ID, using the following code:
{
        "nodeType": "document",
        "data": {},
        "content": [
          {
            "nodeType": "paragraph",
            "data": {},
            "content": [
              {
                "nodeType": "text",
                "value": "Text ab with ",
                "marks": [],
                "data": {}
              },
              {
                "nodeType": "mention", // new node type
                "data": {
                  "target": {
                    "sys": {
                      "id": "userId",
                      "type": "Link",
                      "linkType": "User"
                    }
                  }
                },
                "content": []
              },
            ]
          }
        ]
      }
To mention teams, instead of indicating the 'user ID' and a 'linkType: User', include the 'team ID' and use 'Team' as the 'linkType'. For example:
{
        "nodeType": "document",
        "data": {},
        "content": [
          {
            "nodeType": "paragraph",
            "data": {},
            "content": [
              {
                "nodeType": "text",
                "value": "Text ab with ",
                "marks": [],
                "data": {}
              },
              {
                "nodeType": "mention", // new node type
                "data": {
                  "target": {
                    "sys": {
                      "id": "teamId",
                      "type": "Link",
                      "linkType": "Team"
                    }
                  }
                },
                "content": []
              },
            ]
          }
        ]
      }
To submit comments with rich-text, provide the following header: x-contentful-comment-body-format to mention a user in the comment with the value: rich-text. You can request a comment using either format plain-text or rich-text by passing either value in this header.
The request for the header will return the following:
{
  "sys": {
    "version": 0,
    "parent": {
      "sys": {
        "id": "string",
        "linkType": "Comment",
        "type": "Link"
      }
    },
    "updatedAt": "string",
    "updatedBy": {
      "sys": {
        "id": "string",
        "linkType": "User",
        "type": "Link"
      }
    },
    "createdAt": "string",
    "createdBy": {
      "sys": {
        "id": "string",
        "linkType": "User",
        "type": "Link"
      }
    },
    "parentEntity": {
      "sys": {
        "id": "string",
        "linkType": "Entry",
        "type": "Link"
      }
    },
    "environment": {
      "sys": {
        "id": "string",
        "linkType": "Environment",
        "type": "Link"
      }
    },
    "space": {
      "sys": {
        "id": "string",
        "linkType": "Space",
        "type": "Link"
      }
    },
    "type": "Comment",
    "id": "string"
  },
  "body": Object
}
If you request a comment that was previously created as rich-text and request without a header or plain-text header specification, the comment will be returned in plain-text. In the plain-text representations, mentions will have the following format: User(id=1xGZIRXr2WPnsLkKfREo0z)``. You can also fetch the rich-textrepresentation of aplain-textcomment by passingrich-text` as the value in the above header.
Comment schema
A comment has two top level properties: body and sys.
These are described in detail below.
| Field | Type | Required | Description |
|---|---|---|---|
| body | String or Object | true | The body of the comment. String: maximum size of 512 bytes. Object: maximum of 100 nodes. |
| status | String | false | The status of the comment, it can be either active or resolved. active by default. |
| sys | Object | true | System resource properties |
In addition to the common sys properties comments have the following extra sys
properties
| Field | Type | Description |
|---|---|---|
| parentEntity | Link | A reference to the entry in which the comment exists |
| parent | Link | A reference to the replied comment (optional) |
| resolvedBy | Link | A reference to the user who resolved the comment (optional) |
The property resolvedBy is only defined if the comment is resolved. Reopening a comment will remove the field from the sys property.
Entry comments collection
Get all comments of an entry
Use this endpoint to get all the comments of an entry. This API does not offer pagination, calls to it will return all the existing comments.
It is possible to filter comments by optionally providing the status query parameter, if no value is provided comments with any status will be returned.
Permissions
Any user with read access to an entry can read all the comments in the entry. Space admins can read all the comments in any entry.
Create a comment
Use this endpoint to create a new comment. When using this endpoint, an ID will be
automatically generated for the created comment and returned in the response.
If you want to create a reply to a specific comment, you need to set the header X-Contentful-Parent-Id with the comment ID you want to reply to.
To reference a specific field and locale with your comment, you can set the header X-Contentful-Parent-Entity-Reference. Only values specifying a path to a field and locale of the entry are considered valid, therefore the value must match the pattern fields.<field_id>.<locale_code>.
There's a limit of 100 comments per entry. An attempt to create more than 100 comments will result in an error.
Permissions
Any user with read access to an entry can create comments in the entry. Space admins can create comments on any entry.
Errors
A
400 - BadRequesterror is returned if there's an attempt to create more than 100 comments in one entry.A
422 - ValidationFailederror is returned if thebodyfield has a value bigger than 512 bytes.
Comment
Get a single comment
Use this endpoint to fetch a comment with a specified ID.
Permissions
Any user with read access to an entry can read a comment in the entry. Space admins can read any comment in any entry.
Delete a comment
Use this method to delete a comment.
Permissions
Comment creators can delete their own comments. Admins can delete any comment on any entry.
Update a comment
Use this method to modify the body of the comment.
Permissions
The creator or an admin can update the comment.
Errors
An
403 - AccessDeniederror is returned if a user different from the comment creator or an admin changed the comment body.A
422 - ValidationFailederror is returned if thebodyfield has a value bigger than 512 bytes.
Workflow Comments
Users can add comments to a workflow. This allows for teams to provide additional context to a certain workflow step change.
Availability
Workflow comments are globally available for all customers.
Workflow comment schema
A worklfow comment has two top level properties: body and sys.
These are described in detail below.
| Field | Type | Required | Description |
|---|---|---|---|
| body | String | true | The body of the comment. It has a maximum size of 512 bytes |
| status | String | false | The status of the comment, it can be either active or resolved. active by default. |
| sys | Object | true | System resource properties |
In addition to the common sys properties comments have the following extra sys
properties
| Field | Type | Description |
|---|---|---|
| parentEntity | VersionedLink | A reference to the workflow within which the comment exists |
| parent | Link | A reference to the replied comment (optional) |
| resolvedBy | Link | A reference to the user who resolved the comment (optional) |
The property resolvedBy is only defined if the comment is resolved. Reopening a comment will remove the field from the sys section.
Workflow comments collection
Get all comments of a workflow
Use this endpoint to get all the comments of a workflow.
It is possible to filter comments by optionally providing the status query parameter, if no value is provided comments with any status will be returned.
Permissions
Any user with read access to workflows in the given space-environment can call this endpoint.
Workflow versioned comments collection
Get all comments of a specific workflow version
Use this endpoint to get all the comments of a workflow with a specific version.
Permissions
Any user with read access to workflows in the given space-environment can call this endpoint.
Workflow comment
Create a workflow comment
Use this endpoint to create a workflow comment for a specific workflow version. Currently we only support one workflow comment per workflow version.
Permissions
Any user with read access to workflows in the given space-environment can call this endpoint.
Errors
A
400 - BadRequesterror is returned if there's an attempt to create more than one workflow comment for a given workflow version.A
422 - ValidationFailederror is returned if:- The
bodyfield has a value bigger than 512 bytes
- The
Entry tasks
Tasks are the building blocks to setup editorial workflows on your content. They allow editorial teams to distribute work with clear accountability.
Unresolved tasks block entry publishing
The entry publishing method will return an error if an attempt is made to publish an entry which has unresolved tasks. This is a measure to avoid the accidental publication of content which is not ready to be released.
There can be cases where an entry has to be published even though it has unresolved tasks. There are two options in this case:
a space admin resolves or removes the tasks and then publishes the entry
the creators of the unresolved tasks remove them and then publish the entry
Availability
Tasks are only available on all Premium plans and spaces (in former Enterprise plans Tasks are only available on Performance 1x and above space types).
Task schema
A Task has five top level properties: assignedTo, status, dueDate, body and sys.
These are described in detail below.
| Field | Type | Required | Description |
|---|---|---|---|
| assignedTo | Link | true | A reference to the user/ team to whom/ which the task is assigned |
| status | String | true | Field that can take the values active or resolved |
| dueDate | Date | false | Timestamp of the moment the task is due |
| body | String | true | The body of the task, describing what has to be done. It has a maximum size of 512 bytes |
| sys | Object | true | System resource properties |
In addition to the common sys properties tasks have the following extra sys
properties
| Field | Type | Description |
|---|---|---|
| parentEntity | Link | A reference to the entry in which the task exists |
| resolvedAt | Date | Timestamp of the moment the task was resolved (optional) |
| resolvedBy | Link | A reference to the user who resolved the task (optional) |
Both properties resolvedAt and resolvedBy are only defined if the task is resolved. Reopening a task will remove both fields from the sys section.
Actors
When talking about tasks in this documentation we consider the following actors:
Task creator, the person or app that created the task.
Task assigner, the person who assigns a task to a user/ team. It will usually be the same as the creator.
Task assignee, the person or team that has to do the work specified in the task and resolve once finished. If a team is assigned, team members can act on its behalf (e.g. resolve a task).
Assigned Tasks collection
Get all tasks that are assigned to you
Use this endpoint to get all the tasks that are assigned to you. This API does offer pagination, calls to it will return a paginated list containing the tasks that are assigned to you and your team.
It is important to note that this endpoint expects the query parameter filter=myPendingTasks. A call without this parameter will return a 501 status code.
Permissions
Any user with read access to entries in the given space-environment can call this endpoint.
Entry Tasks collection
Get all tasks of an entry
Use this endpoint to get all the tasks of an entry. This API does offer pagination, calls to it will return a paginated list with tasks for that entry.
Permissions
Any user with read access to an entry can read all the tasks in the entry. Space admins can read all the tasks in any entry.
Create a task
Use this endpoint to create a new task. When using this endpoint, an ID will be automatically generated for the created task and returned in the response.
There's a limit of 100 tasks per entry. An attempt to create more than 100 tasks will result in an error.
Permissions
Any user with read access to an entry can create tasks in the entry. Space admins can create tasks on any entry.
The API does not check if the task assignee has read access to the entry where the task exists. If task assignees do not have read access to the entry they won't be able to resolve them.
Notifications
When a task is created an email is sent to the task assignee to let them know that a task has been assigned to them. If the task is assigned to a team, every user in that team receives an email.
If a due date is specified for a task, a reminder mail will be sent out two days before this date.
Errors
A
400 - BadRequesterror is returned if there's an attempt to create more than 100 tasks in one entry.A
422 - ValidationFailederror is returned if:- The
bodyfield has a value bigger than 512 bytes - The
statusfield has a value different toactiveorresolved
- The
Task
Get a single task
Use this endpoint to fetch a task with a specified ID.
Permissions
Any user with read access to an entry can read a task in the entry. Space admins can read any task in any entry.
Delete a task
Use this method to delete a task.
Permissions
Task creators can delete their own tasks. Admins can delete any task on any entry.
Notifications
No notification is sent when a task is deleted.
Update a task
Use this method to modify the body of the task, re-assign it to another member of the space or resolve it. Note that the body or the assignee of a task can't be modified if the task has already been resolved. Unresolve it first to be able to update these fields.
Permissions
Update permissions are a bit more complex so we are going to use a table to present all the possible combinations of which field can be updated by whom.
| Field \ Whom | Task assignee | Task creator | Space admin |
|---|---|---|---|
| assignedTo | no | yes | yes |
| body | no | yes | yes |
| status | yes | no | yes |
Errors
A
400 - BadRequesterror is returned if a task's body or assignee are updated after the task has been resolved.An
403 - AccessDeniederror is returned in the following cases:- A user different from the task assignee or an admin marked a task as resolved.
- A user different from the task creator or an admin changed the task assignee.
- A user different from the task creator or an admin changed the task body.
A
422 - ValidationFailederror is returned if:- The
bodyfield has a value bigger than 512 bytes - The
statusfield has a value different toactiveorresolved
- The
Notifications
Depending on which field is updated and by whom the recipient of the notification will vary.
- Updates to
body
| Who \ recipient | task assignee | task creator | space admins |
|---|---|---|---|
| task creator | yes | no | no |
| space admins | yes | yes | no |
- Updates to
assignedTo
| Who \ recipient | old task assignee | new task assignee | task creator | space admins |
|---|---|---|---|---|
| task creator | yes | yes | no | no |
| space admins | yes | yes | yes | no |
- Updates to
status
| Who \ recipient | task assignee | task creator | space admins |
|---|---|---|---|
| task assignee | no | yes | no |
| space admins | yes | yes | no |
Scheduled Actions
Enables users to create actions that will be performed on an entity at given time in the future.
Currently supported entities and actions:
Find out more regarding entry publish in entry publish docs.
Availability
Scheduled action feature is globally available for all customers.
Notifications
If an entry fails to publish at the scheduled time due to validation errors, an email will be sent to the user that created the Scheduled Action informing that it failed.
Limitations
The current limit of scheduled actions in scheduled status is 500. Once it's reached, no additional scheduled actions can be created.
In addition there is a limit of 200 scheduled actions that can be executed in a single minute.
The scheduled date for a scheduled action when creating or updating must be between the current time and up to 5 years in the future.
There is a limit of 200 entities when publishing an entity with references, e.g. a Compose page. The scheduled action will fail if the number of entities exceeds that limit.
Scheduled action schema
The scheduled action has the following properties:
| Field | Type | Required | Description |
|---|---|---|---|
| entity | Link | true | A reference to the entity object that the action is created for (Entry, Asset, Release). |
| environment | Link | true | A reference to the enviroment object that the action is created for. |
| scheduledFor | Object | true | The body of the scheduled action. |
| scheduledFor.datetime | String | true | The datetime the scheduled action is scheduled for in ISO8601 format. |
| scheduledFor.timezone | String | false | The timezone of the scheduled action. It should be a valid IANA timezone identifier. |
| action | String | true | Action name for action to be scheduled |
| sys | Object | true | System resource properties |
| error | Object | false | Present when the sys.status is failed. Contains more details on what caused the action to fail. |
| payload | Object | false | Object providing additional information about how the scheduled action will be executed |
Scheduled action status
Every scheduled action has a sys.status field. It contains one of the following values:
| Status | Description |
|---|---|
| canceled | The action was canceled by the user and will never be processed. |
| failed | The action failed to process successfully. |
| scheduled | The initial status of the scheduled action. |
| succeeded | The action has been processed successfully. |
Once the scheduled action is created the status is set to scheduled. In case the scheduled action is canceled before the execution, the status is set to canceled.
Once the scheduled action was executed the status is set to succeeded in case of successful execution and to failed if any error happened during execution process.
Scheduled action payload
Payload is used to provide additional information about how the scheduled action will be executed. It supports the following properties:
| Field | Description |
|---|---|
| withReferences | Filters applied to references of the entity. Note: The entity needs to belong to a content type with annotations. Note: Currently only 'sys.contentType.metadata.annotations.ContentType[nin]': ['Contentful:AggregateRoot'] filter is supported and is required. |
Scheduled actions collection
For more information about scheduled actions in the web app, see our Help Center article.
Get all scheduled actions of an entry
Use this endpoint to get all the scheduled actions of an entry.
Collection filters
Scheduled actions collection supports fillowing filters:
| Params | Required | Description |
|---|---|---|
| ?environment.sys.id=" |
true | Filter by the external environment ID. |
| ?entity.sys.id=1 | false | Filter by the list of entity ids |
| ?sys.status[in]=<scheduled|canceled...> | false | Filter by the list of the scheduled actions' statuses |
| ?sys.status=<scheduled|canceled...> | false | Filter by single scheduled actions' status |
| ?scheduledFor.datetime="ISO-time" | false | Filter by exact match of the scheduledFor.datetime property |
| ?scheduledFor.datetime[lt|lte|gt|gte]="ISO-time" | false | Filter by comparison the scheduledFor.datetime property |
Collection ordering
Scheduled actions collection supports fillowing ordering options:
| Params | Description |
|---|---|
| ?order=-scheduledFor.datetime | Descending order for scheduled actions, ascending if the parameter is absent provided. |
Collection pagination
The scheduled actions collection endpoint implements cursor-based pagination.
The pages object contains the next key which contains the relative URL to the next batch of items.
The URL contains the same set of filters and limit as initially requested.
This key is presented only if there are available elements to be fetched that weren't returned from the current request because of the requested limit.
The pages object also contains the prev key for every request after the initial request.
It contains the relative URL to the batch of items requested in the previous request.
The default page size if 100 and the maximum allowed limit is 1000.
Permissions
Any user can read all the scheduled actions in the entry.
Get a Scheduled Action
Get a scheduled action
Use this method to fetch a single Scheduled Action.
Permissions
Any user with read access to the supported entities can fetch a given Scheduled Action.
Errors
- 404 Error is returned in case:
- The
sys.idis not found - Current user doesn't have access to space
- User doesn't have permissions to read the entity (Release, Entry or Asset) in the Scheduled Action
- The
Create a scheduled action
Create a scheduled action
Use this endpoint to create a new scheduled action. When using this endpoint, an ID will be automatically generated for the created scheduled action and returned in the response.
There's a limit of 200 scheduled actions in pending status per environment. An attempt to create more than 200 pending scheduled actions will result in an error.
Create a scheduled action for a compose page
Use this payload format when you want to create a scheduled action for an entry that belong to a content type with annotations. For example a Compose page.
Permissions
Any user with the ability to perform the specified scheduled action to the referenced content.
Errors
400 Error is returned in case:
- Enviroment is not found
- Exceeds pending actions limit
- The
payload.withReferencesis included for an entity without annotations
422 Invalid request payload input return in following cases:
- The body contains invalid payload
- The
scheduledFor.datetimeis in the past or is not corrent ISO format - The
scheduledFor.timezoneis not a valid IANA timezone identifier - The
actionis unsupported - The
payload.withReferencesis provided but it's not in a valid format. Only forpublishaction
Update a scheduled action
Update a scheduled action
Use this method to update a scheduled action's time (at scheduledFor.datetime) or timezone (at scheduledFor.timezone).
Changes to fields outside of scheduledFor are currently not supported and will result in an HTTP 400 Bad Request.
Permissions
Any user with the ability to perform the specified scheduled action to the referenced content.
Errors
400 Error is returned in case:
- The version header is not provided
- Property outside of
scheduledFor.datetimeandscheduledFor.timezoneis changed - Scheduled action is not in status
scheduled - An action is already scheduled for the same date and time
entity.sys.idis invalid- Enviroment is not found
- Exceeds pending actions limit
- The
payload.withReferencesis included for an entity without annotations
409 Error is returned in case:
- Version number is not a number
- The version in the
X-Contentful-Versionheader doesn't match the current scheduled action version
422 Invalid request payload input return in following cases:
- The body contains an invalid payload
- The
scheduledFor.datetimeis missing - The
scheduledFor.datetimeis in the past or is not a valid ISO 8601 time - The
scheduledFor.datetimeis greater than 5 years (60 months) ahead of the current time - The
scheduledFor.timezoneis not a valid IANA timezone identifier - The
payload.withReferencesis provided but it's not in a valid format. Only forpublishaction
Cancel a scheduled action
Cancel a scheduled action
Use this method to mark a scheduled action as canceled.
Permissions
Any user with publish access to an entry can set a scheduled action to canceled state.
Errors
- 400 Error is returned in case:
- The
sys.statusis not in ascheduledstate
- The
Releases
Enables users to create releases that contains entries or assets and perfom actions on them.
Currently supported actions:
Create release
Update release
Delete release
Fetch release
Query relases
Publish release
Unpublish release
Validate release
Availability
Releases feature is globally available for all customers. In the Contentful web app this feature is available for the customers that purchased Launch application.
Limitations
Release cannot contain more then 200 entities or assets in total.
Release schema
The release entity has following schema:
| Field | Type | Required | Description |
|---|---|---|---|
| title | String | true | The releases title |
| entities | Object | true | The object containing releases items |
| sys | Object | true | System resource properties |
Releases
Create release
Use this endpoint to create a new release. When using this endpoint, an ID will be automatically generated for the created release and returned in the response.
Permissions
Any user can create new release.
Errors
400 Error is returned in case:
- property "linkType" is missing
- property "linkType" is not "Entry" or "Asset"
- enviroment is not found
404 Error is returned in case:
- current user doesn't have access to space
- current user doesn't have access to provided entry
- entity does not exist
422 Error is returned in case:
- provided entity ids are not unique
- provided entity id is undefined
- provided entityType is not Entry or Asset
- exceed limit of entities in the release
Query releases
Use this endpoint to fetch a multiple releases.
Releases collection
The releases collection endpoint implements cursor-based pagination.
The pages object contains the next key which contains the relative URL to the next batch of items.
The URL contains the same set of filters and limit as initially requested.
This key is presented only if there are available elements to be fetched that weren't returned from the current request because of the requested limit.
The default page size is 100 and the maximum allowed limit is 1000.
Filters
These are the following filters (query params) available for this endpoint:
| Filter | Description |
|---|---|
sys.id[in] |
Filter releases to those matching the comma-separated list of ids (e.g. id1,id2) |
sys.id[nin] |
Filter releases excluding those matching the comma-separated list of ids (e.g. id1,id2) |
sys.createdBy.sys.id[in] |
Filter releases by the creator ID to those matching the comma-separated list of ids (e.g. id1,id2) |
sys.status[in] |
Filter releases to those matching the comma-separated list of available statuses (e.g. active,archived) |
sys.status[nin] |
Filter releases excluding those matching the comma-separated list of available statuses (e.g. active,archived) |
entities.sys.id[in] |
Filter releases to those containing a comma-separated list of entity ids (e.g. id1,id2). Requires entities.sys.linkType |
entities.sys.linkType |
Filter releases by provided entity types, required for the "entities.sys.id[in]" filter. Can be one of Asset or Entry |
entities[exists] |
Filter (boolean) indicating whether to return empty releases or non-empty releases. E.g. using true will return releases that have at least 1 Entry/Asset within. |
title[match] |
Filter releases using full text search on the title field. Learn more about full text search in the Delivery API documentation |
pageNext |
If present, will return the next page of releases. This value needs to be provided from a previous release query result. |
order |
Orders the query results. The available options include sys.updatedAt, -sys.updatedAt, -title, title, sys.createdAt and -sys.createdAt |
limit |
Limit the number of releases returned in the response (max. is 1000) |
Permissions
Any user with read access to an entry can query releases.
Errors
400 Error is returned in case:
- Enviroment is not found
- Property LinkType is missing when using "entities.sys.id[in]" filter
- Property "linkType" is not "Entry" or "Asset"
404 Error is returned in case:
- Including an entry that user has no permissions to
- Current user doesn't have access to space
Release
Get single release
Use this method to fetch a single release.
Permissions
Any user with read access to an entry can get a release.
Errors
- 404 Error is returned in case:
- The
sys.idis not found - Current user doesn't have access to space
- The
Update release
Use this method to update the release by provided ID.
Permissions
Any user with write access to an entry can update a release.
Errors
400 Error is returned in case:
- the version header is not provided.
404 Error is returned in case:
- The
sys.idis not found - Current user doesn't have access to space
- Current user doesn't have access to provided entity
- Entity does not exist
- The
422 Error is returned in case:
- provided entity ids are not unique
- provided entity id is undefined
- provided entityType is not Entry or Asset
- exceed limit of entities in the release
Remove release
Use this method to delete a release by provided ID.
Permissions
Only a user that created release or admin can delete a release.
Errors
- 404 Error is returned in case:
- The
sys.idis not found
- The
Validate release
Create validation release action
Use this method to create a release action that validates a release identified by the provided ID asynchronously.
Permissions
Any user with publish access to an entry can validate a release.
Limitations
There is only 1 validation at a time allowed for a single release. Initiating additional validation for the release that already has in progress would result in error.
Errors
404 Error is returned in case:
- The
sys.idis not found - current user has no access to releases
- The
429 Error is returned in case:
- current user has no access to entries
- validation action is not publish or unpublish
- exceeding the publish limit
- release validation is already in progress
Published release
Publish release
Use this method to create a release action that publishes all entities that belong to release by provided ID.
Permissions
Any user with publish access to an entry can publish a release.
Errors
404 Error is returned in case:
- The
sys.idis not found - current user has no access to releases
- the version header is not provided.
- The
429 Error is returned in case:
- exceeding the limit publish limit
- exceeding the limit if in action is already created or in proress
- fails with validation errors
Unpublish release
Use this method to create release action that unpublishes all entities that belong to release by provided ID.
Permissions
Any user with publish access to an entry can unpublish a release.
Errors
404 Error is returned in case:
- The
sys.idis not found - current user has no access to releases
- the version header is not provided.
- The
429 Error is returned in case:
- exceeding the limit publish limit
- exceeding the limit if in action is already created or in proress
- fails with validation errors
Archived release
Archive release
Use this method to archive a release. Archiving a release will prevent publishes, unpublishes or schedules in the target release.
Permissions
Users with access to the release can archive it.
Errors
400 Error is returned in case:
- The release is already archived
409 Error is returned in case:
- Incorrect release version passed in the
X-Contentful-Versionheader
- Incorrect release version passed in the
Unarchive release
Use this method to unarchive an archived release. Unarchiving a release will enable publishing, unpublishing or scheduling in the target release.
Permissions
Users with access to the release can archive it.
Errors
400 Error is returned in case:
- The release is not archived
409 Error is returned in case:
- Incorrect release version passed in the
X-Contentful-Versionheader
- Incorrect release version passed in the
Release actions
Release actions are entities that contain information about actions performed in a release. These actions include validate, publish and unpublish.
Query release actions
Use this method to query release actions that belongs to one or more releases.
Filters
There are following filters available on this endpoint:
| Filter | Description |
|---|---|
limit |
Limit the number of release actions in the response |
order |
Returns results ordered by the value specified. Supports sys.updatedAt, sys.createdAt, -sys.updatedAt, sys.createdAt |
action |
Returns results that match the action value. Supported values are validate, publish and unpublish |
sys.id[in] |
Comma-separated list of release action IDs. Fetches only the release actions specified |
sys.release.sys.id[in] |
Comma-separated list of release IDs. Filter all release actions by the release ID |
sys.status[in] |
Comma-separated list of status. Filter all release actions including the status (succeeded, inProgress or created) |
sys.status[nin] |
Comma-separated list of status. Filter all release actions excluding the status (succeeded, inProgress or created) |
uniqueBy |
Returns unique release actions by the field specified. Only supports sys.release.sys.id |
Permissions
Any user with read access to an entry/release can query release actions.
Errors
- 400 (BadRequest) Error is returned when:
sys.status[in]andsys.status[nin]are present at the same time in the request
Release action
Get single release actions
Use this method to get single release action that belongs to specific release.
Permissions
Any user with read access to an entry can query release actions.
Errors
- 404 Error is returned in case:
- release not found
- release action not found
Bulk Actions
Enables users to create actions that will perform asynchronously on a batch of entities on the environment level.
Entity types that are currently supported:
Asset
Entry
Currently supported actions:
| Action | Description |
|---|---|
| Get a bulk action | Get the status of created bulk action |
| Publish bulk entities | Publish bulk content items |
| Unpublish bulk entities | Unpublish bulk content items |
| Validate bulk entities | Validate for publishing bulk content items |
Availability
Bulk actions are globally available for all customers.
Notifications
Since the execution of batch actions occur asynchronously, the status of the action can be checked by retrieving the batch action by the id in the response.
Limitations
Currently there are following limitations regarding bulk actions feature:
Max active bulk actions per space is limited to 5.
Max of 200 items per bulk action.
Bulk action schema
The bulk action has 4 top level properties as described below:
| Field | Type | Required | Description |
|---|---|---|---|
| action | String | true | Action to be executed, e.g. publish |
| payload | Object | true | Payload, an object with the collection of entities provided for action creation. |
| sys | Object | true | System resource properties |
| error | Object | false | Error emmited during bulk action execution |
System property indicating the status of the bulk action is located inside the root sys property.
The status of the bulk action could be one of following:
created: bulk action is created, but not acted on
inProgress: the action has been started
succeeded: the action has successfully completed
failed: the action execution failed
Bulk action
Fetch bulk action
Use this method to fetch the bulk action by id.
Permissions
Any user with read access to the supported entities can fetch a given Bulk Action.
Retention
Bulk action records are retained for 7 days.
Errors
- 404 Error is returned in case:
- The bulk action is not found
- The space is not found
- The current user is not allowed to see the bulk action
Publish bulk action
Publish bulk action
Use this method to publish the content linked in the payload.
Permissions
User can publish only existing content on which they have publish permissions.
Errors
400 Error is returned in case:
- One or more items do not exist or are inaccessible
- Provided version is incorrect
404 Error is returned in case:
- The space is not found
422 Error is returned in case:
- Validation failed
- Entity collection exceeds limit
- Duplicated items were found in the payload
- Version is not specified
429 Error is returned in case:
- The rate limit is exceeded due to number of active bulk actions
Unpublish bulk action
Unpublish bulk action
Use this method to unpublish the content linked in the payload.
Permissions
User can only unpublish existing content on which they have unpublish permissions.
Errors
400 Error is returned in case:
- Provided entity does not exists
404 Error is returned in case:
- The space is not found
422 Error is returned in case:
- Validation failed
- Entity collection exceeds limit
- Duplicate entities in the payload
429 Error is returned in case:
- The rate limit is exceeded due to the number of active bulk actions
Validate bulk action
Validate bulk action
Use this method to validate entities before publishing.
Permissions
User can only validate existing entities with publish permissions.
Errors
400 Error is returned in case:
- Provided entity does not exist
404 Error is returned in case:
- The space is not found
422 Error is returned in case:
- Validation failed
- Entity collection exeeds limit
- Duplicate entities in the payload
429 Error is returned in case:
- The rate limit is exceeded due to the number of active bulk actions
App definitions
AppDefinition is an entity type that stores all information about a single app on the organization level. By itself this entity does not do anything. To use an app you need to create an AppInstallation in a selected space-environment pointing to your definition.
Definitions centralize app management within an organization. Changes to a definition will automatically be propagated to all of its installations. There is no need to update installations when updating a definition.
A definition contains information about whether the app frontend is hosted by Contentful or outside of Contentful. If the app frontend is hosted outside of Contentful, the definition will have a src (Third party URL or localhost for development as a string) property.
If the app is hosted by Contentful, the definition will have a bundle property, which is a link to an AppBundle entity. The AppBundle can contain just frontend assets, Functions code, or both.
It is possible for an app to have both a bundle and src property only when the app has a bundle containing just functions code (no frontend) and then is using a Third Party URL to host the frontend.
App definition properties
name: a human-readable name of the appsrc: publicly available source URL of the app; requires HTTPS with exception oflocalhost(for development)bundle: a link to anAppBundleif hosted on Contentfullocations: list of places in the web app where the app can be rendered; see belowparameters: definitions of configuration parameters
App locations
Locations are described in more detail in the App SDK reference.
The locations property is an array of one or more of:
| Location | locations array item |
Description |
|---|---|---|
| Entry field | { |
Renders as an entry field editor; requires at least one field type (see below) |
| Entry sidebar | { "location": "entry-sidebar" } |
Renders in the entry sidebar |
| Entry editor | { "location": "entry-editor" } |
Replaces the entire entry editor |
| Dialog | { "location": "dialog" } |
Renders in a dialog window |
| App configuration | { "location": "app-config" } |
Renders on the app configuration screen |
| Page | { "location": "page" } |
Renders a separate page. You can add an optional navigationItem property, see below. |
Entry field location
All valid fieldTypes are:
Short text:
{ "type": "Symbol" }Short text, list:
{ "type": "Array", "items": { "type": "Symbol" } }Long text:
{ "type": "Text" }Rich text:
{ "type": "RichText" }Number, integer:
{ "type": "Integer"}Number, decimal:
{ "type": "Number" }Boolean:
{ "type": "Boolean" }Date and time:
{ "type": "Date" }Location:
{ "type": "Location" }JSON object:
{ "type": "Object" }Entry reference:
{ "type": "Link", "linkType": "Entry" }Entry reference, list:
{ "type": "Array", "items": { "type": "Link", "linkType": "Entry" } }Media reference:
{ "type": "Link", "linkType": "Asset" }Media reference, list:
{ "type": "Array", "items": { "type": "Link", "linkType": "Asset" } }
Page location
When you add a page location in your AppDefinition, there is the possibility to add an optional navigationItem property to it.
{
"location": "page",
"navigationItem": {
"name": "My app",
"path": "/my-app"
}
}{
"location": "page",
"navigationItem": {
"name": "My app",
"path": "/my-app"
}
}
If provided, a link will be added to the "Apps" navigation item in the Contentful web app pointing to your app installation.
Example
The following app definition is called "Hello world" which is served from https://example.com/hello-app.html and can be rendered both as an editing widget for short text fields and as an app configuration screen:
{
"name": "Hello world",
"src": "https://example.com/hello-app.html",
"locations": [
{
 "location": "entry-field",
 "fieldTypes": [
  { "type": "Symbol" }
 ]
},
{
"location": "app-config"
}
]
}App definitions collection
Get all app definitions
Create a new app definition
App definition
Get one app definition
Update an app definition
Delete an app definition
App uploads
An AppUpload is an entity that corresponds to a zip file containing all the assets of an app.
The zip file cannot be accessed directly, but an AppUpload can be converted into an AppBundle entity.
App upload
App uploads collection
Creating an app upload
App upload
Get one app upload
App bundles
AppBundle is an entity for hosting your app on Contentful. An AppBundle is a sub-resource of an AppDefinition.
To create it you will need to create an AppUpload first and link it during the creation of the bundle.
The entity itself contains information about the files of the upload and the AppDefinition it relates to.
Additionally, it is possible to add a comment to every bundle to identify it later on.
To enable an AppBundle, you need to link it in the AppDefinition entity with the bundle property.
If your app has a frontend, it can either be hosted by Contentful using an appBundle or hosted outside of Contentful using the src property.
The AppBundle entity is also used to host code to run Contentful Functions, serverless workloads that run on Contentful’s infrastructure to provide enhanced flexibility and customization.
A bundle can contain frontend files, functions code, or both.
Limitations:
Every
AppBundlecontaining frontend code needs a validindex.htmlfile at the root level of the folder.All internal links to your assets like stylesheets, JS files or others from the
index.htmlmust be relative paths.If an
AppDefinitionhas abundleproperty linking to anAppBundlecontaining frontend code, then the app definition cannot also have asrcproperty
App bundles collection
Get all app bundles
Create a new app bundle
App bundle
Get one app bundle
Delete an app bundle
App Details
AppDetails is an entity for storing additional information about an app.
This information is used to provide presentational and non-functional information about the app, such as specifying a custom icon.
The entity has a 1-to-1 relationship with the AppDefinition, but is optional and must be created manually.
Limitations:
Custom icons cannot be larger than 128px x 128px and can only be in png or jpg format.
Using the endpoints, icons can only be uploaded as base64 strings.
App details
Create or update app details
Get app details
Delete app details
App event subscriptions
AppEventSubscription is an entity type that defines Contentful event topics (for example: "entry publication") to which an app is subscribed. Event subscriptions can be defined only for an existing AppDefinition. An app only receives events about content entities in a space environment of its installation.
App event subscription properties:
targetUrl: a URL to be called with events specified as topics; requires HTTPStopics: list of event topics
All listed properties are required.
All valid topics are:
Entry.createEntry.deleteEntry.saveEntry.publishEntry.unpublishEntry.archiveEntry.unarchiveAsset.createAsset.deleteAsset.saveAsset.publishAsset.unpublishAsset.archiveAsset.unarchiveContentType.createContentType.deleteContentType.saveContentType.publishContentType.unpublishAppInstallation.createAppInstallation.updateAppInstallation.deleteRelease.createRelease.saveRelease.deleteReleaseAction.createReleaseAction.executeScheduledAction.createScheduledAction.saveScheduledAction.deleteScheduledAction.executeBulkAction.createBulkAction.execute
App event subscription
Get an app event subscription
Update or subscribe to events
Delete an app event subscription
App signing secret
AppSigningSecret is an entity that represents a symmetric key shared between Contentful and an app backend.
Contentful uses this secret to sign requests sent to an app backend, which allows an app backend to verify that requests it receives are made by legitimate users of the app through Contentful.
Storing an AppSigningSecret for an app in Contentful enables two features:
- All future app event requests will be automatically signed using the secret. The receiving backend can decide whether it wants to validate this signature or not, so enabling this should not have any immediate effect until used.
- The signed request endpoint can be used to sign requests from the app frontend. There are helper functions in the App SDK that further simplify the process.
There are two constraints on the secret:
It must be exactly 64 characters long.
It must match this regular expression:
/^[0-9a-zA-Z+/=_-]+$/. This also means secrets using the hex or base64 character set are allowed.
We recommend using a cryptographic pseudorandom number generator to generate a secret. See our guide on request verification for examples on how to generate a secret.
Only one AppSigningSecret per AppDefinition can be stored at any given time.
Key rotation can be done by modifying the app backend to verify the request against both the old and a new secret, then saving the new secret to Contentful through this API.
Contentful will then sign requests with the new secret, and the old secret can be removed from the app backend.
See our guide on key rotation for examples.
App signing secret
Get the current app signing secret
Create or overwrite the app signing secret
Remove the current app signing secret
App signed request
A signed request is an object representing a HTTP request, that includes a signature header and some additional metadata.
Installing an app whose AppDefinition has an associated AppSigningSecret into a space
allows users with access to that space to use the Content Management API to sign any request.
To do this, the full request needs to be submitted, and the computed signature will be returned, along with some additional headers. Including these headers in your subsequent request makes it possible for the receiving party to verify the request.
Requests expecting to be signed need to be in the following format:
| Field | Type | Required | Description |
|---|---|---|---|
| method | String | true | The HTTP method of the request to be signed. |
| path | String | true | The canonical path of the request to be signed. Should not include the procotol, host, or port. |
| headers | Object | false | A map of headers and their values to be signed, can be left empty if no headers need to be signed. |
| body | String | false | The request body as a string. When sending JSON, pass the stringified version. |
App signed request
Create a signed request
App keys
AppKey is an entity that represents a key pair that can be used by an app to make a signed request to Contentful in order to issue an access token for a specific app installation.
The top-level jwk property holds a standard JSON Web Key. The following properties require constant values:
alg:"RS256"kty:"RSA"use:"sig"
As shown, the generated key must be a RSA key using the RS256 algorithm. To generate such a key pair, openssl (you may need to download a binary if you're not on Mac or Linux) can be used:
openssl req -x509 -newkey rsa:4096 -nodes -batch -noout -keyout key.pem
openssl rsa -in key.pem -pubout -outform DER -out key.der.pub
The content of key.der.pub can be used as the first element of the x5c array. Please note:
the string needs to be encoded as a base64 string
Contentful never expects your private keys: make sure you're uploading the public key!
The signature value is used as both kid and x5t. We will also use it as a globally unique key identifier within Contentful. To generate a signature use:
openssl dgst -binary -sha256 < key.der.pub | openssl base64 | sed 's/+/-/g; s/\//_/g; s/=*$//'Limitations:
the same key pair cannot be used for more than one app
the limit of keys per app is 3 (which makes it possible to perform a rotation while keeping one backup key operational)
If you do not want to create your own key pair with openssl, we also offer the functionality to generate the key pair for you.
It is important to note that we do not store any private keys on our side and only store the public key. We show the private key only once in the response of the POST request,
so make sure that you store the private key and keep it safe. Once the response is lost, there is no other way to retrieve the private key.
App keys
Get all app keys
Create a new app key
Generate a new key pair
App key
Get one app key
Delete an app key
App access grants
An AccessGrant is an entity type that indicates that an app described by some
AppDefinition is able to be installed into a
space in an Organization other than the Organization that owns the
AppDefinition
An AccessGrant allows all organizations to install the AppDefinition it
belongs to.
Access Grants Collection
Create One Access Grant
Query Access Grants of a App Definition
Access Grant
Delete One Access Grant
App installations
AppInstallation is an entity type that indicates if an app described by some AppDefinition is installed in a space environment.
An app installation can store app-specific configuration variables in its parameters property. This property is optional, and when present it can be a free-form object with values managed by the code of the app with the App SDK. The only limitation is that the stringified value of parameters cannot be longer than 16kB.
App installations are copied in the process of environment creation. This means that when app X is installed in the master environment and then you create a staging environment out of it, both the installation and its parameter will be copied to the target (staging) environment.
App installations collection
Get all app installations
App installations for organization
Get all installations of an app within an organization
App installation
Install or update an app
Get one app installation
Uninstall an app
App access token
AppAccessToken entities allow apps to act on their own in space environments in which they are installed.
In terms of access, an access token for an app:
is scoped to a specific space environment matching the space environment of an app installation
allows all actions on the following entity types:
ContentType,EditorInterface,Entry,Asset,Locale,Tag,Task,Snapshot(only on master environment), and the app's ownAppInstallationallows reading of the app's configuration parameters
To obtain an access token, an app needs to use one of its active private keys (with a corresponding public key registered as an AppKey) to sign a JWT.
The following claims are mandatory:
iss: Issuer -sys.idvalue of theAppDefinitionexp: Expiry - number of seconds the JWT should be valid; not longer than 10 minutesiat: Issued at - number representing a timestamp when the JWT was issued
The following header properties are mandatory:
typ:"JWT"alg:"RS256"
A JWT created this way can be used to call the endpoint described below. The response will contain the value of the app access token as the token property. The token can be used to call CMA endpoints (as outlined above) for 10 minutes. The token can be cached until it expires.
App access token
Issue a token for an app installation in a space environment
App Actions
App Action is an entity that allows communication between apps. An app can expose actions that the other apps can call to trigger specific behaviors.
Actions are asynchronous and don't return a payload: they are used for single tasks like sending a notification. One can think about an AppAction as asynchronous function that doesn't return anything.
Notes
ActionConsumeris a user or an app that triggers behaviours in other apps.ActionProvideris an app that exposes actions that other users or apps can trigger.
The diagram below displays an interaction between ActionProvider, ActionConsumer and CMA when an App Action is called.
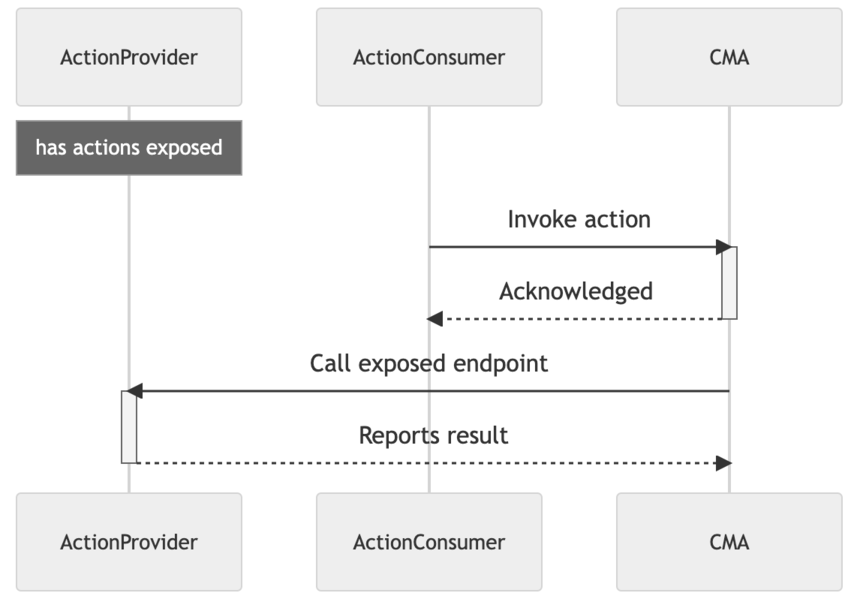
In order to trigger an action on your app, a ActionConsumer needs to make a call to the CMA: Contentful will then send a signed request to your application. This comes with the following out-of-the-box features:
Apps exposing actions are secured by request verification.
Action parameters are pre-validated (with a provided schema) by Contentful.
Actions can be triggered if and only if both
ActionConsumerandActionProviderhave access to the same space-environment.
See an example implementation of an App Action in the code example below:
import createApp from 'imaginary-http-framework';
import { verifyRequest } from "@contentful/node-apps-toolkit";

import { sendNotification } from './service/imaginary';
import { signingSecret } from './secure-storage';

const app = createApp();

app.post('/send_notification', async (req, res, next) => {
    const canonicalRequest = {
        method: req.method,
        path. req.url,
        headers: req.headers,
        body: req.body,
    }

    if (!verifyRequest(signingSecret, canonicalRequest)) {
        next(new Error('409 - Conflict, signature does not match'));
        return;
    }

    const response = await sendNotification(req.body);

    res.send(200)
})

app.listen(3000)
Notes
When working with App Actions, consider the following:
Actions can only be triggered by apps with app identities.
Actions are asynchronous and don't yield a response.
Only apps with signing secret can expose actions.
Errors
409 - Forbidden- This error is returned if signing secret is invalid or missing.
App Actions collection
Get all actions of an app
Create an action
App Actions of Environment
Get all actions of an environment
App Action
Update an action
Read an action
Delete an action
App Action calls
Calls to trigger actions are always mediated by Contenful. You can read the the previous section to understand why.
Errors
403 - Forbidden- This error is returned if the caller is not an installed app, or if the calling app is shared.404 - NotFound- This error is returned if the action does not exist or the provider app is not installed in the current space-environment.409 - Conflict- This error is returned if the provider has a missing or invalid signing secret.
App Action call
Trigger an action
App Action categories
Common use cases would require you to rewrite the same App Action over and over. With App Action Categories you can simply reference one of the pre made schemas, without having to redefine the same interface multiple times.
Let's assume your app needs to perform an operation and needs to trigger a notification to different services. Utilising categories, you can simply call App Actions whose category is Notification and ultimately integrate with all of them at once: you will only rely on the Notification and you are good to go.
Additionally, App Actions with some specific App Action Categories will show up in specific locations of the user interface.
App Action Categories are versioned in a semantic way: the first digit indicates a breaking change and the second digit all the other changes.
List of App Action categories
Entries- An action that operates on a list of entry ids. Appears in Entry List.Notification- An action that sends notifications to an external serviceCustom- A custom action like deploying a website
Get all app action categories
Get app action categories
Functions
Functions are serverless workloads that run on Contentful's infrastructure to provide enhanced flexibility and customization.
For more information on Function definition and use cases, see the extensibility documentation.
Filtering
Plural GET requests (i.e. getMany, getManyForEnvironment) can be filtered by a query parameter accepts[all] : '<event1>,<event2>,<eventN>' to filter functions that accept all of the specified events. Note that the value is a string of comma-separated event names.
Get Function
Get Function
Get Many Functions
Get many Functions
Get many Functions for environment
Get many Functions for environment
Function Logs
Function Logs are data objects that represent the output of a Function. They are created when a function is executed and contain information about the function, such as the status of the execution.
For more information on Functions and Function Logs, please refer to the extensibility documentation
Get Function Log
Get Function Log
Get Many Function Logs
Pagination
Function Logs accept a query parameter limit to specify the number of logs to return per page. The parameter also accepts cursor pagination requests prevPage and nextPage to navigate through the logs.
Get many Function Logs
Usage
Enables users to query organization API usage data.
You can further filter by Contentful API types (cma, cda, cpa, gql) through the
parameter metric. Results are paginated and support ordering.
Permissions
Usage API is available to Premium/Enterprise, Basic and Free plans. Premium/Enterprise and Basic customers can access historical usage data with API batch size of 45 days. Free plans can access the last 45 days of historical usage data. Usage API calls can only be made by a user with the Organization Admin or Organization Owner role.
Organization usage
Query organization usage by metric for a given date range.
If startAt and endAt are not passed through the query a historical data for the last 45 days will be returned by default.
Get organization usage
Space usage
Query organization usage by space and metric for a given date range.
Get space usage
Workflow Definitions
Workflows definitions allow you to configure a pre-defined process for entries. Each workflow definition describes the schema for its workflows by a sequence of workflow steps which the executed workflows undergo.
Limitations
A workflow definition can define up to 20 steps. Defining more than 20 steps will result in a validation error.
The current maximum limit for workflow definitions is 20. If you lose access to the workflow API due to a price and package downgrade we will ensure that you can delete and complete existing workflows. An overview for our pricing and packaging can be found here.
Workflow definition schema
Besides the sequence of workflow steps, there are multiple properties to specify how workflows behave.
| Field | Type | Required | Description |
|---|---|---|---|
| name | String | true | Name of the workflow definition |
| description | String | false | Explaining notes, e.g. a description of the use case |
| appliesTo | Array[Object] * | false | Target entries for which workflows of this definition can be used. |
| flowType | String | false | Can be no_restriction (default) or strict_neighbor. See the following paragraphs for more guidance. |
| startOnEntityCreation | Boolean | false | Automatically start a workflow on targeted entries when they are created (default: false). See the following paragraphs for more guidance. |
| steps | Array[Object] | false | Ordered list of steps which a workflow undergoes. The shape of a step is described in a following chapter. |
| sys | Sys ** | true | System resource properties |
* The items in the list appliesTo must match the following shape:
{ linkType: "Entry", type: "Link", validations: [{ linkContentType: ["contentTypeA", "contentTypeB"] }] }
It is recommended to have only one item in appliesTo as well as only one item in validations. If you want to address multiple content types, you can do so by mentioning multiple within the list at linkContentType.
** In addition to the common sys properties, a workflow definition has the following extra sys properties
| Field | Type | Description |
|---|---|---|
| isLocked | Boolean | If the set up of permission rules was incomplete, the definition is marked as locked until it is saved again. |
| lockReason | string | Provides context about why the last save request wasn't successful. |
The flow type of a workflow definition
The property flowType controls to which step a user can move a workflow. It supports the follow two modes:
no_restriction: Apply no restrictions when moving a workflow to another step.strict_neighbor: Enforce non-admin users to only move to the previous or the following step. The workflow can only be marked as 'complete' upon reaching the last step.
Automatically starting workflows
The property startOnEntityCreation will automatically start a workflow for newly created targeted entries. Each time you create an entry of a content type configured for this workflow definition, the workflow will start automatically. However, this does not mean that workflows are started for entries that were already created before setting this property to true.
Assigning multiple workflows to the same content type(s)
You can choose to configure multiple workflows for the same content type. This allows different teams working on the same content type to use dedicated workflows for their own review processes and governance.
Workflow step schema
A step within a workflow definition is described by the following properties.
| Field | Type | Required | Description |
|---|---|---|---|
| id | String | true * | Internally defined ID |
| name | String | true | Name of the workflow step |
| description | String | false | Explaining note |
| annotations | Array[String] | false | List of meta tags. To render a color in the Contentful UI, add a string with the shape cf-color-1 (allowed digits: 1-6). |
| permissions | Array[Object] | false | Allow or deny actions for selected users when a workflow is in this step. |
| actions | Array[Object] | false | Automated actions that are triggered when a workflow reaches this step. |
* When leaving out the id in a POST/ PUT request for a workflow definition, you create a new step at that position in the list. When you define it (in a PUT request), you thereby update the existing step with that id.
Workflow step permission schema
In addition to the permission defined by a users role, a workflow step can restrict or grant permissions for selected users or teams. The permissions can only apply to a single active step in a workflow. The user restrictions in step permissions do not apply to organization or space admins. One permission must provide the following properties:
| Field | Type | Required | Description |
|---|---|---|---|
| type | String | true | Can be entity_permission or workflow_permission. * |
| configuration.effect | String | true | Can be allow or deny. |
| configuration.action | String | true | Can be edit or publish. Publishing is only available for entity permissions (see type). |
| configuration.actors | String | Array[Link] | true | Can be all or a list of user/ team links. Defines who is targeted by this permission rule. |
* There are two supported types for targeted resources:
workflow_permission: Use this together with the action beingeditto explicitly allow or deny who can move the workflow to another step.entity_permission: Grant or restrict permission to edit or publish the entry on which the workflow is being executed.
Workflow step action schema
When a workflow reaches a step, it will automatically trigger the actions defined for this step. Those actions can be one of the following three:
Send an email to a set of users and teams. Additionally, you can also use any valid email address. The email notifies about the workflow being moved to this step. So far, the template is fixed and cannot be changed. There may be only one email action per step.
Create an entry task with a customisable message and assign it one user or team. Optionally, you can define a due date. Please note that you need to have the tasks app installed. You can define up to three task actions per step.
Send a custom message via Slack to a selected (public) channel about the workflow being moved to another step. Please note that you need to have the Slack app installed to use its app action. There may be only one Slack action per step.
Depending on the type, an action is defined by the following properties:
| Field | Type | Required | Description |
|---|---|---|---|
| type | String | true | Can be email, task or app (for Slack). |
| configuration.recipients | Array[Link | String] | if type is email |
Recipients of the sent out email. |
| configuration.assignee | Link | if type is task |
Assignee (user or team) of the created task. |
| configuration.body | String | if type is task |
Text of the created task. |
| configuration.dueDate | Number | false | Days to add to the current timestamp to calculate the due date. |
| appId | String | if type is app |
ID of the installed Slack app. |
| appActionId | String | if type is app |
ID of the installed Slack app action. |
| configuration.body | Object | false | Optional payload for the Slack app action. May be defined when the type equals app. |
Workflow definitions collection
Get all workflow definitions
This endpoint returns a paginated list of workflow definitions for a given environment.
Permissions
Any user can read workflow definitions.
Create a workflow definition
Use this endpoint to create a workflow definition.
Permissions
Only organization or space admins can create a workflow definition.
Workflow definition
Get one workflow definition
Permissions
Any user can read a workflow definition.
Update a workflow definition
Permissions
Only organization or space admins can update a workflow definition.
Delete a workflow definition
Permissions
Only organization or space admins can delete a workflow definition.
Workflows
The workflow presents the relationship between the entry, the associated workflow definition, and the current workflow step. When a workflow is started on an entry, it will apply permission rules and automated actions which are defined in the related workflow definition.
Limitations
Though you may have more than one active workflow for each entry, creating a workflow for an entry will result in a validation error if there is already a workflow of the same type linked to the specified entry. For example, if you have a “Translation” workflow on an entry, you cannot start another “Translation” workflow until that one is completed or cancelled. However, you can start a “Legal Review” workflow in parallel with the “Translation” workflow for the same entry.
If you lose access to the workflow API due to a price and package downgrade we will ensure that you can delete and complete existing workflows. An overview for our pricing and packaging can be found here.
Workflow schema
| Field | Type | Required | Description |
|---|---|---|---|
| stepId | String | false * | ID of the step in the corresponding workflow definition. |
| sys | Sys ** | true | System resource properties |
* It is possible to start a workflow without entering a specific step right away. Thus, the stepId can be undefined directly after the creation of a new workflow.
** In addition to the common sys properties, a workflow has the following extra sys properties
| Field | Type | Description |
|---|---|---|
| completedBy | Link | A reference to the user who completed the workflow. |
| completedAt | Date | Timestamp with the moment when the workflow was completed. |
| workflowDefinition | Link | A reference to the workflow definition that describes this workflow. |
Workflows collection
Create a workflow
Permissions
Every user can create a workflow if they have read access to the linked entry.
Workflows query
Query workflows
This endpoint allows to query workflows with certain filters. The filters are defined as query parameters which are described in the endpoint specifications.
Permissions
Any user can query workflows.
Get workflow
Get workflow by ID
This endpoint allows to get a workflow with a certain ID.
Permissions
Any user can get a workflow.
Workflow
Update a workflow
Canceling a workflow (Previously known as "Delete a workflow")
Permissions
Updating a workflow (to move to another step) or cancelling it is per default only allowed for organization or space admins. You can explicitly grant permission to other space users by using the permission type workflow_permission in the workflow step permissions.
Workflow completion
Complete a workflow
This action completes the workflow.
Permissions
Completing a workflow is per default only allowed for organization or space admins. You can explicitly grant permission to other space users by using the permission type workflow_permission in the workflow step permissions.
Workflows migration guide
We will be discontinuing the legacy Workflows version. To maintain the workflows from the legacy version, follow the migration guide below.
Who should migrate?
This guide is relevant for you if you have the Workflows legacy version configured to your space prior to March 1st, 2023.
The legacy version will stop being supported by Contentful on June 1st, 2023. If you would like to use the new Workflows app, you will need to migrate with support offered by Contentful in the process. Please refer to the guide below to discontinue using the legacy Workflows version.
Migration steps overview:
Upgrading to the Workflows app is accomplished by going through the following steps:
Ensure no tag-based permissions are associated with legacy Workflows tags.
Create a workflow configuration in the new Workflows app.
Begin migration of entries assigned to the legacy Workflow steps. There are two options for this: a. Manually remove all workflow tags from affected entries and reassign identical steps created in the new app. b. Use this script to help migrate the entry statuses.
Note: If the legacy Workflows configuration is removed prior to this process, this option will no longer be available.
Verify the information from the legacy version is replicated in the new app.
NOTE: Update any external systems that are relying on the legacy Workflows to the new app.
Workflows Changelog
The workflows changelog is used to present the chronological list of records describing the history of workflow step changes for a single workflow which is linked to a specified entry. The changelog includes the associated entry, the new workflow step, and the timestamp of the event that occurred.
Workflows changelog record schema
| Field | Type | Required | Description |
|---|---|---|---|
| entity | Link | true | A reference to the entry for which the workflow was executed |
| event | String | true | Maybe one of the following values: completed, created, deleted, stepChanged |
| eventAt | Date | true | Timestamp of the event that occured |
| eventBy | Link | true | A reference to user or app definition which triggered this stepAnnotations |
| stepId | String | true | ID of the step after the event was triggered |
| stepName | String | true | Name of the step after the event was triggered |
| workflow | Link | true | A reference to the associated workflow |
| workflowDefinition | Link | true | A reference to the associated workflow definition |
Workflows changelog
Query records from the workflows changelog
This endpoint allows to query records in the workflows changelog with certain filters. The filters are via multiple query parameters which are described in the endpoint specifications.
The resulting list is sorted by the event date in a descending order, i.e. the first item is the most recent one.
Permissions
Every user can query a workflows changelog if they have read access to the specified entry.
