Basics
How do I categorize my content?
In Contentful there are multiple ways to create categories. If you’d like your categories available from the Content Delivery API to be used in your client applications, we recommend using either short text fields or reference fields. If you’d like to categorize content for better organization in the Contentful web app, we recommend using our Tags feature. You can read more about Tags here.
For categories that will be available in the delivery API, you can use short text fields or using Reference fields to other entries.
Short text fields
This comes in handy when you want to assign specific categories without metadata - tags for example. Short texts are relatively small tokens of text that only make sense unbroken and can only be searched for as a whole element (contrary to the text fields, whose text can be searched in parts). For instance, if you use the short text Vegetarian as a category, you won't find your Vegetarian entries when you search for 'Veg'. Categories as short texts require special attention, since several names can be assigned to the same object or concept.
Reference fields
Other entries can be used as categories with metadata. This means that you would assign not only the name as a category, but also other information within the determinate entry itself. To use a reference a category, you have first to create the entry that will serve as the category.
Let's say you will have a Book entry that needs an author. You would create the Author entry with a Name (text field), a short Biography (text field) and a Picture (media). These other fields are the metadata of your category. You would then create a Book entry that would reference the Author entry. Now you have a category (Book) with one entry (Author). It's that easy!
What is the lifecycle of a field?
There are the following statuses of the field's lifecycle:
Hide field when editing — Select this status to hide the field from the entry editor. The field and its content remain present in the API response, but not visible in the entry. This status can be used to hide specific fields from editors.
NOTE: A user still has an option to show a hidden field and edit its content in the entry editor. To restrict a user from editing the hidden field, configure the user's space role accordingly — for example, add a deny rule preventing the user from editing this field.
Omit from API response — Select this status to disable the field completely. When a field is disabled in response, it isn't possible to fetch its content via the Content Delivery API or the Content Preview API. This status can be used for fields that contain management-related data but have no actual content to be delivered.
Delete — Select this status to completely remove the field from your content type. If there are entries connected to this content type, they will loose the content of this field forever.
NOTE: To delete active fields — those that are currently being used — you must first disable them from the response.
How do I resize an image with an API request?
Instead of choosing image dimensions in Content Management you can specify the dimensions of images during delivery. Images are hosted on images.contentful.com. For files on this host you can attach several URI query parameters to specify the desired dimensions, crop and even focus. The image will never be stretched, skewed or enlarged but rather fit into the bounding box given by the w and h parameters.
Width and height
By adding a width and a height parameters, the image always scales accordingly and is never deformed even if the parameters passed do not correspond to the ratio of the image.
Images API request parameters: Width & Height
Fit
To change the way your image responds to the w and h parameters, attach the fit parameter to the asset’s url.
Images API request parameters: Fit
Focus
The focus parameter determines where the fit parameter should focus on. It takes values such as right, left, top and bottom, or combines them like bottom_left or top_right. You can also choose to focus on faces. However, the parameter aces only works with fit=thumb, fit=fill, fit=lfill and fit=crop.
Images API request parameters: Focus
Radius
The radius parameter adds rounded corners to your image. The higher the value, the more enclosed in a circle your image will be.
Images API request parameters: Radius
Additionally, a q can be passed to define the JPEG compression quality between 1 and 100 and the fm parameter can be used to change the format to either "png" or "jpg".
See also: Images API documentation
How can I use predefined values?
You can set predefined values for your content creators to choose from using Short Text fields and selecting the 'Predefined values' validation.
Adding and ordering values
To add several values, insert the value in the text input and press Enter. The more values you add, the more rows will appear. To order the values previously inserted, just drag and drop them to the right order. The order you add to the validations will influence the order in which these are displayed on the Entry editor.
How do I create a dropdrown menu?
First create a regular 'Short Text' field (not type 'List), add your predefined values, then navigate to the 'Appearance' settings and select 'Dropdown'.
How can I delete my data? (including personal data)
To delete an organization you manage or delete your account, please contact support.
How do I enable a reference editor?
When working with fields containing multiple references, you might benefit from a reference editor. The editor streamlines the task of creating, editing and publishing related entries by displaying them all in a single view. To activate the editor, in the Content Model section, open the field settings, navigate to the Appearance tab and select the "Use bulk editing" checkbox. Now save the changes and you can start using the feature.
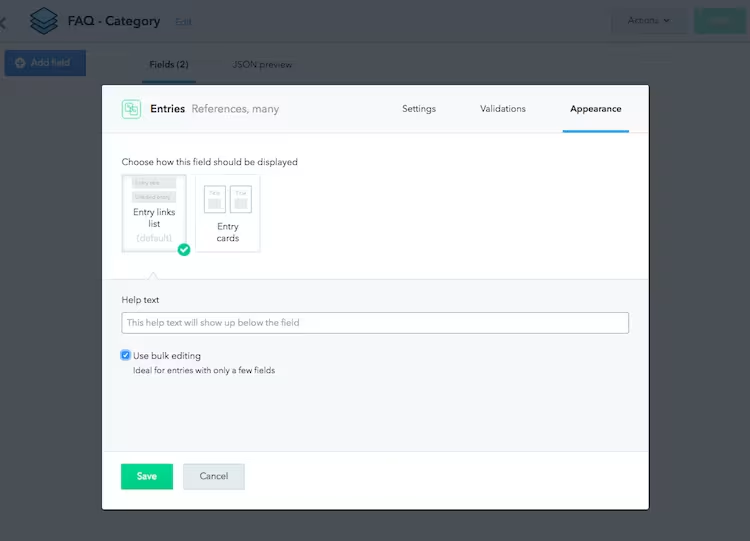
The reference editor works best with fields containing up to a dozen of linked entries, if you plan to work with more entries, we recommend using the default option instead. Currently, the reference editor is only available for fields with multiple references, which means you cannot use it with multiple assets.
How can I distribute my entries in multiple languages?
To localize a field, you should do the following:
Go to space settings
Select ‘Locales’ on the menu and choose ‘Add locale’
Select a locale from the dropdown box
Optionally you can add a fallback locale
Adjust locale settings:
‘Enable this locale in response’ includes the locale in the Delivery API response
‘Enable editing for this locale’ displays the locale to editors and enables it in Management API
‘Allow empty fields for this locale’ allows entries with required fields to be published if the locale is empty (otherwise you are required to add a localized version as well)
After creating the locales you will need to make sure that the fields you want to translate have the ‘Localized’ option selected in the content type editor. The next step is adding a new entry and enabling the locales for it by clicking 'Change' under 'Translation' in the right sidebar. The last step is actually putting the content and pressing ‘Publish’ to make it available.
See also: Localization patterns, Localization
How do I validate content?
Each field type has different types of validations available. One of the most useful validations is the ability to make fields required, which will prevent your content creators from leaving out important content. You can also specify which Content Types can be used in Reference fields, what kind of media files can be added to an Entry, etc.
To add a validation to a field, go to your Content Type and edit the field settings. Navigate to the 'Validations' view to see which validations are available!
How do I upload an image, video, audio or other asset?
There are two ways of uploading assets: you can either upload an asset it in the entry editor or create an asset with the Add button.
Entry editor
Assets, when created through the asset field in the entry editor, will be automatically linked to the entry you added them to. This applies to entries that belong to a content type which has an Asset field inside it.
Press the Add button to open the asset editor. Name and describe the asset. Either open file picker or just drag and drop a file to upload it. File picker enables uploading files from external sources such as Facebook, Google Images and a dozen more.
Publish the asset. If you choose to archive the asset instead of publishing it, the asset will still be linked to the entry, but won’t be exported with the rest of the content. Go back to your entry – it is now linked to the asset.
Add button
Assets, when created through the add button, are not linked to any Entry. Therefore, these need to be linked after the asset is uploaded. Press the Add button and choose Asset. Name and describe your asset. Either open file picker or just drag and drop a file to upload it. File picker enables uploading files from external sources such as Facebook, Google Images and a dozen more.
Publish the asset. If you choose to archive the asset instead of publishing it, the asset can still be linked to any entry, but won’t be exported with the rest of the content. Go to the entry to which you want to link the entry and search for the asset. Linking completed.
How to add titles to Entries?
Any Short Text field can become the title of an entry. By default, when creating a new content type, the first text field automatically becomes the title of an entry, but you can choose another field to serve this purpose.
When adding a field, there are several options available – from making a field mandatory to making it localized. The last of these options displayed in the second row is use as title. Choose it if you want a field to become an entry title.
After selected, the option should read used as title. From this moment on, when creating an entry of this content type, the content within specific field will be displayed as the title of an entry.
How do I preview my content?
Contentful delivers content using a JSON RESTful API, which means that your content is delivered in a pretty generic format, not as an end application. This means that you would need to build a client app or website to view your content displayed.
Alternatively, you can always use our example iOS apps.
See also: The complete beginner's guide to creating content with Contentful
How do I delete a content type?
Content types can only be deleted if they don't have any content associated with them – that is, if there is no entries of that content type. (The entries should be deleted completely – unpublishing or archiving them does not work.) After that's done, go to the content type that is to be deleted and Unpublish it; then click More and delete it.
How do I add a new content type?
First go to the 'Content model' section from the top navigation bar, then select 'New Content Type' on the right.
Add a meaningful name and description. The name should describe the content you will add (e.g.: Recipe, Book, Quiz).
It's time to add fields! Click on 'Add Field' and select one field type. Repeat this as many times as needed until you have several fields within the content type.
After you've added all of your fields, hit 'Save' to activate the content type.
See also: The complete beginner's guide to creating content with Contentful
How do I create a space?
Note that you should have enough permissions to create spaces.
Click on the name of the space in the top left corner of the interface and select 'Add new Space'. You'll be given the choice between starting with a blank Space or one of the template Spaces. Name your space, select its default locale (language) and the organization it should belong to. Then hit 'Create Space'.