Building a backend app
You can create custom backend applications that extend Contentful through the use of app identities and events. For an app to interact with Contentful’s APIs outside the web app, it needs to request a valid access token. This article will walk you through creating an app that uses identities and events to add default values to entries.
You can also watch this video outlining the steps below:
Table of contents
Getting up and running
Things you will need
- Git
- An up-to-date version of Node.js
- ngrok, or another way to host the app. ngrok is a tool that allows applications running on localhost to be available to the public internet. For this tutorial, we’ll use it to make the app available to receive app events. ngrok also provides a guide on how to use ngrok to integrate your localhost app with Contentful by using Webhooks.
Set up process
These steps will guide you through setting up app identities and events for an app. You can use them if you’d like to understand the process. However, you can skip the setup with a script that’s included in the demo.
Getting the demo app code
Clone our apps repository to get the code for the demo app.
git clone https://github.com/contentful/appsCreating the app definition
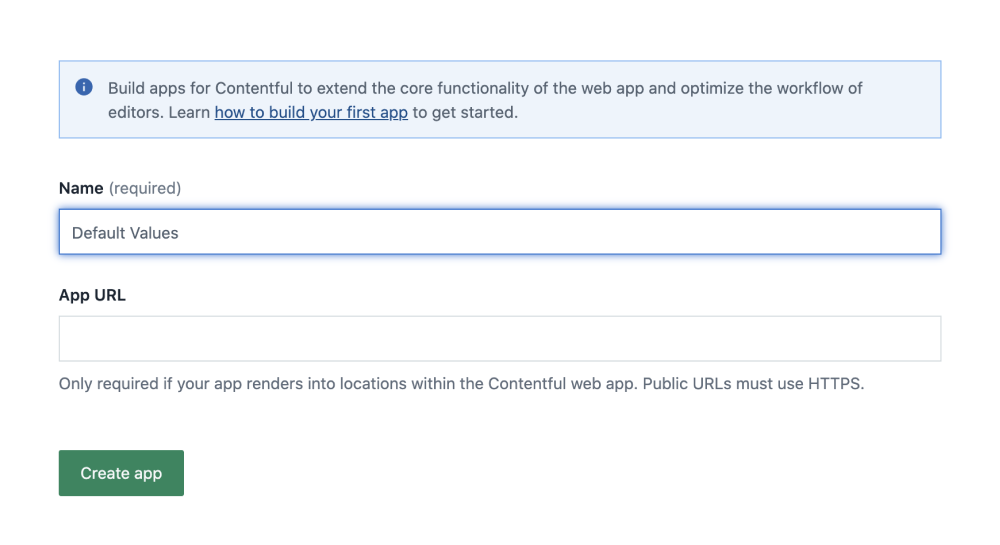
Create a new AppDefinition to make your app installable in the space environments within your organization.
To do this, navigate to the app management view and click Create app. You only need to enter a name for now.
Creating your app keys
Next, we’ll make a key pair, consisting of a public and a private key. It will be used by your app’s backend to request access tokens for its installations.
On the same page as before, navigate to the Security tab, which should have appeared after creating your app definition. This page contains a list of keys you created.
Click on the Generate key pair button. After the keys have been generated, the private key will be downloaded to your device. The appropriate public key will be automatically stored by Contentful and should show up in the key list on the page. In case you already have a key pair that you want to use, you can instead use the upload a public key link on the same page, and then paste your public key into the dialog.
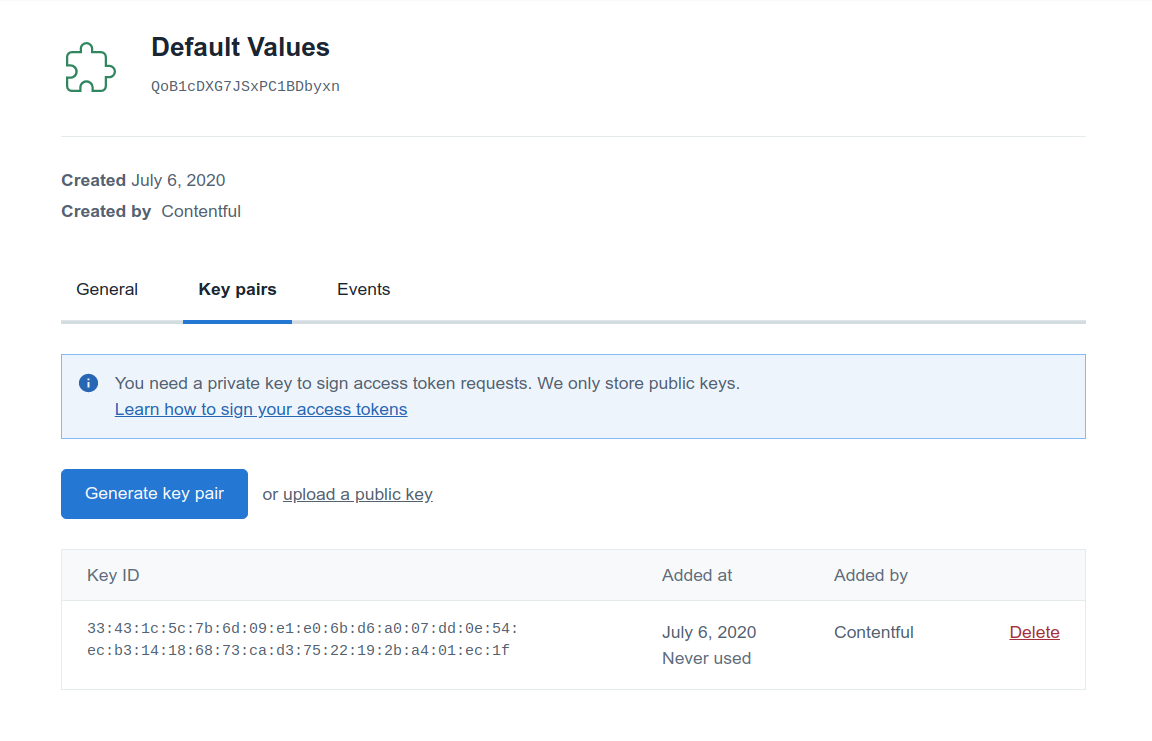
Move the downloaded private key into the directory of your cloned apps repository, so that it can be used by the app.
# Navigate into the project folder
cd apps/examples/default-values-backend
# Move the key
mv <path/to/downloaded/private-key> ./keys/key.pem
Do not check your private key into version control. Make sure you add yourkey.pemfile to your.gitignore.
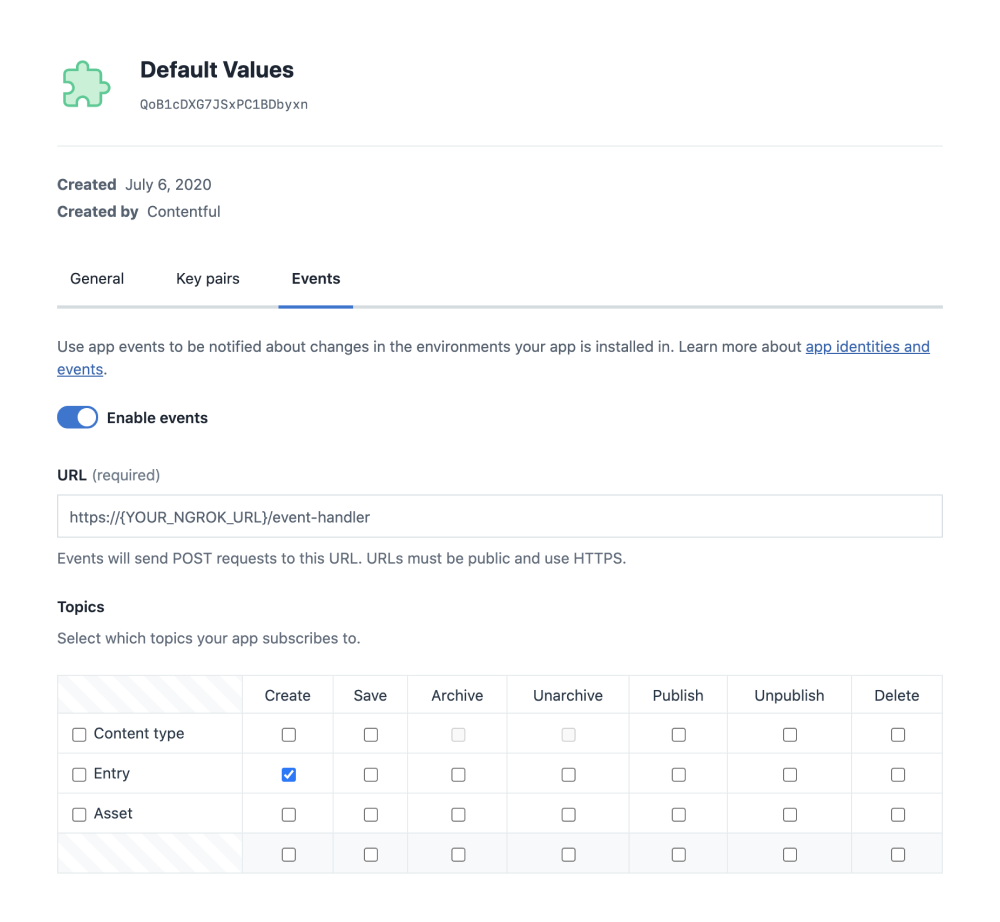
Subscribing to app events
App events allow apps to subscribe to changes in Contentful entities, similarly to webhooks. App events are linked to a specific app definition and will be sent for each space environment that an app is installed into.
To define which events your app subscribes to, you’ll need to know where your app will eventually be hosted. Contentful then POSTs to that URL when the events take place.
Hosting the app
If you want to test app identities and events quickly, we recommend using ngrok.
It’s a tool that allows you to make your localhost accessible from
the public internet.
Download ngrok if you haven’t already, then invoke the following:
# Use 3543, as that is the port where the demo app will run
ngrok http 3543
You’ll see a status screen that includes the URL where ngrok has made your localhost available. Note down the HTTPS URL.
Navigate to your app's Events tab, enable events for your app and add your ngrok URL.
Then select the Entry | Create action in the topics selection matrix. It will look like this:
Installing the app
To use the app, you’ll need to install it into a space environment.
To do that, click Install to space at the top right of the app definition settings or navigate to the Apps tab within a space environment.
Creating a content type for the app
As the app will be used to set default values to entries, you’ll need a content type. If you already have a content type that you want to use, note its ID and skip the rest of this step.
Otherwise, navigate to the content model in the space environment where your app is installed and click Add content type at the top right of the screen.
Name your content type whatever makes the most sense for you, but please
ensure to add a field with an ID of “title”.
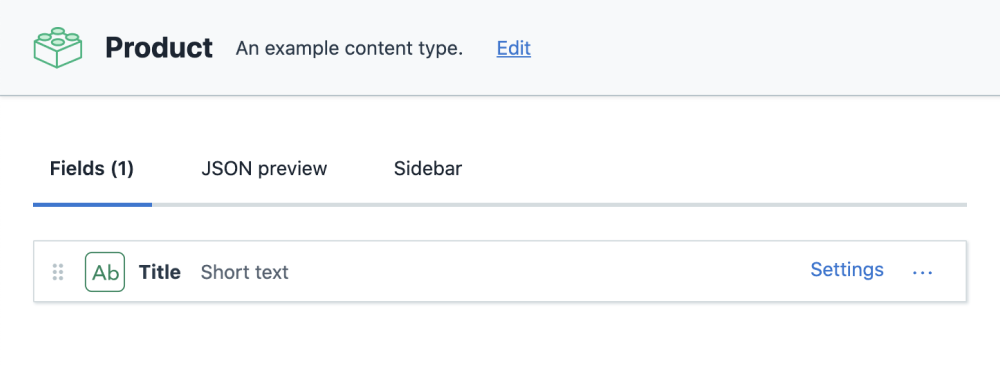
Once your content type is created, note down its ID. You’ll need it in the next step.
A content type’s ID can be seen in the sidebar on the right of the screen.

Running the app
If you’ve followed the above steps, ngrok should make localhost:3543 available to the public internet.
Update the .env file in the demo app’s folder with a few pieces of information to run the app:
APP_ID= the app id you noted down earlier
CONTENT_TYPE_ID= the content type id you noted down earlier
At this point, you can run the app with:
yarn && yarn startNow, let’s see how the app looks in action!
Testing the app
If you go into the Contentful web app and create a new entry of the content type you set up earlier, you will see a default value inserted into the title field shortly after creation by your app.
Code breakdown
You’ve seen how to set up app identities and events, and played around with them. Now, let’s look at the code to see how it works.
The code presented below is edited to show only the parts that are important to this tutorial.
If you’d like to get an overview of the code, find it in examples/default-values-backend/src/index.ts or directly on Github).
First, let's look at how our code authenticates with Contentful.
To let Contentful know that the backend really belongs to the app developer, we use our private key to sign a JSON Web Token (JWT). This token is used to request an app access token, which allows the app to interact with Contentful’s Content Management API.
In our example, this is all handled through the node-apps-toolkit, an NPM package that provides convenient tooling for app creators.
const appAccessToken = await getManagementToken(privateKey, {
  appInstallationId: APP_ID,
  spaceId,
  environmentId,
});
If you'd like to replicate this process in another language, or simply learn more about it, you can take a look at the code here.
The app access token will only be valid for a short time period (10 minutes).
In a production application, we would save the token between requests, and create a new one only once it expires. Because we are using node-app-toolkit, this behavior is already included.
Now, let’s take a look at a route handler that is listening to app events. This will be called whenever a piece of content is created in a space environment where the app is installed.
const addDefaultData = (appToken: string) => ({
  method: 'POST',
  path: '/event-handler',
  handler: async (request: Hapi.Request, h: Hapi.ResponseToolkit) => {
    try {
      // First we extract the entry id and version from the payload. We'll need
      // these to determine if this is an Event for the sort of Content that we
      // are interested in.

      const { id, version, contentType, space, environment } =
        request.payload.sys;

      // We also retrieve the space and environment IDs, as we will need these
      // to create the app access token.
      const spaceId = space.sys.id;
      const environmentId = environment.sys.id;

      console.log(`Received webhook request because entry ${id} was created`);

      if (contentType.sys.id !== CONTENT_TYPE_ID) {
        // If the content type does not match the one we created in setup, we just
        // ignore the event
        console.log(
          `Entry's content type: ${contentType.sys.id} did not match the content type created for the App, ignoring`
        );
        return h.response('success').code(204);
      }

      // Now we use the private key to get an App Access Token
      // The app can use this to interact with the CMA in the space environment of the app installation.
      // The token is internally cached until it expires after 10 minutes.
      const appAccessToken = await getManagementToken(privateKey, {
        appInstallationId: APP_ID,
        spaceId,
        environmentId,
      });

      // Then we make a request to contentful's CMA to update the entry with our
      // default value.
      const res = await fetch(
        `${BASE_URL}/spaces/${spaceId}/environments/${environmentId}/entries/${id}`,
        {
          method: 'PUT',
          headers: {
            Authorization: `Bearer ${appAccessToken}`,
            'X-Contentful-Content-Type': contentType.sys.id,
            'Content-Type': 'application/json',
            'X-Contentful-Version': version,
          },
          body: JSON.stringify({
            fields: { title: { 'en-US': 'a default value' } },
          }),
        }
      );

      if (res.status === 200) {
        console.log(`Set default values for entry ${id}`);
        return h.response('success').code(204);
      } else {
        throw new Error('failed to set default values' + (await res.text()));
      }
    } catch (e) {
      console.error(e);
      throw new Error(e);
    }
  },
});
Conclusion
In this tutorial, you saw how to set up app identities and events. The app we created listens to app events and interacts with Contentful’s Content Management API using an app access token.
Why not take a look at the other app events for ideas on how to extend this app for different use cases. There are lots of possibilities, and we can’t wait to see what you come up with! Share your feedback or show off your app in our Discord community.
