Bynder
After you’ve installed the Bynder app, you can easily reference assets hosted on Bynder directly inside the Contentful web app. Asset data from Bynder is stored directly in your content entry as a JSON field, which your developers can reference directly from Contentful's delivery APIs.
Overview
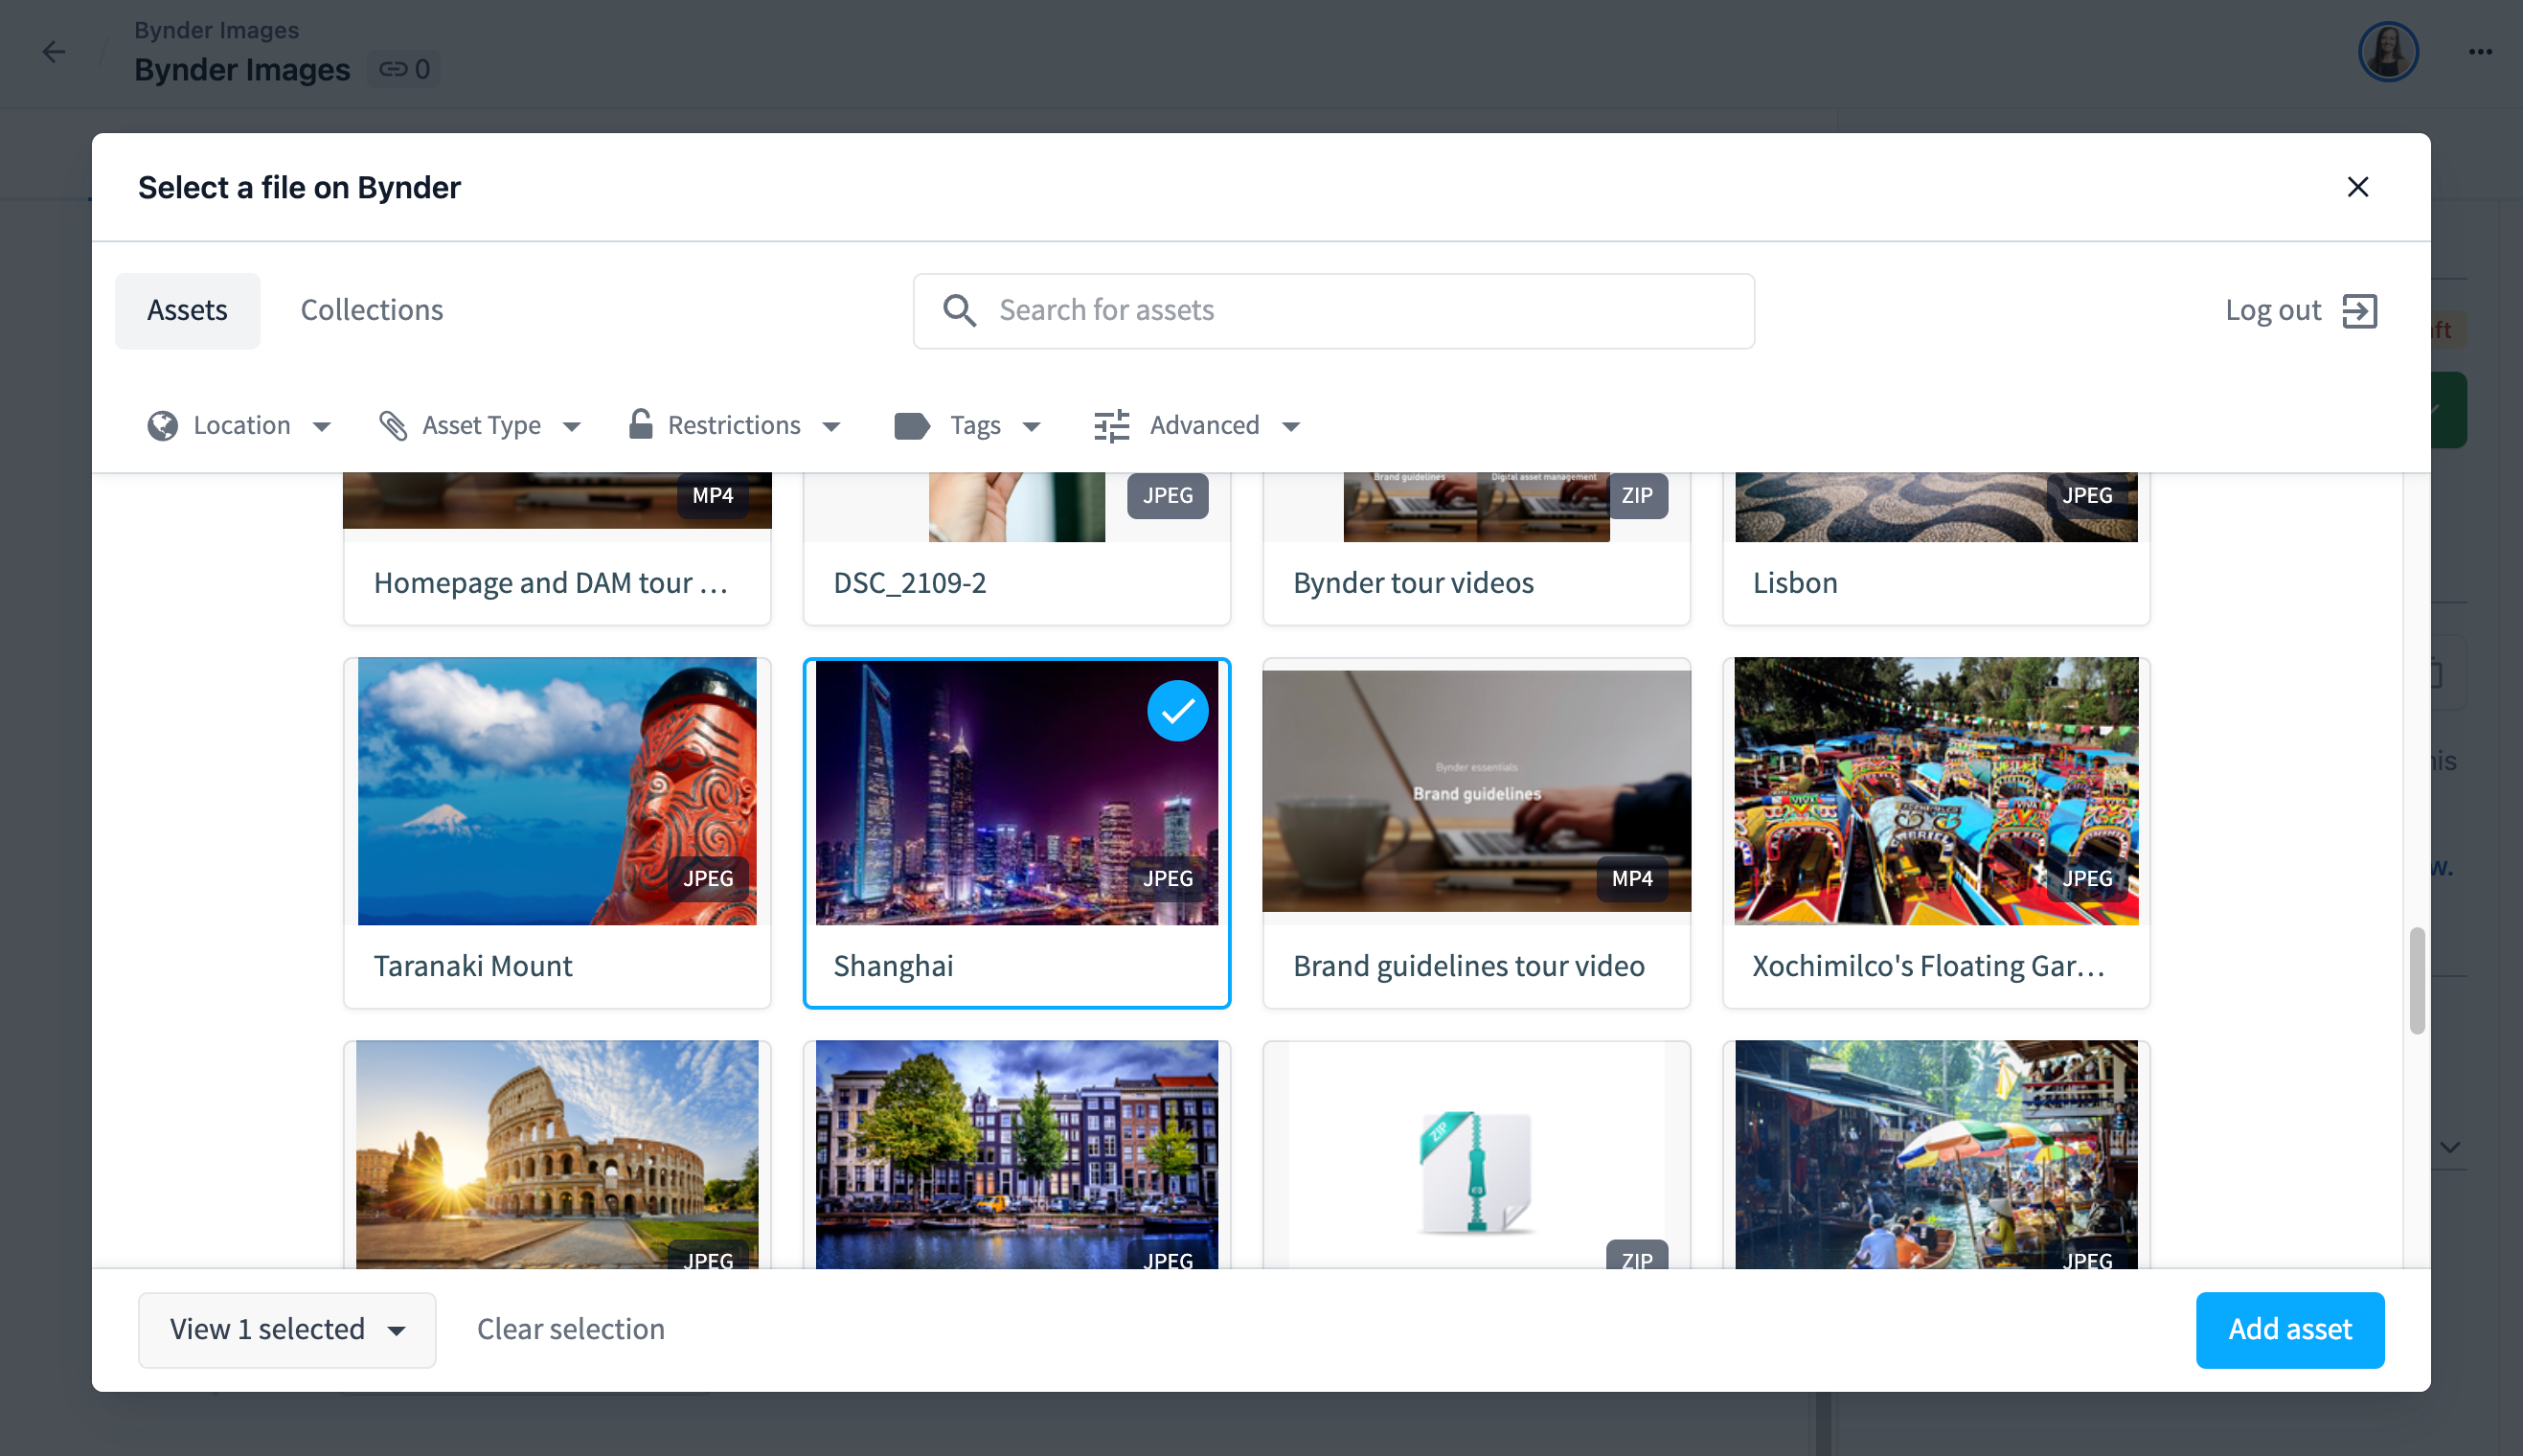
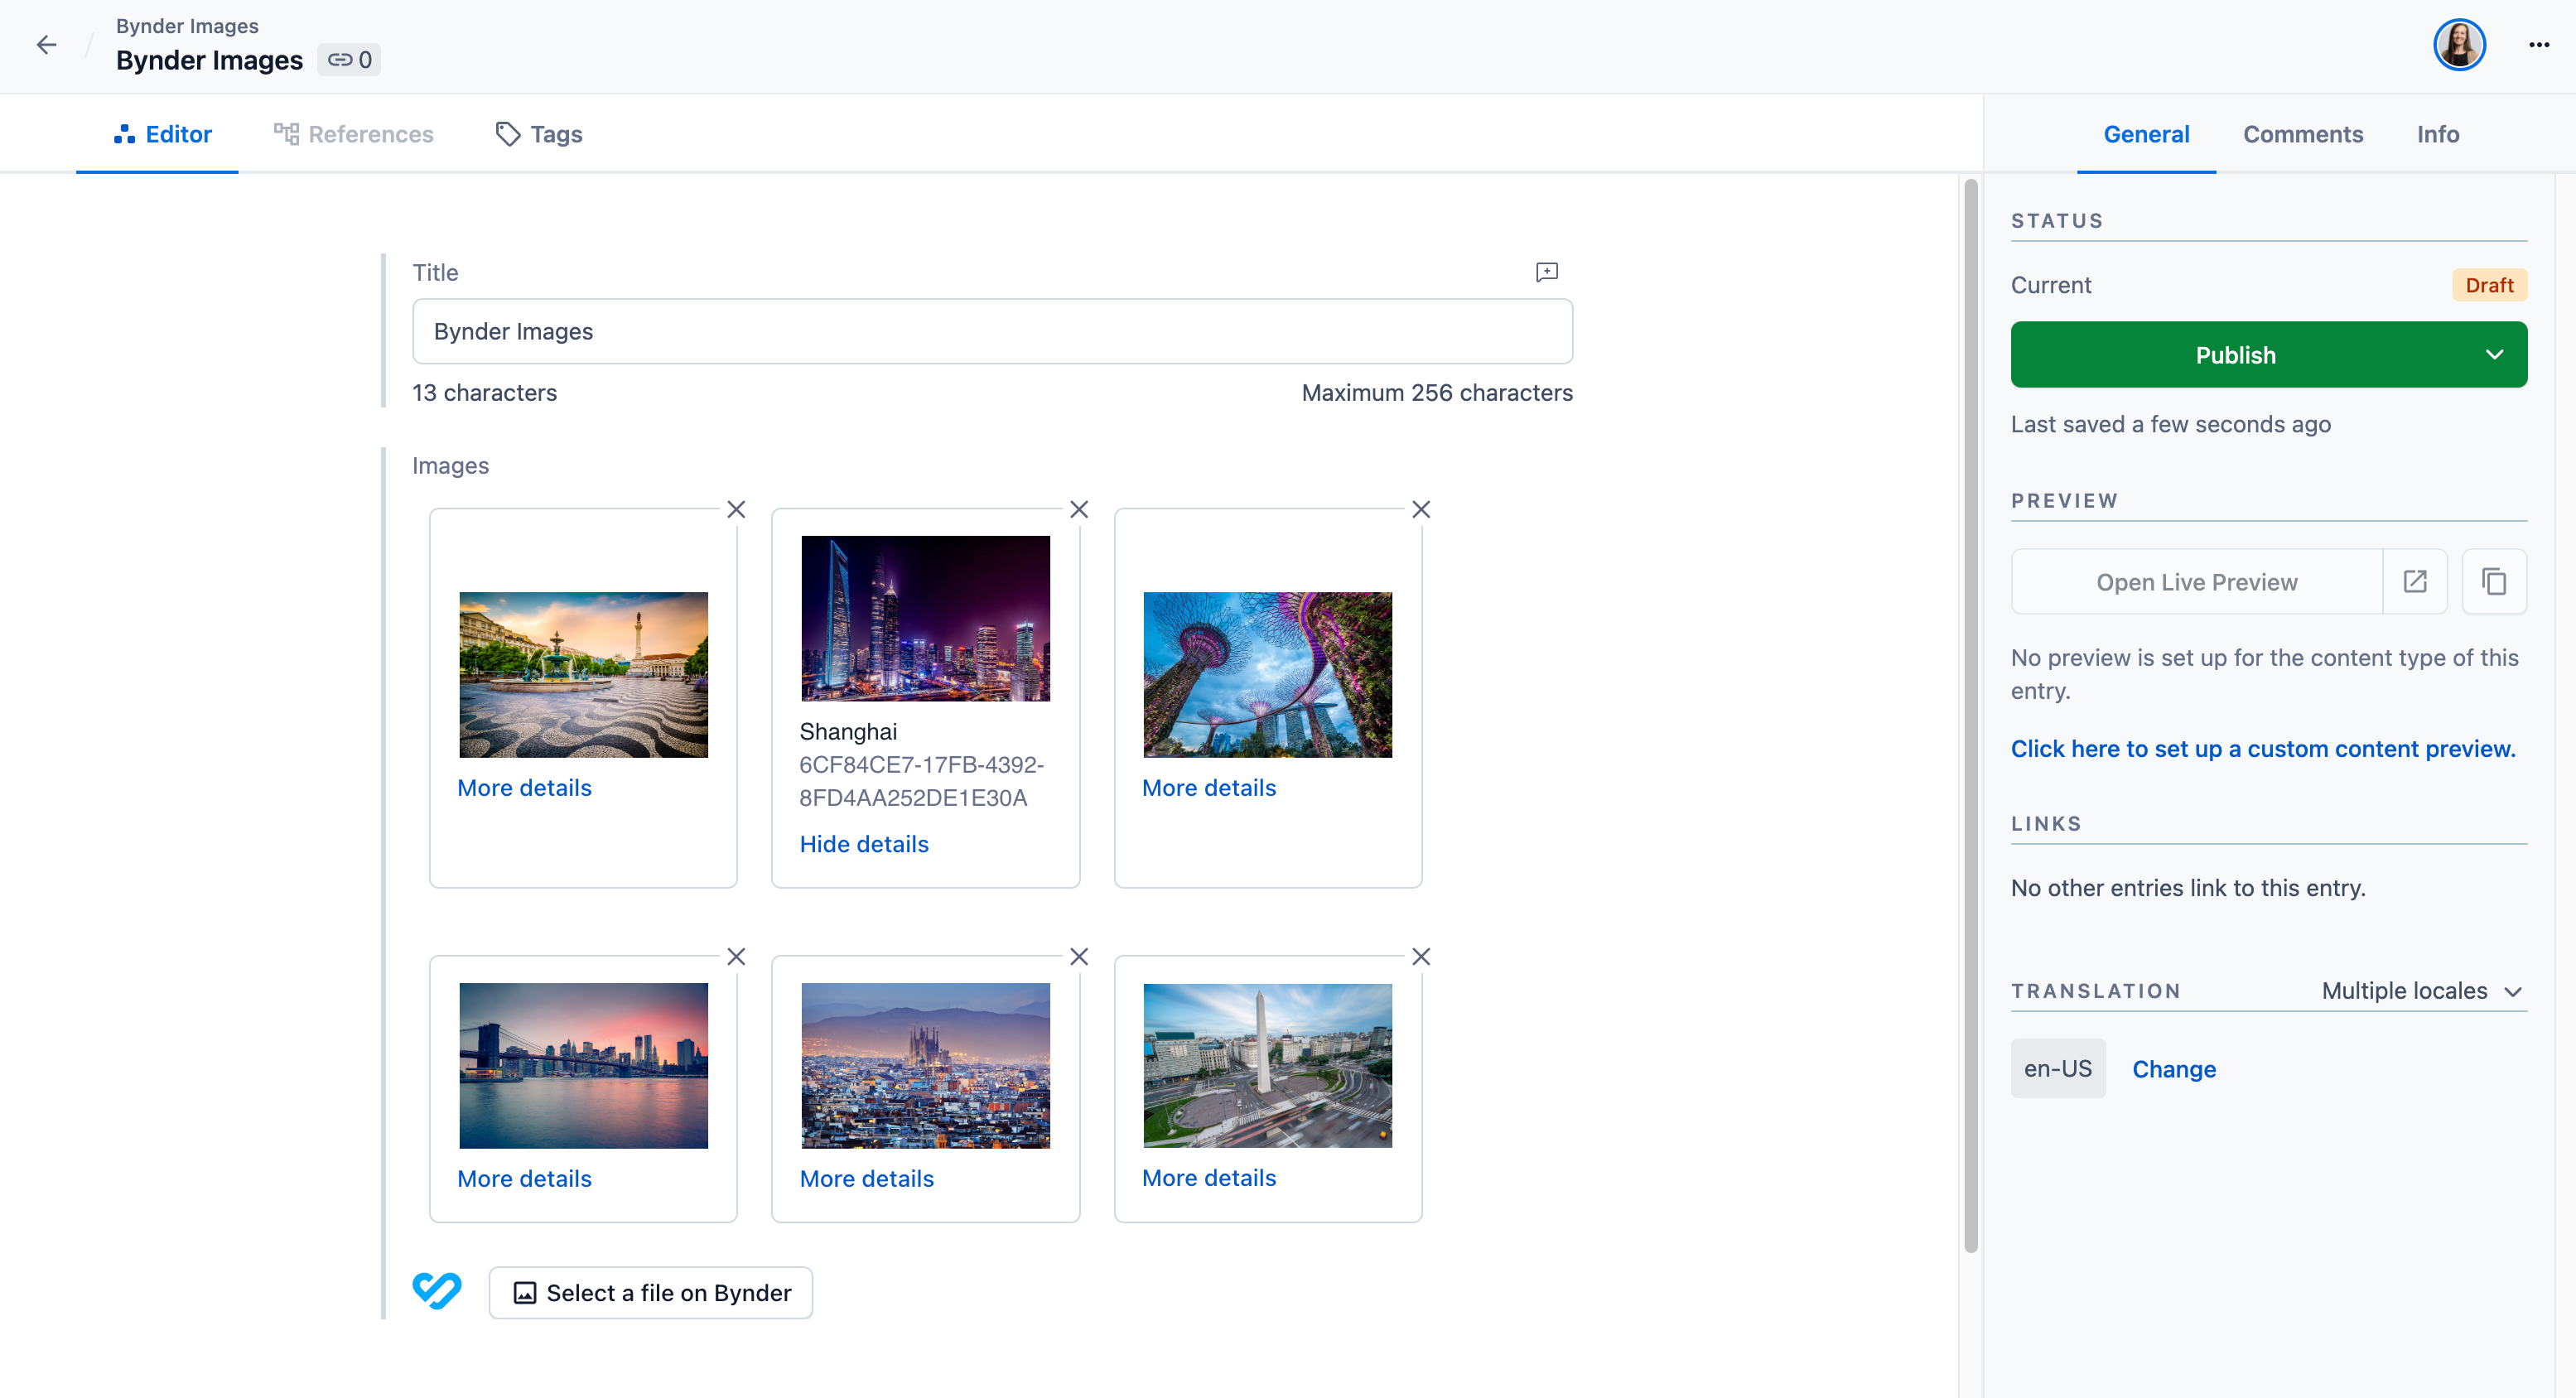
The Bynder app is a widget that allows editors to select media from their Bynder account. Simply click Select a file on Bynder and select the assets you want to be referenced from your entry.
The IDs of selected media are then stored in Contentful. Inside your client application, you then fetch content from Contentful and resolve all needed details on media by using the IDs to fetch binaries or metadata from Bynder’s API.
Requirements
To use this app, you will need:
The URL of your Bynder account.
A content type with a field of type
JSON objectto hold the references to Bynder.
Usage
Step 1: Determining Select Mode
The Contentful Bynder integration offers two different image select modes - Multi Select and Single File Select. These modes offer different capabilities and produce different API responses. You must select the correct mode as you install the app, and update your frontend to correctly use each mode.
It is strongly recommended that you do not switch between modes after installing the Bynder app. This will produce unexpected API responses that your frontend may not be configured to handle, potentially causing unexpected image styles or formats at build.
Multi Select Mode
This is the default mode and allows content creators to select multiple images at once to apply to an entry.
This mode:
Allows for the selection of one or more base images at once using the Bynder media picker.
Does not allow for the selection of image derivatives or Digital Asset Transformations.
Does not provide the
selectedFileattribute in the API response.
Multi Select mode is recommended for most customers unless you specifically want access to derivative images or Bynder’s Digital Asset Transformations functionality.
When using Multi Select mode, your front end needs to rely on the src parameter or a similar URL parameter from Bynder. The API will return several options, including source/original images and resized images.
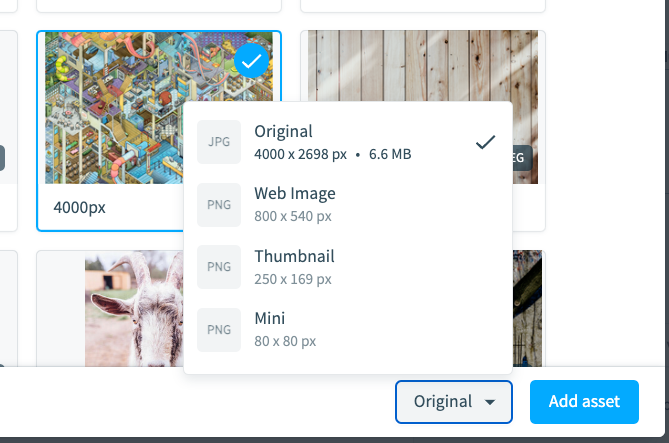
Single File Select Mode
Single File Select mode allows content creators to only select one file at a time, but also to select from derivative images or transform images within the Contentful app.
This mode:
Allows for the selection of only one image at once.
Allows for the selection of image derivatives.
Allows a content creator to transform images within the Contentful app.
Provides the
selectedFileattribute in the API response.
Single File Select mode is recommended for customers specifically wanting access to derivative images or Bynder’s Digital Asset Transformations functionality.
When using Single File Select mode, your frontend needs to instead rely on the selectedFile parameter and the url parameter nested within it. This will allow your front end to retrieve any transformations made to an image by a content creator, including attributes like cropped size or focal point. If no transformations are made, this URL points back to the original base image. If Single Select Mode is used, you may also need to alter frontend code to avoid applying conflicting or duplicated styles to transformed images.
Step 2: Determining Prefill Selected Assets Mode
By default, the asset picker will allow you to add new assets to your entry, and the new assets you select will be appended to the end of the selected assets in your field.
On the app configuration screen, you will see an option to “Prefill Selected Assets”. If you want to keep the default save behavior, keep this option as “No”, which is the default.
If you want to change the default behavior so that the entire group of selected assets in the picker replaces the selected assets in your field, change the “Prefill Selected Assets” option to “Yes”.
Below are some considerations for each mode:
Default behavior, when “Prefill Selected Assets” is set to “No”:
Selected assets in the picker are appended to the end of the selected assets stored in the field. What you have selected in the picker is only representative of new assets to be added, not of all assets stored in the field
You can save the same asset more than once in the field
Saved assets in the field are not preselected when the asset picker modal is opened
Assets can be removed by clicking on the “X” in the asset card
Prefill mode, when “Prefill Selected Assets” is set to “Yes”:
Selected assets in the picker replace all of the saved assets in your field. What you have selected in the picker is representative of what will be saved in the field
You cannot save the same asset more than once in the field
Saved assets in the field are preselected when the asset picker modal is opened
Assets can be removed from either the picker or by clicking on the “X” in the asset card (with the exception of needing to delete all assets from the field, that needs to be done by clicking on the “X” in the asset card)
Step 3: Install and configure
Under Configuration, provide your Bynder URL in the respective field.
Under field assignment, select the content type fields that you want this app to be used for. Please note that only compatible fields of type JSON object are displayed here.
Select the selection mode - leave Multi Select enabled by default unless you specifically want access to Single File Select mode.
Select the prefill mode - leave the default option “No” unless you specifically want to turn on prefilling the selected asset and change the picker and save behavior.
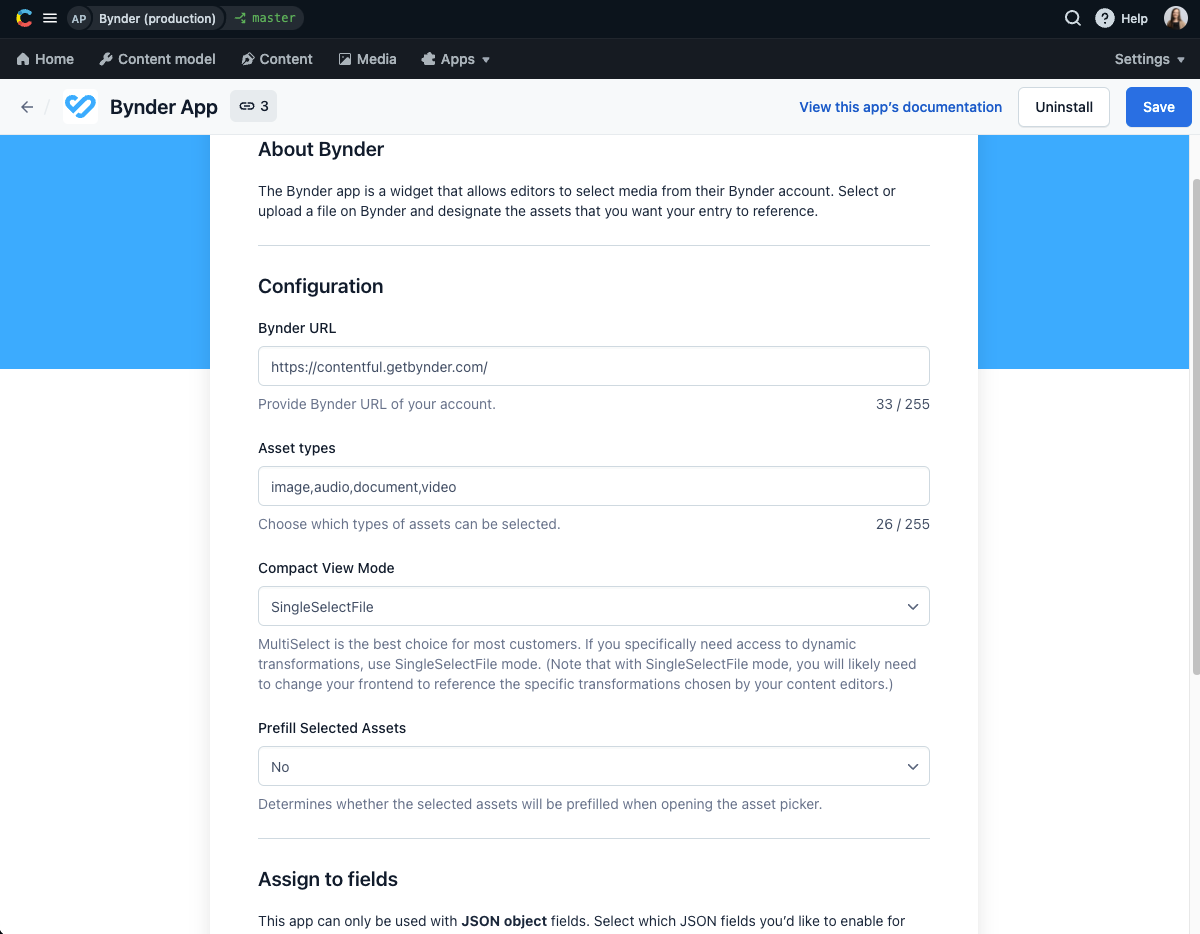
Click Install to finish the installation and save the configuration.
Step 4: Using the App
Multi Select Mode
To reference an asset on Bynder from your entry:
Click Select a file on Bynder.
Select the assets in Bynder using the dialog.
Click Add Asset.
Your frontend developers will receive a JSON payload containing a parameter similar to "original": "https://BRAND.getbynder.com/~/file.jpg". It is recommended that they use the original or src fields to pull assets. The specific fields available in this response may differ based on your specific Bynder configuration and package.
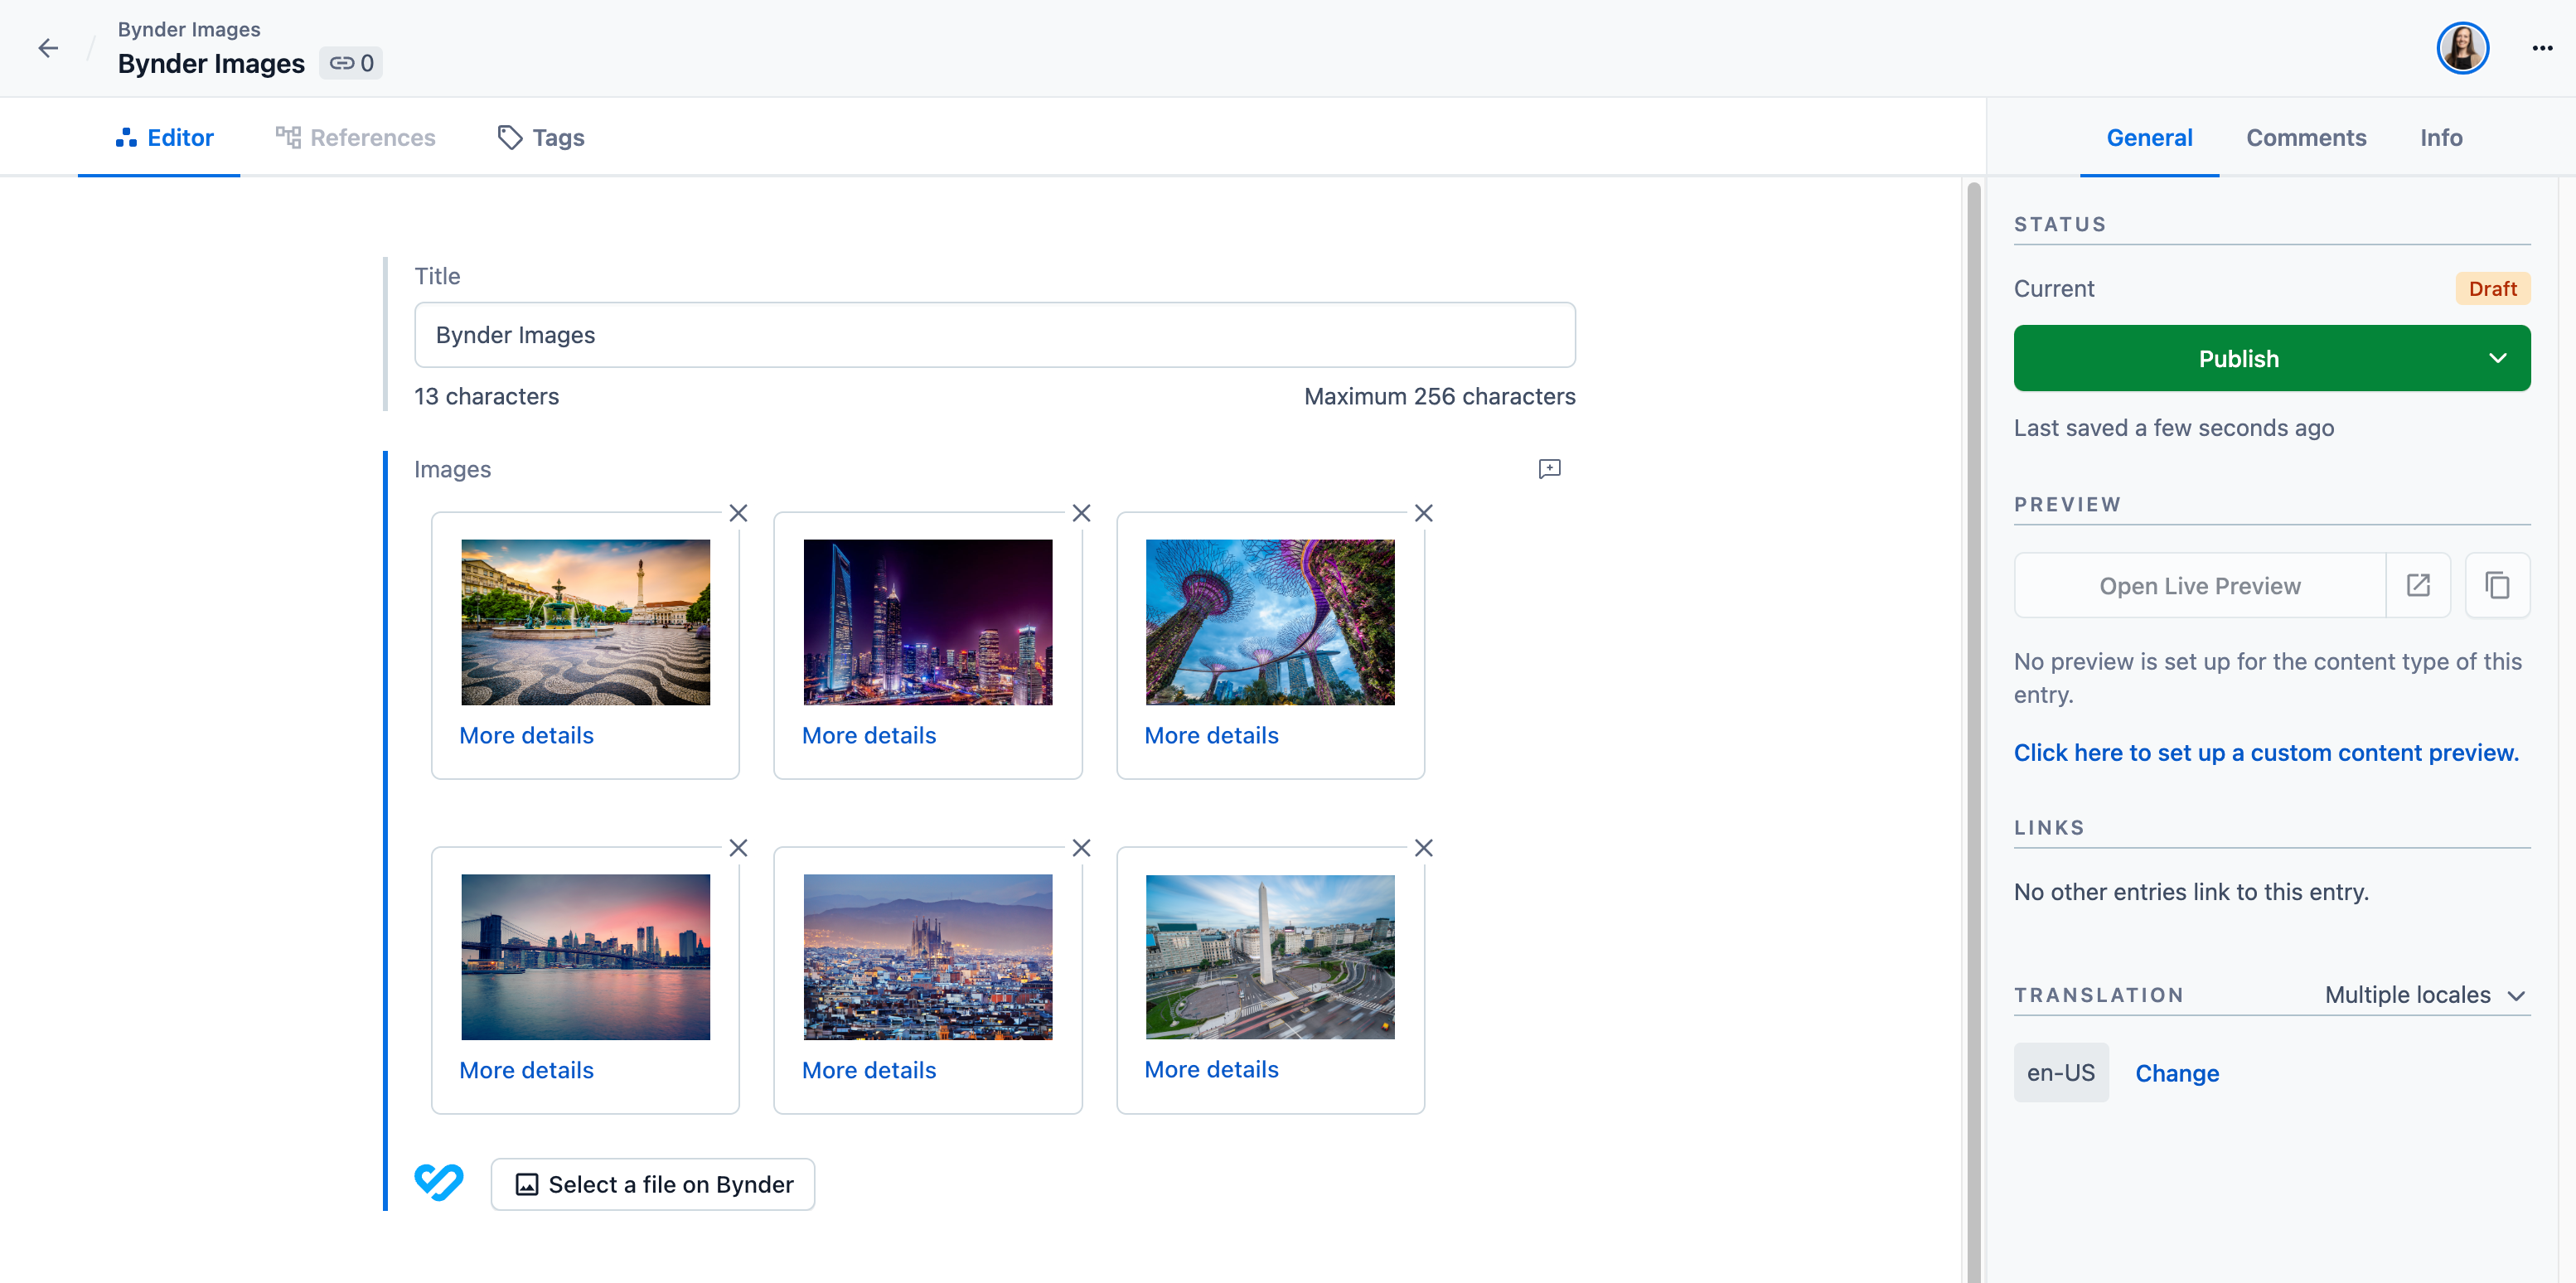
Previews of your assets will now appear in your entry. You can also click on “More details” to see the asset name and id.
Single File Select Mode
To reference an asset on Bynder from your entry:
Click Select a file on Bynder.
Select the assets in Bynder using the dialog.
Either select a derivative or transform base URL, and make any necessary transformations.
Click Add Asset.
Your frontend developers will receive one of two JSON payloads containing a selectedFile attribute. In both cases, your developers should pull the `url` parameter under the `selectedFile` parameter to get the accurately transformed image.
If SingleSelectFile mode and TransformBaseURL are selected with a custom transformation, the response will include parameters on the transform url that provide the requested height, width, transform type, and gravity. If SingleSelectFile mode and TransformBaseURL are selected without a custom transformation, you will receive parameters for height, width, and filesize as separate attributes.
Previews of your assets will now appear in your entry.
FAQ
There are no content types with JSON Object field, help!
Bynder saves data into a Contentful entry using JSON data. If you'd like to associate Bynder assets with a specific content type, you must update that content type to include a new field which is of type JSON Object. Learn more about the JSON Object field type in our concepts documentation.
What to do if the entry editor displays the warning Field value is incompatible?
The "JSON object" field of this entry already contains data that was not generated by the Bynder app. Please ensure that you've selected the correct field in the app configuration to be used with Bynder, and that you do no longer need the previously entered data. Then select I want to override the value using the App., which will initialize the field with an empty selection. Now you can start to add media to your entry.
To access the underlying field value, deselect the field in the Bynder app configuration. This will reset the editor to the default json display for object fields.
How do I access the URL of the original asset?
Availability of the URL of the original asset in the JSON payload depends on making an asset public in the Bynder Portal. In order to make an asset public, you need to go to the "Edit" section in your Bynder Portal and then under Advanced Rights, you need to select the Mark as public option. As soon as the setting is saved, the JSON payload will include the orginal property pointing to an unmodified asset.
I see odd behavior when switching from Single to Multi Select (or in reverse)!
If you select Single Select or Multi Select in the Bynder App Definition, you may see unpredictable behavior when switching this choice later on. The Single Select option provides an additional parameter for the images you select (selectedFile) that is not available on Multi Select. If you rely on this parameter for some part of your site, you will see unpredictable behavior on existing entries if you change selections.
We recommend choosing and staying either Single or Multi Select exclusively.
How do I see additional details about the selected assets?
You can see previews of selected assets in the Bynder field editor. You can also click “More details” to reveal the asset name and id. Additional data for each asset is saved in JSON in the field, and can be accessed via our APIs.