Okta user provisioning integration with SCIM
If your organization uses Okta to manage your employees’ access to tools and services, you can take advantage of Okta’s “Provisioning” feature to automatically grant access to Contentful to your users, and even optionally synchronize membership in select Okta Groups with Contentful Teams.
The integration between Okta and Contentful that enables this provisioning to occur is built around an industry-standard protocol known as SCIM (System for Cross-domain Identity Management). To learn more about how Okta works with SCIM, please see this article.
The remainder of this guide is focused on enabling you to configure both Contentful and Okta to get provisioning up and running for your organization.
Features
The following provisioning features are supported by Contentful at present:
Push Users. Users in Okta that are assigned to the Contentful application in Okta are automatically added as members to your organization in Contentful.
Import Users. Users created in Contentful can be imported into Okta and either matched against existing Okta users or created as new Okta users.
Import Groups. Import Teams from Contentful as Groups in Okta. Note: Okta does not allow you to manage memberships of these imported groups.
Push Groups. Groups and their members in Okta can be pushed to Contentful (as Contentful teams and team members).
Presently, Contentful does not support the following Okta provisioning features, but may in the future:
Update user attributes.
Sync password.
Enhanced group push.
Requirements
SCIM-based user provisioning is available to Premium/Enterprise customers on High Availability and Scale platform plans.
How to configure
Configure your Provisioning settings for Contentful as follows.
Enable provisioning functionality
In Contentful
If you have not already done so, create a “Service User” account in Contentful to use with Okta provisioning. All provisioning permissions for Okta will be provided through this account. Contentful recommends that you choose “Owner” as the organization role for this account when you add it to your organization.
Log out of Contentful with your normal user account and log in as the Service User you created in Step 1.
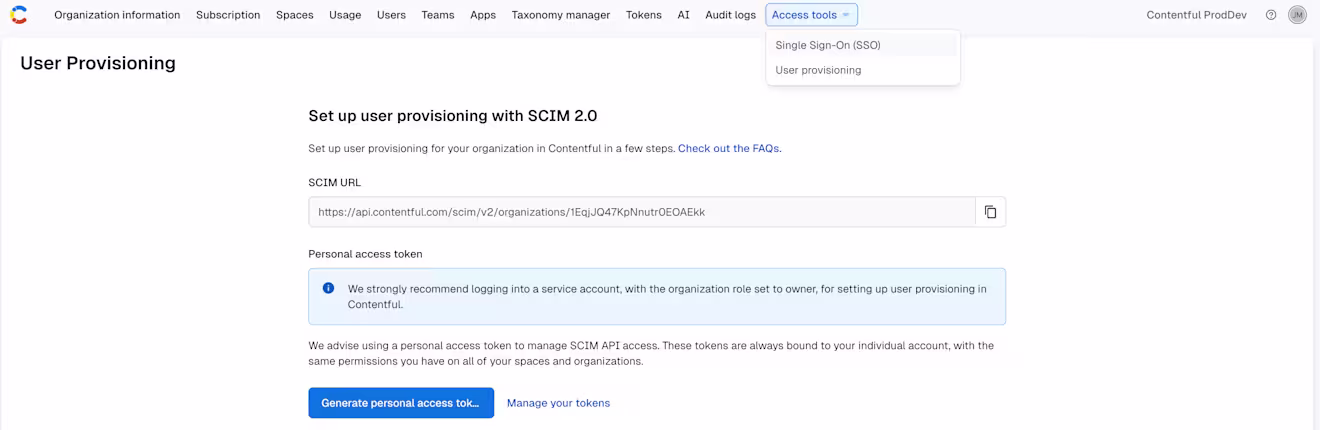
Under Organization settings & subscriptions, click the Access Tools tab and select User provisioning from the drop-down menu.
NOTE: Here you will find the configuration details you need to take from Contentful and use in Okta.Click Generate personal access token to create an authentication token to be used for the provisioning tool in Okta.
In the modal window that appears, give your Personal Access Token a meaningful name and click Generate.
The configuration details required by Okta will now be available for copying to Okta.
Leave the browser window open, and log in to your Okta instance to complete the configuration on the Okta side.
In Okta
Log in to your Okta admin portal and complete the following steps:
Under the Applications tab, navigate to the Contentful application.
Click on the "Sign On" tab in the application. Under the "Advanced Sign-On Settings" section enter the Organization ID in the field. This should be the identifier value that appears at the end of the SCIM URL from Step 6 above:

3. Click on the “Provisioning” tab in the application. Under the “Settings” panel on the left side, click the “Integration” link. Then click the “Configure API Integration” button:

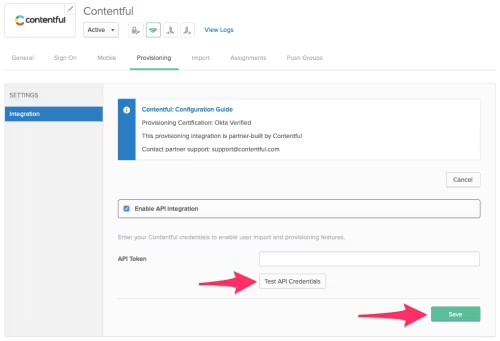
4. Check the “Enable API Integration” box. Then copy and paste the access token from Contentful into the “API Token” field in Okta:

5. Click "Test API Credentials" and verify that the connection is working. Click "Save" to save your configuration in Okta:
Enable “create users” functionality
In Okta
Under the Applications tab, navigate to the Contentful application.
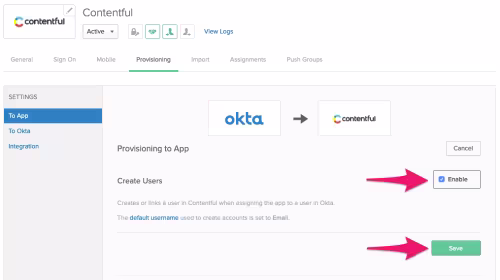
Click on the “Provisioning” tab in the application. Under the “Settings” panel on the left side, click “To App” under the Settings panel on the left.
Click the "Edit" button at the top right. Check the “Enable” box next to “Create Users” to allow users to be automatically provisioned into Contentful whenever they are assigned to the Contentful application in Okta:
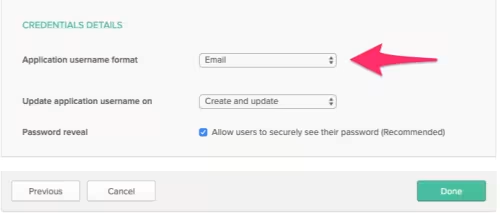
Important: Ensure that the “default username” used to create accounts in Okta is set to “Email”:

You can update this value in the "Sign On" tab under the "Credentials Details" section:
You should now be able to assign your Okta users to the Contentful application as needed. These users will be automatically invited to your Contentful organization, and will receive an email with an invitation link.
User removal and deprovisioning with Okta
Contentful now supports user removal (deprovisioning) via SCIM for Okta. When a user is deactivated or removed in Okta, their access to the Contentful organization is automatically removed through SCIM.
If your organization has enabled SCIM user management restrictions, deprovisioning must be performed in Okta. Removing SCIM-provisioned users directly in the Contentful web app may be disabled to ensure Okta remains the single source of truth.
Enable “push groups” functionality
Groups and their members can be pushed to Contentful as teams and team members. For more about using group push operations, see Using Group Push.
Troubleshooting
If you have questions or difficulties with your Contentful/Okta SCIM integration, please contact Contentful support via support@contentful.com.